Raymii.org

אֶשָּׂא עֵינַי אֶל־הֶהָרִים מֵאַיִן יָבֹא עֶזְרִֽי׃Home | About | All pages | Cluster Status | RSS Feed
High Available k3s kubernetes cluster with keepalived, galera and longhorn
Published: 09-07-2024 22:30 | Author: Remy van Elst | Text only version of this article
❗ This post is over one years old. It may no longer be up to date. Opinions may have changed.
Table of Contents
After my first adventure with Kubernetes, getting started with k3s on my small 3 node ARM cluster that boots via PXE / NFS, I noticed that there is only one k3s node that has the control-plane,master role. If that node fails you can no longer manager the cluster. Other nodes can fail and then the workloads (pods) will be restarted eventually after 5 minutes, but this node is special. Time to change that and make it a high available cluster.
K3s supports high-availability with embedded etcd and with external databases like MySQL and postgres. etcd will thrash your storage (SD cards) so I decided to go with a MySQL cluster using Galera for the database and keepalived for the High Available Cluster IP. This guide will show you how to configure the HA database and HA-IP and I'll also setup longhorn for high-available block storage inside kubernetes. The end result is that I can pull the power from any two of the three nodes without the k3s cluster or workloads going down.
You need at least 3 nodes for a cluster!. 2 nodes are prone to split-brain situations and harder to setup. If you go beyond 3 nodes, make sure you always have an odd-number of cluster components (3, 5, 7, etc) so in the case of a failure there is always a majority for the quorum.
My k3s cluster now has 4 nodes, but one of them is only a worker node, not part of the high-available control plane setup, so technically, the high-available cluster uses 3 nodes.
The version of Kubernetes/k3s I use
for this article is v1.29.6+k3s1.
Overview
Here is a high-level diagram of the setup:
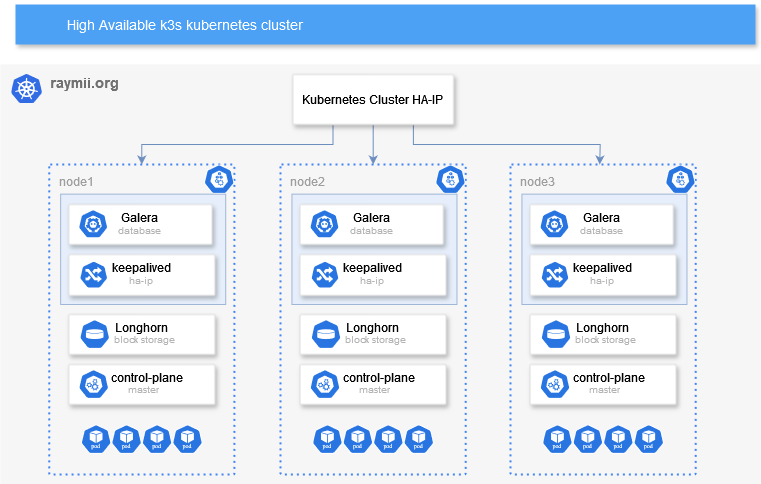
The blue parts (keepalived & galera) on the diagram inside a node provide
the high-availability for the kubernetes (k3s) control plane. For other
high-available options for k3s, consult their documentation.
keepalived provides a high-available IP via VRRP. All three nodes run
keepalived, one of them being the MASTER, the other two are the BACKUP
nodes. This HA-IP is what the Galera database will use and where all k3s
nodes (that are not part of the HA control plane) will communicate with. I'm
also using it as a LoadBalancer to make services accessible in the cluster
from the outside.
Galera is a synchronous multi-master replication plug-in for InnoDB. A client can read and write
to any node in a cluster and changes are applied to all servers.
Galera-cluster is built in to MariaDB
nowadays. I used to use Percona ExtraDB but since it's now built in to
MariaDB I decided to use that. Galera makes MySQL clustering very easy. Next
to the multi-master part (no failover since there are no slaves) it also
automatically syncs up any new nodes, skipping lengthy manual provisioning.
The rest of the diagram inside of a node runs "inside" of kubernetes.
Longhorn provides
high-available block storage. Any Persistent Volumes in you kubernetes
cluster are replicated over all three nodes including automated failover. In
k3s, by default, volumes use local storage, meaning that if a node goes down,
the volume is not accessible on the other node where the pods will start up
again. With Longhorn that problem is gone, making the k3s cluster truly
high-available. Otherwise our control-plane would survive a node failure, but
the workloads would not function correctly afterwards.
The rest of the article will focus on setting up the individual components. For simplicity's sake I'm showing the manual setup. The parts are small enough to easily convert to Ansible or your favorite configuration management tool.
It's important that you install the components in order shown here. First
keepalived, then galera, then k3s. Before deploying any workload inside
of kubernetes, make sure you have setup Longhorn for HA-storage.
My cluster uses Armbian, a Debian distribution for small board computers. The guide should work on regular debian as well.
The High-Available IP address (managed by keepalived) for the cluster is:
192.0.2.50
The 3 cluster nodes have the following IP addresses:
192.0.2.60192.0.2.61192.0.2.62
The worker node in the cluster has the following IP address:
192.0.2.63
The HA-IP (192.0.2.50) must be set up before the database or k3s can be
installed.
keepalived
I've been using keepalived for over 10 years,
that article is from 2014. For a simple setup with just an HA-IP like
this I prefer it over corosync since it's easier to setup.
Install the required components on all 3 nodes:
apt install dirmngr software-properties-common rsync keepalived
Choose one of your 3 nodes to be the master node. This node will by default have the high-available IP. It does not matter which node it is, although if your cluster has different hardware it's best to choose the most powerful node.
Edit the configuration file:
vim /etc/keepalived/keepalived.conf
Place the following:
vrrp_instance VI_1 {
  state MASTER
  interface end0
  virtual_router_id 51
  priority 100
  advert_int 1
  authentication {
    auth_type PASS
    auth_pass
  }
  virtual_ipaddress {
    192.0.2.50
  }
}
Change the following parameters:
interface: your physical network interface, useip addrto find itauth_passto a secret password.virtual_ipaddressto the HA-IP you want to use.
On the other two nodes, also edit the configuration file:
vim /etc/keepalived/keepalived.conf
Place the following:
vrrp_instance VI_1 {
  state BACKUP
  interface end0
  virtual_router_id 51
  priority
  advert_int 1
  authentication {
    auth_type PASS
    auth_pass
  }
  virtual_ipaddress {
    192.0.2.50
  }
}
Change the following parameters:
auth_passto match the password in the master node config filepriority: each node must have a different (lower) priority. Node2 should be50, Node3 should be49and so on.interface: your physical network interface, useip addrto find itvirtual_ipaddressto the HA-IP you configured on the master node.
After configuring keepalived restart the service on all three nodes:
systemctl restart keepalived
You can test the HA-IP by logging in via ssh to the HA-IP for example. Or you can send
SIGUSR1 to the keepalived process and check /tmp/keepalived.data:
kill -SIGUSR1 $(pidof keepalived)
cat  /tmp/keepalived.data
Output:
------< Global definitions >------
[...]
 VRRP IPv4 mcast group = 224.0.0.18
 VRRP IPv6 mcast group = ff02::12
 Gratuitous ARP delay = 5
 Gratuitous ARP repeat = 5
 [...]
------< VRRP Topology >------
 VRRP Instance = VI_1
   VRRP Version = 2
   State = BACKUP
   Master router = 192.0.2.60
   Master priority = 100
   Flags: none
   Wantstate = BACKUP
   Number of config faults = 0
   Number of interface and track script faults = 0
   Number of track scripts init = 0
   Last transition = 1720124853.373151 (Thu Jul  4 20:27:33.373151 2024)
   Read timeout = 1720131680.650708 (Thu Jul  4 22:21:20.650708 2024)
   Master down timer = 3804687 usecs
   Interface = end0
   Using src_ip = 192.0.2.61
   Multicast address 224.0.0.18
   [...]
   Virtual Router ID = 51
   Priority = 50
   Effective priority = 50
   Total priority = 50
   Advert interval = 1 sec
   Virtual IP (1):
     192.0.2.50 dev end0 scope global
   fd_in 13, fd_out 14
  [...]
Test the keepalived failover by shutting down your master node. Check the
above file on the two other nodes and login via SSH on the HA-IP to see that
the other node has taken over.
MariaDB Galera cluster
On all three nodes, add the MariaDB APT repository:
add-apt-repository 'deb http://mirrors.digitalocean.com/mariadb/repo/11.5/debian bookworm main'
apt-key adv --recv-keys --keyserver hkp://keyserver.ubuntu.com:80 0xF1656F24C74CD1D8
On their page there is also a setup script, but that requires piping curl to bash which is very insecure. Setting up the repository manually is not much more difficult.
Update the local cache and install mariadb:
apt update
apt install mariadb-server
This article exposes MariaDB to your network. On a real production setup, please use separate VLAN's for management and this kind of traffic. For a home-lab setup like mine, this is fine.
Make sure mariadb is accessible over the network (instead of localhost):
vim /etc/mysql/mariadb.conf.d/50-server.cnf
Update bind-address, change 127.0.0.1 to 0.0.0.0:
# Instead of skip-networking the default is now to listen only on
# localhost which is more compatible and is not less secure.
bind-address            = 0.0.0.0
Make sure the root user has a secure password. By default that user has no password. Open a MySQL prompt:
mariadb -uroot
Set a secure password:
set password = password("SuperS3cUr3P@ssw0rd");
quit;
Now it's time to set up the Galera Cluster. Create the configuration file:
vim /etc/mysql/conf.d/galera.cnf
Paste the following:
[mysqld]
binlog_format=ROW
default-storage-engine=innodb
innodb_autoinc_lock_mode=2
bind-address=0.0.0.0

# Galera Provider Configuration
wsrep_on=ON
wsrep_provider=/usr/lib/galera/libgalera_smm.so

# Galera Cluster Configuration
wsrep_cluster_name="k3s_cluster"
wsrep_cluster_address="gcomm://192.0.2.60,192.0.2.61,192.0.2.62"

# Galera Synchronization Configuration
wsrep_sst_method=rsync

# Galera Node Configuration
wsrep_node_address="192.0.2.60"
wsrep_node_name="node1"
Change the following parameters to be the same on all 3 nodes:
wsrep_cluster_name: the name of your clusterwsrep_cluster_address: add all IP's of the cluster nodes
Change the following parameters on each node, unique for that specific node:
wsrep_node_address: IP address of that nodewsrep_node_namename for that node
Time to bootstrap the cluster. Stop MySQL on all nodes:
systemctl stop mysql
On node 1, start up galera:
galera_new_cluster # no output
Check:
mysql -u root -p -e "SHOW STATUS LIKE 'wsrep_cluster_size'"
Output:
+--------------------+-------+
| Variable_name      | Value |
+--------------------+-------+
| wsrep_cluster_size | 1     |
+--------------------+-------+
On node 2 (and node3):
systemctl start mariadb
Check cluster status on node 1:
+--------------------+-------+
| Variable_name      | Value |
+--------------------+-------+
| wsrep_cluster_size | 2     |
+--------------------+-------+
Repeat the above step on node3, the value should increase to 3.
Galera Cluster auto-reboot
Normally you would not want to do this and assume the cluster is up. In my case I turn off the Orange Pi Zero 3 computers when I'm experimenting for the day. When restarting a Galera Cluster you need to follow specific steps and do checks to make sure everything starts up correctly without data loss. The same goes for when one node drops out.
But that also means that every start of my cluster I manually need to
intervene and fix the Galera cluster. In this case I don't care much about
data loss or correct startup order, I want things to boot without manual
intervention. So here is something you should never do in production.
Edit the mariadb systemd service:
systemctl edit mariadb
Add the following (in between the comment lines):
### Editing /etc/systemd/system/mariadb.service.d/override.conf
### Anything between here and the comment below will become the new contents of the file

[Service]
Restart=on-failure
RestartSec=5s

### Lines below this comment will be discarded
By default mariadb only restarts on-abort, not on-failure. I want it to
retry starting up continuesly.
Next is the most dangerous part, a cronjob to forcefully "fix" the galera cluster:
* * * * * sleep 30 ; /usr/bin/systemctl is-active --quiet mariadb.service || { /usr/bin/sed -i 's/safe_to_bootstrap: 0/safe_to_bootstrap: 1/g' /var/lib/mysql/grastate.dat ; /usr/bin/galera_new_cluster || { sleep 60 ; /sbin/reboot; } } 2>&1 | /usr/bin/logger
This cronjob will wait 30 seconds and then, if the mariadb service is not
running, set safe_to_bootstrap to 1. Then it bootstraps the cluster. If
that bootstrapping fails, it sleeps for a minute and reboots.
If mariadb is running it does nothing. If the bootstrapping succeeds, it
also does not reboot.
In normal operations I issue the shutdown command like this:
ssh -o ConnectTimeout=5 -o BatchMode=yes -o StrictHostKeyChecking=no root@192.0.2.60 poweroff;
ssh -o ConnectTimeout=5 -o BatchMode=yes -o StrictHostKeyChecking=no root@192.0.2.61 poweroff;
sleep 30;
ssh -o ConnectTimeout=5 -o BatchMode=yes -o StrictHostKeyChecking=no root@192.0.2.62 poweroff;
With this wait time it results in an "orderly" shutdown with one node being the "last" node for the Galera cluster, so most of the time this cronjob does nothing.
Continuing on with the k3s parts of the database setup.
k3s mysql database setup
This is simple and straightforward, just like you would normally create a database and user. Login to the database:
mysql -uroot
Create the specific database for k3s:
CREATE DATABASE k3s;
Create a user with password for k3s:
CREATE USER 'k3s'@'%' IDENTIFIED BY 'Supers3cr3tP4ssw0rd';
Grant that user all permissions on that database:
GRANT ALL PRIVILEGES ON k3s.* TO 'k3s'@'%';
FLUSH PRIVILEGES;
Installing K3S
On the first node (of the three) you install K3S like you would normally do but with two extra arguments.
The first is --tls-san="$HA-IP", the Keepalived high available cluster IP.
All nodes will connect to k3s and the database via this high available IP.
The second argument is --datastore-endpoint, which is where you provide your
newly created database connection information, using the HA-IP as well.
curl -sfL https://get.k3s.io | sh -s - \
  --datastore-endpoint="mysql://k3s:Supers3cr3tP4ssw0rd@tcp(192.0.2.50:3306)/k3s" \
  --tls-san="192.0.2.50"
After installation finishes, get the token. You need that on the other nodes:
cat /var/lib/rancher/k3s/server/node-token
Output:
K10a[...]418::server:7a8[...]8e441
On the second and third master node, use the following command. It's the same as above only the token is provided extra:
curl -sfL https://get.k3s.io | sh -s - server \
  --datastore-endpoint="mysql://k3s:Supers3cr3tP4ssw0rd@tcp(192.0.2.50:3306)/k3s" \
  --token="K10a[...]418::server:7a8[...]8e441" \
  --tls-san="192.0.2.50"
Installation of extra agents is done like normal, just the token and the HA-IP:
curl -sfL https://get.k3s.io | \
  K3S_URL="https://192.0.2.50:6443" \
  K3S_TOKEN="K10a[...]418::server:7a8[...]8e441" \
  sh -s -
After installation you can issue the following command on any of the master nodes:
kubectl get nodes
Output:
NAME            STATUS   ROLES                  AGE     VERSION
opz3-1-onder    Ready    control-plane,master   7m23s   v1.29.6+k3s1
opz3-2-midden   Ready    control-plane,master   9m50s   v1.29.6+k3s1
opz3-3-boven    Ready    control-plane,master   7m18s   v1.29.6+k3s1
opz3-4-top      Ready    <none>                 14s     v1.29.6+k3s1
There are 3 master nodes now!
We're almost done with the high-available part. The only thing to do is
install longhorn in the cluster so that our pod storage(persistent volumes)
is high available as well.
Please consult my other article
on how to set up your local workstation with kubectl and helm. You will
need that for the rest of this article.
HA storage in k3s
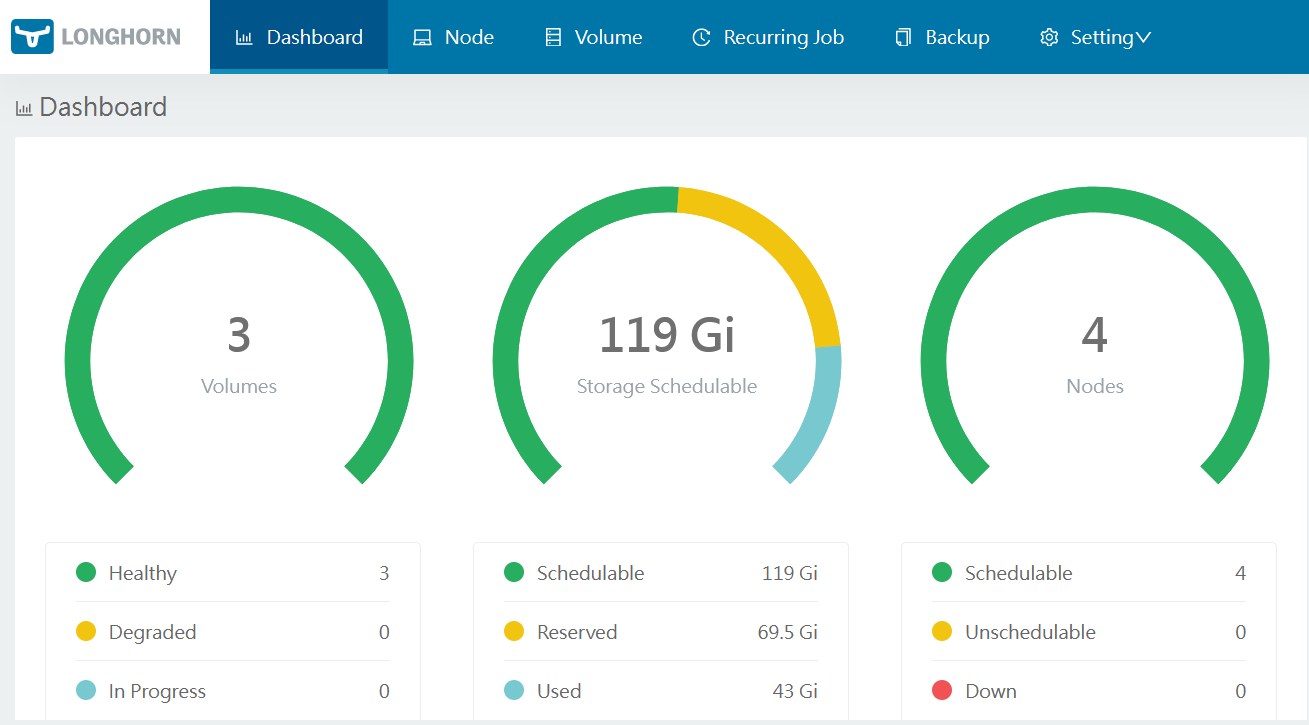
A screenshot of my longhorn dashboard
longhorn is a distributed block storage system which makes the persistent
volumes in kubernetes available on multiple nodes and keeps those in sync. If
one node fails, pods get started up on another node and storage is still
available. Without longhorn, the persistent volume would not be available
since that, in the case of k3s, is on the local node.
This article exposes iSCSI to your network. On a real production setup, please use separate VLAN's for storage traffic. For a home-lab setup like mine, this is fine.
Start by installing the following package on all k3s nodes:
apt-get install open-iscsi
On your local admin workstation you must create a folder for the yaml files:
mkdir longhorn
cd longhorn
Download the deployment file for longhorn:
wget https://raw.githubusercontent.com/longhorn/longhorn/v1.6.0/deploy/longhorn.yaml
Apply it with kubectl:
kubectl apply -f longhorn.yaml
For testing, expose the dashboard on port 8877. There is no login required
by default. In a follow up article I'll show you how to setup an Ingress
with a password, but for now this is fine.
kubectl expose service longhorn-frontend --type=LoadBalancer --port=8877 --target-port 8000 --name=longhorn-frontend-ext --namespace longhorn-system
You should now be able to navigate in your browser to http://ha-ip:8877 and
see the longhorn dashboard.
We need to make the longhorn storage be the default storage. Otherwise,
unchanged helm charts and deployments still would use the local-path
storage (per node). This step is k3s specific.
Check the current storage classes:
kubectl get storageclass -A
Output:
NAME                   PROVISIONER             RECLAIMPOLICY   VOLUMEBINDINGMODE      ALLOWVOLUMEEXPANSION   AGE
local-path (default)   rancher.io/local-path   Delete          WaitForFirstConsumer   false                  18m
longhorn (default)     driver.longhorn.io      Delete          Immediate              true                   3m48s
Use the following command to remove local-path as default option:
kubectl patch storageclass local-path -p '{"metadata": {"annotations":{"storageclass.kubernetes.io/is-default-class":"false"}}}'
Output:
storageclass.storage.k8s.io/local-path patched
Check the storage classes again:
kubectl get storageclass -A
Output:
NAME                 PROVISIONER             RECLAIMPOLICY   VOLUMEBINDINGMODE      ALLOWVOLUMEEXPANSION   AGE
local-path           rancher.io/local-path   Delete          WaitForFirstConsumer   false                  18m
longhorn (default)   driver.longhorn.io      Delete          Immediate              true                   4m23s
The last thing you need to do is go to the dashboard, settings and search for
Pod Deletion Policy When Node is Down. By default it's set to Do Nothing.
In my case, I set it to delete-both-statefulset-and-deployment-pod.
Longhorn will force delete StatefulSet/Deployment terminating pods on nodes that are down to release Longhorn volumes so that Kubernetes can spin up replacement pods.
If you do not change this and a node fails, the other nodes will not be able to start the pods with the following error:
the volume is currently attached to different node (the node that is down)
The longhorn documentation explains what this setting does:
This section is aimed to inform users of what happens during a node failure and what is expected during the recovery.
After one minute, kubectl get nodes will report NotReady for the failure node.
After about five minutes, the states of all the pods on the NotReady node will change to either Unknown or NodeLost.
StatefulSets have a stable identity, so Kubernetes won't force delete the pod for the user. See the official Kubernetes documentation about forcing the deletion of a StatefulSet.
Deployments don't have a stable identity, but for the Read-Write-Once type of storage, since it cannot be attached to two nodes at the same time, the new pod created by Kubernetes won't be able to start due to the RWO volume still attached to the old pod, on the lost node.
In both cases, Kubernetes will automatically evict the pod (set deletion timestamp for the pod) on the lost node, then try to recreate a new one with old volumes. Because the evicted pod gets stuck in Terminating state and the attached volumes cannot be released/reused, the new pod will get stuck in ContainerCreating state, if there is no intervene from admin or storage software.
Which basically means that there is no automated failover of storage, unless
you change the aforementioned option Pod Deletion Policy When Node is Down
to something else then do-nothing.
Testing
The most important part of the high availability cluster is testing different scenario's. Just like with backups, if you don't regularly test restores, you don't actually have a backup.
The most simple scenario is powering off one node. (ssh, then poweroff).
You should see that reflected in kubectl get nodes. After 5 minutes all
pods should be started on another node. Try shutting down the node that is
the keepalived node with MASTER in the HA-IP config. Note that after a
few seconds the IP will be available on the other node and you should be able
to reach any port forwards / loadbalancers again.
Here is a screenshot from headlamp showing one of the master nodes being down:
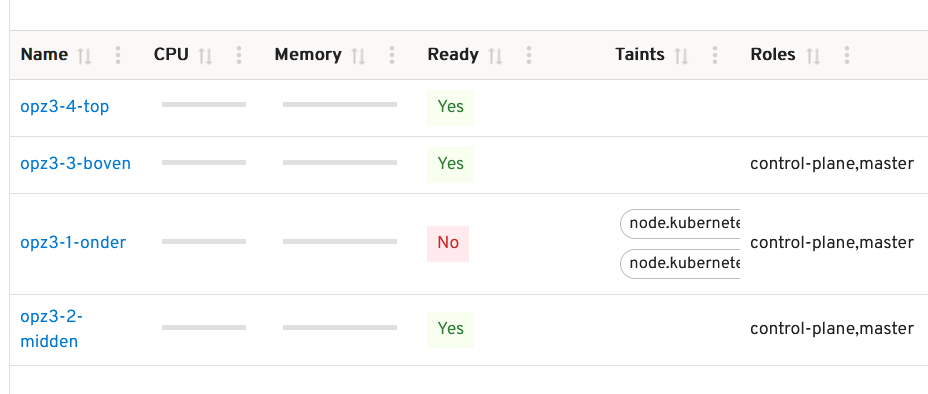
The cluster should not be impacted and after 5 minutes all pods / workloads should be back up.
The second test should be unplugging the network cable. Not powering off cleanly but just unplugging the network. Same effect, after 5 minutes your cluster should be healthy again.
Third test is to power off two nodes out of three, one by one. Many more tests are possible but this set should give you enough confidence on the high-availability of the cluster.
Tags: armbian , cloud , cluster , helm , high-availability , iscsi , k3s , k8s , keepalived , kubernetes , linux , longhorn , mariadb , mysql , orange-pi , raspberry-pi , tutorials