Raymii.org

Quis custodiet ipsos custodes?Home | About | All pages | Cluster Status | RSS Feed
OpenVMS 9.2 for x86, Getting Started part 1, install guide with VirtualBox
Published: 11-04-2023 22:30 | Last update: 14-08-2024 23:57 | Author: Remy van Elst | Text only version of this article
Table of Contents
![]()
OpenVMS on x86 is now available for hobbyists! Almost a year after the official release. This is a part 1 of my getting started guide, showing you how to install OpenVMS on VirtualBox on Windows 10/11. More parts will follow, documenting license installation, network setup, ssh, application installation etc.
You can read all my OpenVMS articles here.
Recently I removed all Google Ads from this site due to their invasive tracking, as well as Google Analytics. Please, if you found this content useful, consider a small donation using any of the options below. It means the world to me if you show your appreciation and you'll help pay the server costs:
GitHub Sponsorship
PCBWay referral link (You get $5, I get $20 after you've placed an order)
Digital Ocea referral link ($200 credit for 60 days. Spend $25 after your credit expires and I'll get $25!)
This guide is a summarized / shorter version of the official installation guide. It is taylored for hobbyist usage using VirtualBox and helps you to get set up quickly. Please refer to the official documentation for any questions. The official documentation is targeted at VMWare ESXi, this guide is for VirtualBox.
- Update: 15-4-2023: You can read part 2 of the guide here.
- Update: 16-4-2023: You can read part 3 of the guide here.
- Update: 14-8-2024: Serial port is no longer needed and CDE/Decwindows now work, see this page.
Disable Hyper-V and install VirtualBox
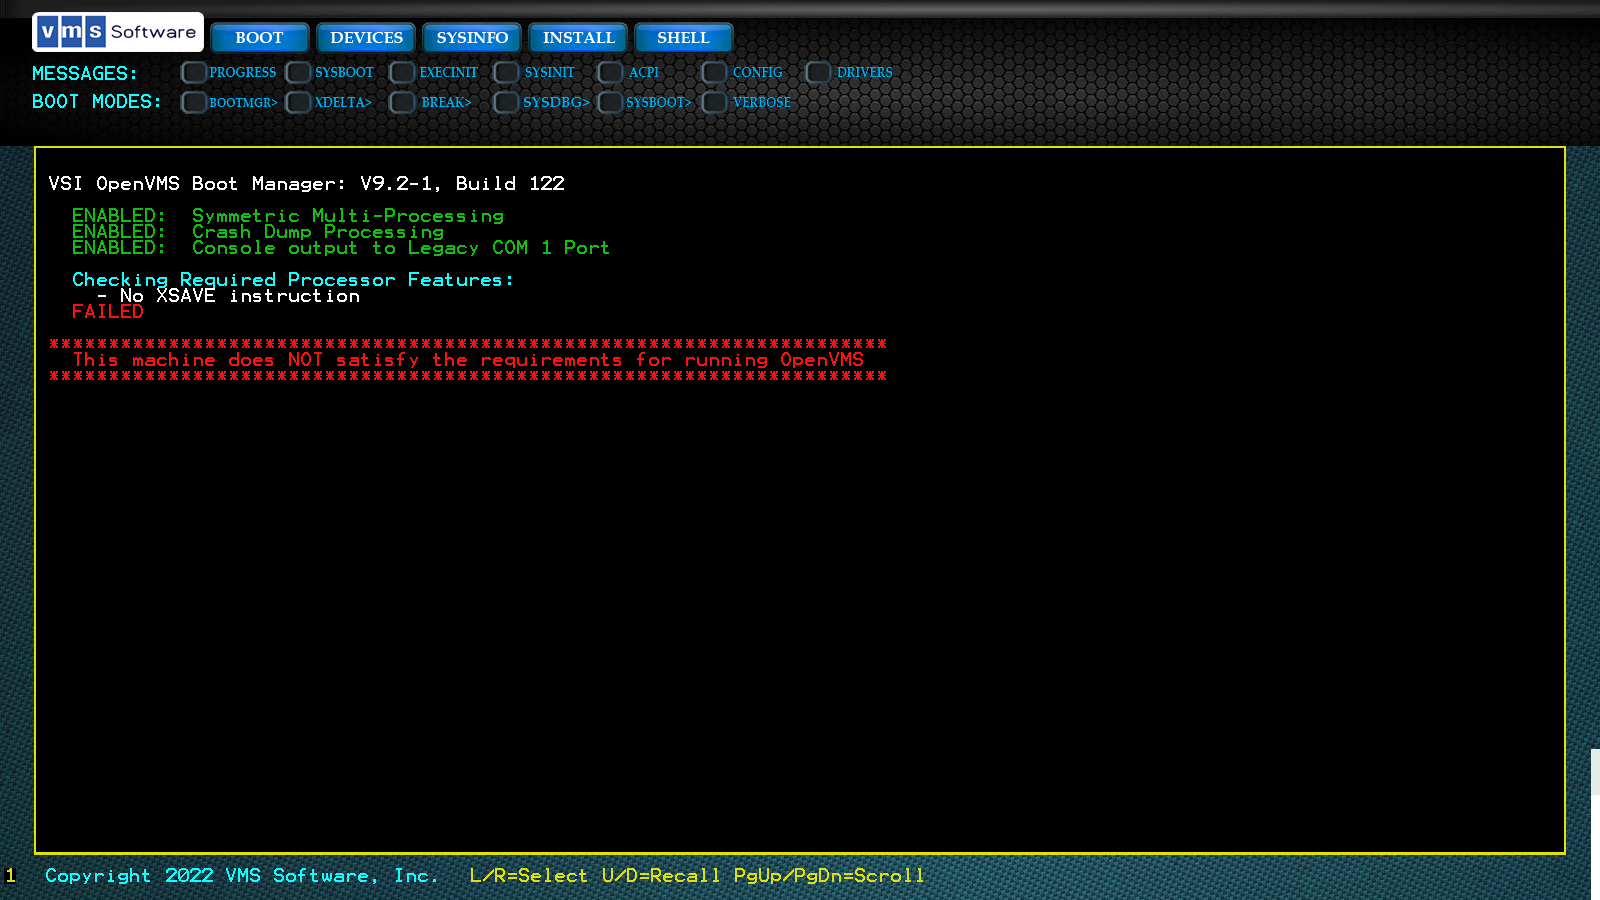
You'll need to install VirtualBox and disable Hyper-V, otherwise you will
get a boot error, No XSAVE instruction. Installing VirtualBox is a
matter of downloading the installer and clicking next/next/next a few times.
Disabling Hyper-V is a bit more work. On an adminstrative command prompt, execute the following and reboot:
bcdedit /set hypervisorlaunchtype off
To turn Hyper-V back on, change off to auto.
In newer versions of Windows 11 you also need to turn off Memory Integrity.
Navigate to Start > Settings > Update & Security > Windows Security >
Device security > Core isolation > Memory integrity.
Alternatively, you can disable VBS completely in the Group Policy Editor
under Computer Configuration > Administrative Templates > System >
Device Guard > Turn On Virtualization Based Security.
I suspected that WSL (Windows Subsystem for Linux) would stop working, but my WSL 1 installation continued to work. All of my WSL 2 installations are broken, which is expected since they use Hyper-V. They now give the following error code:
WSL2 wordt niet ondersteund met uw huidige computerconfiguratie.
Schakel het optionele onderdeel Virtual Machine Platform in en zorg ervoor dat virtualisatie is ingeschakeld in het BIOS.
Ga naar https://aka.ms/enablevirtualization voor meer informatie
Switching Hyper-V on again (bcedit command) and rebooting makes them work
again without data loss, so it's like the good old days of dual-booting in some
sense.
You'll also need a Telnet client. Putty is a great one for Windows,
but I'm using my (WSL1) linux terminal for it.
I have received reports that VMWare Player works without disabling Hyper-V and that some folks only had to disable Memory Integrety on Windows 11, not also disable Hyper-V. Not tested those myself though.
How to get OpenVMS 9.2 for Hobbyists
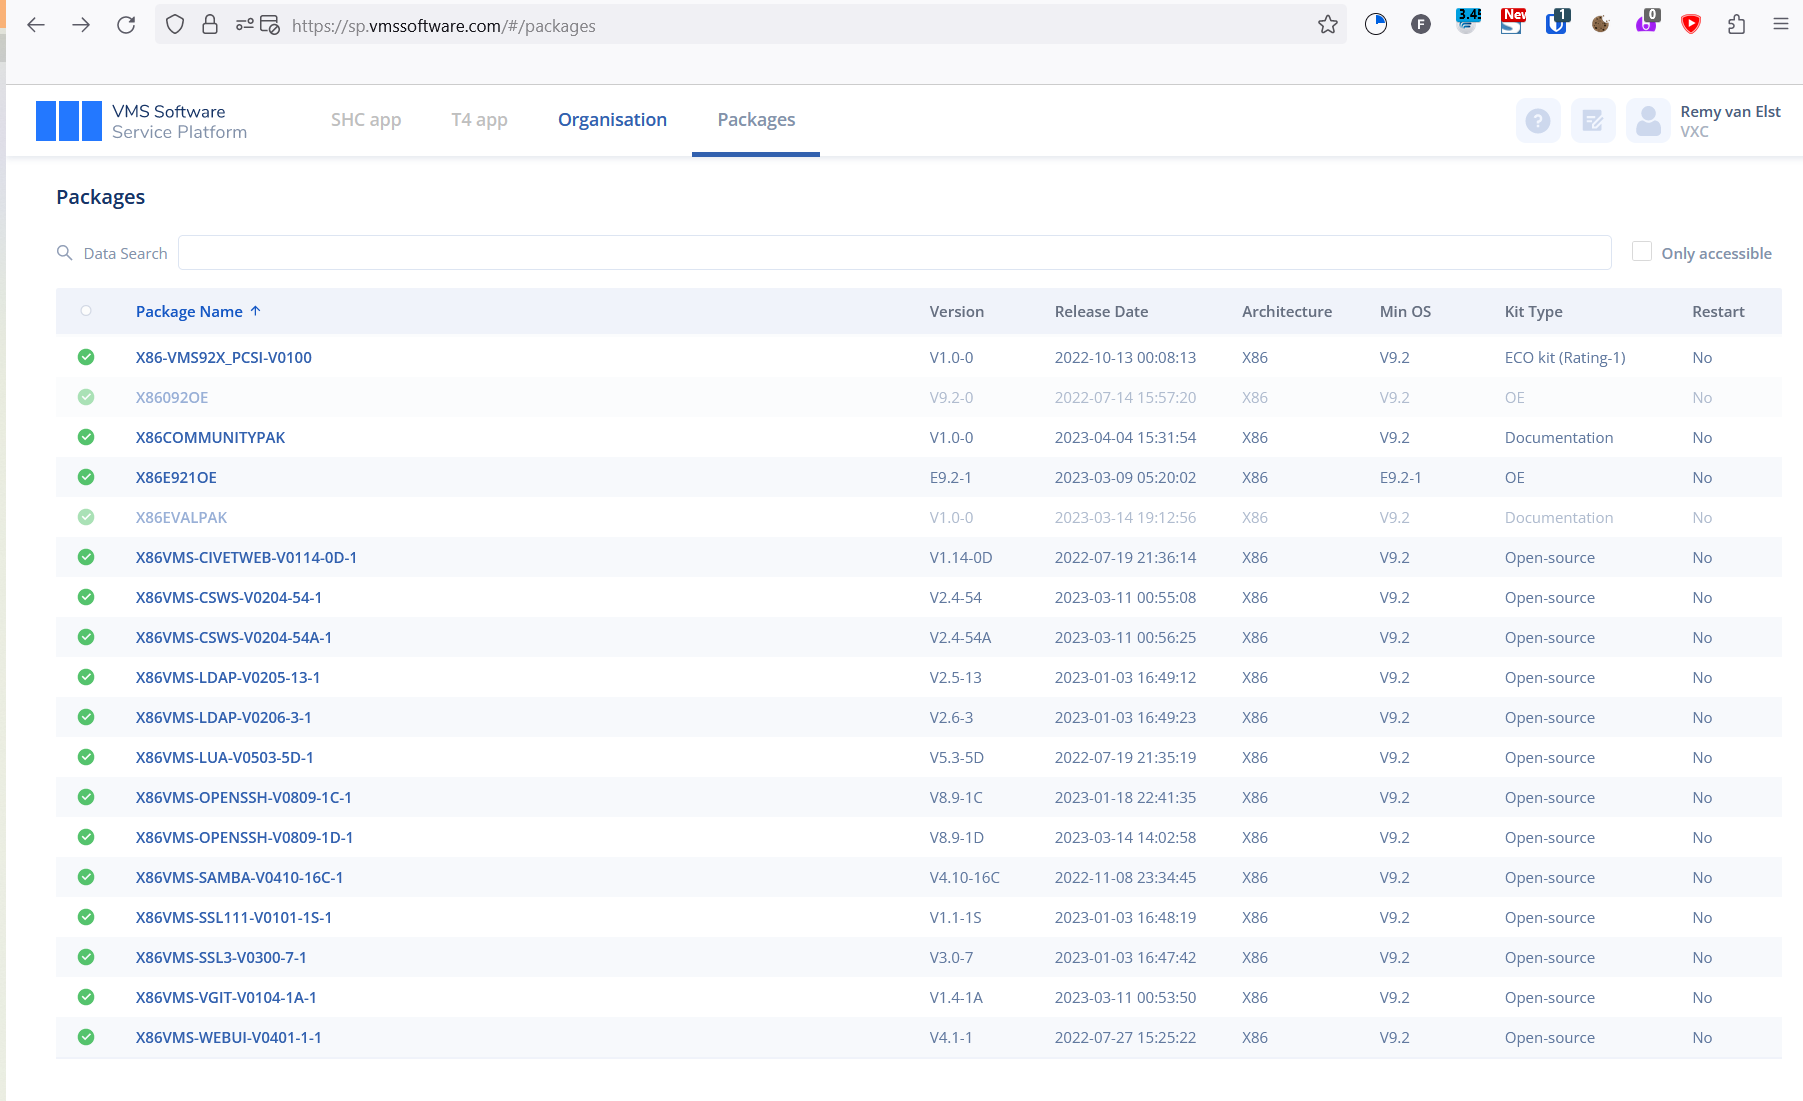
You must be a registered hobbyist user. After registration you
can download X86E921OE.ZIP and the PAK (license)
files (x86community-20240401.zip) from https://sp.vmssoftware.com:
Extract the ISO file. Ignore the .VNC file, I'm not sure what it is for,
I did not need it.
Booting the OpenVMS 9.2 x86 installation in VirtualBox
Fire up Virtualbox and create a new Virtual Machine. Select OS / Type Other / Unknown 64 Bit
and give the VM at least 6 GB of RAM and 2 cores, as per the official guide.
Attatch 2 disks, I did 2 of 20 GB and I also enabled UEFI. From the PDF manual:
- In the Oracle VM VirtualBox Manager window, click Machine, then New.
- In the Name field, enter a VM name
- Accept the default for the Machine Folder field, set Type to
Other, and Version toOther/Unknown (64-bit). - Click Next. VSI recommends that you set the memory size to
6144MB, then click Next again. - Select "Do not add a virtual hard disk", then click Create and Continue from the warning.
- Select Settings for the new VM and click System.
- In the Motherboard tab, uncheck Floppy and Optical, choose Chipset
ICH9, and check Enable EFI. - In the Processor tab, VSI recommends that you set the CPU count to at least 2.
- Select Storage from the settings menu.
- Click Add controller, select the
AHCI (SATA)type controller. - Add four disks to this controller in the following order:
-
VM1_sysdisk_name.VMDK(as a hard disk) -
VM1_paging_disk_name.VMDK(as a hard disk) -
X86092OE.ISO(as an optical drive) -
VM2_sysdisk_name.VMDK(as a hard disk) - You must add each disk to the available drives first, and then select it for the VM.
On the Serial Port screen, enable COM1, select Port Mode: TCP
and enter 1023 in the Path/Address field. Make sure that Connect to
existing pipe/socket is unchecked:
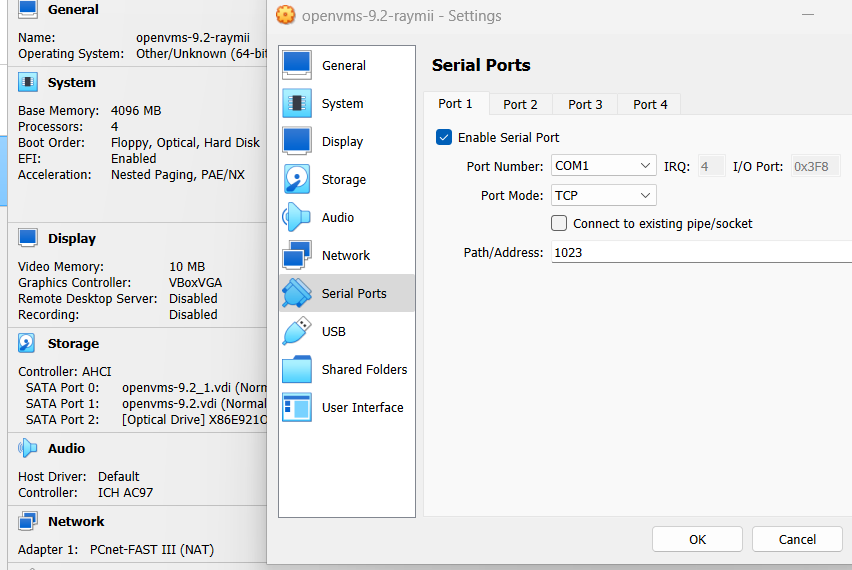
This serial port is required for the installation.
Couple the installation ISO in the VM settings and start the machine. In
the UEFI boot screen, look at the Mapping Table and see which device
says CDROM. In my case it was fs0. Enter the following command at the EFI
prompt:
fs0:\EFI\VMS\VMS_BOOTMGR.EFI
Replace fs0 with your cdrom disk. You should now see the following boot
screen:
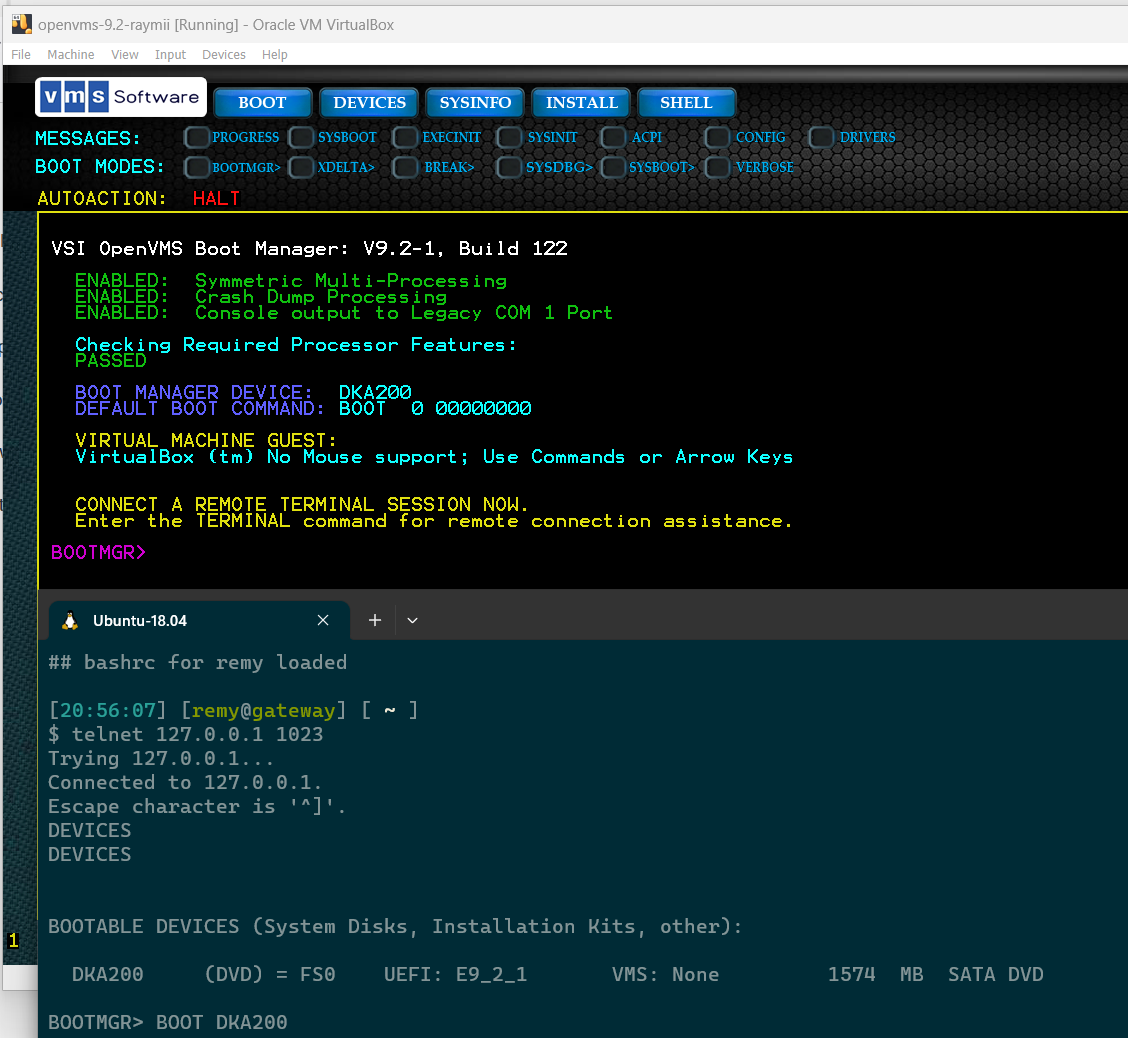
Notice the yellow text stating: CONNECT A REMOTE TERMINAL SESSION NOW.
- Update 14-08-2024: Serial port is no longer needed and CDE/Decwindows now work, see this page.
In your telnet client, connect to 127.0.0.1 port 1023, see my screenshot.
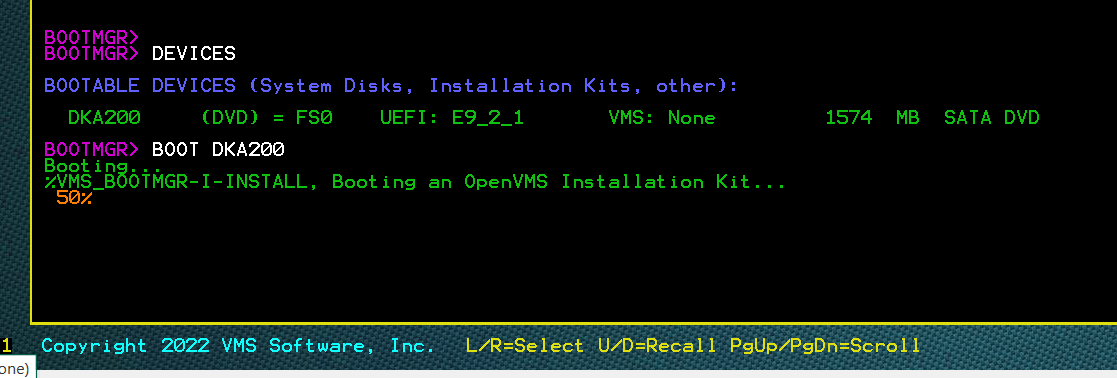
Enter the command DEVICES (all capitals) to see the boot device, in my
case DKA200.
Enter the command BOOT DKA200 to start. The terminal will show the loading
progress as will your VirtualBox:
When the loading is finished, the VirtualBox screen will show:
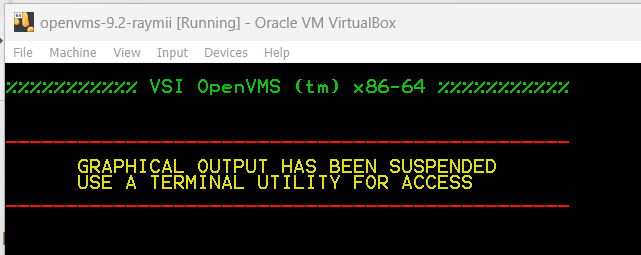
Continue on in your Telnet terminal.
OpenVMS 9.2 x86 installation
The telnet terminal will continue printing output, the VirtualBox screen does not show anything anymore. One of the things you'll notice is the following message:
  VirtualBox users must enable the HPET clock source one-time using the
  following command:
  vboxmanage modifyvm {your-vm-name} --hpet on
In my case, the VM is named openvms-9.2-raymii. After the installation has
finished and the VM is off, you must execute the command provided in an
administrative command prompt:
"\Program Files\Oracle\VirtualBox\VBoxManage.exe" modifyvm openvms-9.2-raymii --hpet on
The TELNET prompt will now show:
    VMS Software, Inc. OpenVMS (TM) x86_64 Operating System, E9.2-1
                Copyright 2023 VMS Software, Inc.

[...]

You can install or upgrade the OpenVMS X86-64 operating system
or you can install or upgrade layered products that are included
on the OpenVMS X86-64 distribution media.

You can also execute DCL commands and procedures to perform
"standalone" tasks, such as backing up the system disk.

Please choose one of the following:

    1)  Upgrade, install or reconfigure OpenVMS X86-64 Version E9.2-1
    2)  Display layered products that this procedure can install
    3)  Install or upgrade layered products
    4)  Show installed products
    5)  Reconfigure installed products
    6)  Remove installed products
    7)  Find, Install or Undo patches; Show or Delete Recovery Data
    8)  Execute DCL commands and procedures
    9)  Shut down this system
Press and hold CTRL, then press ]. The prompt changes to telnet>. You
need to enter the command:
unset crlf
Press CTRL+] again and enter another command:
mode char
If you don't do this, you cannot enter a SYSTEM account password later on.
Continue with the installation. Enter 1 as your choice. The prompt reads:
This procedure installs the OpenVMS X86-64 operating system.

All software and data files that were previously on the
    target disk will be removed.

Do you want to INITIALIZE or to PRESERVE? [PRESERVE]
Enter INITIALIZE as your choice. The prompt reads:
You must enter the device name for the target disk on which
OpenVMS X86-64 will be installed.

Enter device name for target disk: (? for choices) ?
?

  Device Name       Device Type Name        Volume Label     Size (blocks/xB)
  ------------  -------------------------  --------------  --------------------
  DKA0:         ATA VBOX HARDDISK
  DKA100:       ATA VBOX HARDDISK

  For volume label and device size enter ??


Enter device name for target disk: (? for choices)
If you receive an error like "No devices found", make sure you've selected
IC9 as the chipset and AHCI/SATA as the controller type.
Enter DKA0. The prompt reads:
Enter volume label for target system disk: [X86SYS]
Press ENTER to accept the default. The prompt reads:
OpenVMS V9.0 and later requires that the target system disk be
initialized with On-Disk Structure Level 5 (ODS-5).


Hard links can be enabled on ODS-5 disks.  WBEM Services for OpenVMS
does not require hard links.  (? for more information)

Do you want to enable hard links? (Yes/No/?)
Enter Y. The prompt reads:
You have chosen to install OpenVMS X86-64 on a new disk.

The target system disk, DKA0:, will be initialized
with structure level 5 (ODS-5).
Hard links WILL be enabled.
The disk will be labeled X86SYS.
Any data currently on the target system disk will be lost.

Is this OK? (Yes/No)
Enter Y. The prompt reads:
Y
Initializing and mounting target....

Creating page file....


You must enter a password for the SYSTEM account.

The password must be a minimum of 8 characters in length, and
may not exceed 31 characters.  It will be checked and verified.
The system will not accept passwords that can be guessed easily.

The password will not be displayed as you enter it.
Enter a password for the SYSTEM user. In my example I used PASSW0RD.
The prompt reads:
Password for SYSTEM account:

Re-enter SYSTEM password for verification:

    For your system to operate properly, you must set two parameters:
    SCSNODE and SCSSYSTEMID.

    SCSNODE can be from 1 to 6 letters or numbers.  It must contain at
    least one letter.

    If you plan to use DECnet, SCSNODE must be the DECnet Phase IV
    node name, or the DECnet-Plus (Phase V) node synonym.

    If you have multiple OpenVMS systems, the SCSNODE on each system
    must be unique.

Enter SCSNODE:
I entered the intented hostname here, REMY1. The prompt reads:
If you plan to use DECnet, SCSSYSTEMID must be set based on the
DECnet Phase IV address.

Do you plan to use DECnet? (Yes/No) [Yes]
Enter Y. The prompt reads:
DECnet Phase IV addresses are in the format

    DECnet_area_number.DECnet_node_number

DECnet_area_number is a number between 1 and 63.
DECnet_node_number is a number between 1 and 1023.

If you plan to use DECnet WITHOUT Phase IV compatible addresses,
enter 0.0.


Enter DECnet (Phase IV) Address: [1.1]
I entered 1.42. The prompt reads:
  SCSSYSTEMID will be set to 1066.

  This was calculated as follows:

      (DECnet_area_number * 1024) + DECnet_node_number

  Configuring the Local Time Zone


TIME ZONE SPECIFICATION -- MAIN Time Zone Menu            "*" indicates a menu

  0* GMT
  1* AFRICA          17) EST             33) IRAN            49) PORTUGAL
  2* AMERICA         18) EST5EDT         34) ISRAEL          50) PRC
  3* ANTARCTICA      19* ETC             35) JAMAICA         51) PST8PDT
  4* ARCTIC          20* EUROPE          36) JAPAN           52) ROC
  5* ASIA            21) FACTORY         37) KWAJALEIN       53) ROK
  6* ATLANTIC        22) GB-EIRE         38) LIBYA           54) SINGAPORE
  7* AUSTRALIA       23) GB              39) MET             55) TURKEY
  8* BRAZIL          24) GMT-0           40* MEXICO          56) UCT
  9* CANADA          25) GMT             41* MIDEAST         57) UNIVERSAL
 10) CET             26) GMT0            42) MST             58* US
 11* CHILE           27) GMTPLUS0        43) MST7MDT         59) UTC
 12) CST6CDT         28) GREENWICH       44) NAVAJO          60) W-SU
 13) CUBA            29) HONGKONG        45) NZ-CHAT         61) WET
 14) EET             30) HST             46) NZ              62) ZULU
 15) EGYPT           31) ICELAND         47* PACIFIC
 16) EIRE            32* INDIAN          48) POLAND

Press "Return" to redisplay, enter "=" to search or "?" for help, or
Select the number above that best represents the desired time zone:
I entered 20, then 1, for AMSTERDAM but you should choose the time zone closest to you.
The prompt reads:
You selected EUROPE / AMSTERDAM as your time zone.
Is this correct? (Yes/No) [YES]:
Confirm with Y. The prompt reads:
Configuring the Time Differential Factor (TDF)

Default Time Differential Factor for standard time is 1:00.
Default Time Differential Factor for daylight saving time is 2:00.

The Time Differential Factor (TDF) is the difference between your
system time and Coordinated Universal Time (UTC).  UTC is similar
in most respects to Greenwich Mean Time (GMT).

The TDF is expressed as hours and minutes, and should be entered
in the hh:mm format.  TDFs for the Americas will be negative
(-3:00, -4:00, etc.); TDFs for Europe, Africa, Asia and Australia
will be positive (1:00, 2:00, etc.).

This time zone supports daylight saving time.
Is this time zone currently on daylight saving time? (Yes/No):
I entered N. The prompt reads:
Enter the Time Differential Factor [1:00]:
I pressed ENTER for the default. The prompt reads:
NEW SYSTEM TIME DIFFERENTIAL FACTOR = 1:00

Is this correct? [Y]:
Confirm with Y. The prompt reads:
If you have Product Authorization Keys (PAKs) to register,
you can register them now.

Do you want to register any Product Authorization Keys? (Yes/No) [Yes]
Enter NO to decline. We will register PAKs later on after installation.
During installation it's a pain to manually copy and paste them. Later on we
can just mount an ISO file.
The prompt reads:
The following products are part of the OpenVMS installation;
they will be installed along with the OpenVMS operating system:

    o Availability Manager (base) for OpenVMS X86-64
    o TCP/IP Services for OpenVMS X86-64
    o KERBEROS for OpenVMS X86-64
    o SSL3 V3.0-7 for OpenVMS X86-64 (based on OpenSSL V3.0.7)
    o SSL111 V1.1-1S for OpenVMS X86-64 (based on OpenSSL V1.1.1s)
    o OpenSSH for OpenVMS X86-64
    o 64-bit PERL for OpenVMS X86-64

You can also install the following optional products along with the
OpenVMS operating system:

    o DECwindows Motif for OpenVMS X86-64
    o DECnet-Plus for OpenVMS X86-64
    o DECnet Phase IV for OpenVMS X86-64

If you want to change your selections, you can do so later in the
installation by answering "NO" to the following question:

    "Do you want the defaults for all options?"

Do you want to install DECwindows Motif for OpenVMS X86-64 V1.8?
Confirm with Y. The prompt reads:
The DECnet-Plus kit is provided with the OpenVMS operating system kit.
DECnet Phase IV applications are supported by DECnet-Plus.

DECnet Phase IV is also provided as an option.

If you install DECnet-Plus and TCP/IP you can run DECnet
applications over a TCP/IP network.  Please refer to the
VSI DECnet-Plus for OpenVMS Planning Guide for information
on running DECnet over TCP/IP.

Do you want to install DECnet-Plus for OpenVMS X86-64 V9.2-D? (Yes/No) [Yes]
Confirm with Y. The prompt reads:
The installation operation can provide brief or detailed descriptions.
In either case, you can request the detailed descriptions by typing ?.

Do you always want detailed descriptions? (Yes/No) [No]
Confirm with NO. The installer will now validate files:
Performing product kit validation of signed kits ...
%PCSI-I-VSIVALPASSED, validation of DMM1:[VMS$COMMON]VSI-X86VMS-VMS-E0902-1-2.PC
SI$COMPRESSED;1 succeeded
%PCSI-I-VSIVALPASSED, validation of DMM1:[KITS.DWMOTIF_SUPPORT_X860921_KIT]VSI-X
86VMS-DWMOTIF_SUPPORT-E0902-1-1.PCSI$COMPRESSED;1 succeeded
%PCSI-I-VSIVALPASSED, validation of DMM1:[KITS.AVAIL_MAN_BASE_KIT]VSI-X86VMS-AVA
IL_MAN_BASE-E0902-1-1.PCSI$COMPRESSED;1 succeeded
%PCSI-I-VSIVALPASSED, validation of DMM1:[KITS.TCPIP]VSI-X86VMS-TCPIP-X0600-20-1
.PCSI$COMPRESSED;1 succeeded
[...]
After that is finished, the prompt reads:
The following product has been selected:
    VSI X86VMS OPENVMS E9.2-1              Platform (product suite)

Configuration phase starting ...

You will be asked to choose options, if any, for each selected product and for
any products that may be installed to satisfy software dependency requirements.

Configuring VSI X86VMS OPENVMS E9.2-1: OPENVMS and related products Platform

    Copyright 2015-2023 VMS Software, Inc.

    VMS Software, Inc.

Do you want the defaults for all options? [YES]
Confirm with Y. The prompt reads:
* Product VSI X86VMS TCPIP X6.0-20 requires a system reboot.
Can the system be REBOOTED after the installation completes? [YES]
Confirm with Y. The prompt reads:
KERBEROS for OpenVMS X86-64

SSL3 V3.0-7 for OpenVMS X86-64 (based on OpenSSL V3.0.7)

SSL111 V1.1-1S for OpenVMS X86-64 (based on OpenSSL V1.1.1s)

OpenSSH for OpenVMS X86-64

64-bit PERL for OpenVMS X86-64

Do you want to review the options? [NO] N
Confirm with NO. The installation will now start, takes a while, about 5 minutes
for me. The terminal shows:
Execution phase starting ...

The following products will be installed to destinations:
    VMSPORTS X86VMS PERL534 T5.34-0        DISK$X86SYS:[VMS$COMMON.]
    VSI X86VMS AVAIL_MAN_BASE E9.2-1       DISK$X86SYS:[VMS$COMMON.]
    VSI X86VMS DECNET_PLUS V9.2-D          DISK$X86SYS:[VMS$COMMON.]
    VSI X86VMS DWMOTIF V1.8                DISK$X86SYS:[VMS$COMMON.]
    VSI X86VMS DWMOTIF_SUPPORT E9.2-1      DISK$X86SYS:[VMS$COMMON.]
    VSI X86VMS KERBEROS V3.3-2A            DISK$X86SYS:[VMS$COMMON.]
    VSI X86VMS OPENSSH V8.9-1D             DISK$X86SYS:[VMS$COMMON.]
    VSI X86VMS OPENVMS E9.2-1              DISK$X86SYS:[VMS$COMMON.]
    VSI X86VMS SSL111 V1.1-1S              DISK$X86SYS:[VMS$COMMON.]
    VSI X86VMS SSL3 V3.0-7                 DISK$X86SYS:[VMS$COMMON.]
    VSI X86VMS TCPIP X6.0-20               DISK$X86SYS:[VMS$COMMON.]
    VSI X86VMS VMS E9.2-1                  DISK$X86SYS:[VMS$COMMON.]

Portion done: 0%
Once the Portion done: shows 90%, you're almost finished:
   DISK$X86SYS:[VMS$COMMON.]

Portion done: 0%...10%...20%...30%...40%...50%...60%...70%

    Restoring STARTUP.NSH file(s)...

    No files restored

...80%...90%

%PCSI-I-PRCOUTPUT, output from subprocess follows ...
% - Execute SYS$MANAGER:TCPIP$CONFIG.COM to proceed with configuration of
%   VSI TCP/IP Services for OpenVMS.
%
Portion done: 100%
The prompt now prints a whole bunch of text:
The following products have been installed:
    VMSPORTS X86VMS PERL534 T5.34-0        Layered Product
    VSI X86VMS AVAIL_MAN_BASE E9.2-1       Layered Product
    VSI X86VMS DECNET_PLUS V9.2-D          Layered Product
    VSI X86VMS DWMOTIF V1.8                Layered Product
    VSI X86VMS DWMOTIF_SUPPORT E9.2-1      Layered Product
    VSI X86VMS KERBEROS V3.3-2A            Layered Product
    VSI X86VMS OPENSSH V8.9-1D             Layered Product
    VSI X86VMS OPENVMS E9.2-1              Platform (product suite)
    VSI X86VMS SSL111 V1.1-1S              Layered Product
    VSI X86VMS SSL3 V3.0-7                 Layered Product
    VSI X86VMS TCPIP X6.0-20               Layered Product
    VSI X86VMS VMS E9.2-1                  Operating System

VSI X86VMS OPENVMS E9.2-1: OPENVMS and related products Platform

    VSI X86VMS TCPIP X6.0-20: VSI TCP/IP Services for OpenVMS.

      VSI X86VMS SSL3 V3.0-7: SSL3 for OpenVMS X86-64 V3.0-7 (Based on OpenSSL 3
.0.7)

        Insert the following lines in SYS$MANAGER:SYSTARTUP_VMS.COM:
            @SYS$STARTUP:SSL3$STARTUP.COM
        Insert the following lines in SYS$MANAGER:SYSHUTDWN.COM:
            @SYS$STARTUP:SSL3$SHUTDOWN.COM

        Review the Installation Guide and Release Notes for post install directi
ons.

        Review the Installation Guide and Release Notes for post upgrade verific
ation suggestions.

        Refer to SYS$HELP:SSL30-7-X86.RELEASE_NOTES for more information.

        It is recommended to run extended IVP tests as a post-installation step.

      Check the release notes for current status of the product.

    VSI X86VMS KERBEROS V3.3-2A

      Configure and set up Kerberos

      If Kerberos will be run on this system, but has not been
      used previously, you need to perform the following steps.

       o Run the Kerberos configuration procedure:

          @SYS$STARTUP:KRB$CONFIGURE.COM

       o Add the following line to SYS$MANAGER:SYSTARTUP_VMS.COM:

          $ @SYS$STARTUP:KRB$STARTUP

       o Add the following line to SYS$MANAGER:SYLOGIN.COM:

          $ @SYS$MANAGER:KRB$SYMBOLS


    VSI X86VMS SSL3 V3.0-7: SSL3 for OpenVMS X86-64 V3.0-7 (Based on OpenSSL 3.0
.7)

      Insert the following lines in SYS$MANAGER:SYSTARTUP_VMS.COM:
          @SYS$STARTUP:SSL3$STARTUP.COM
      Insert the following lines in SYS$MANAGER:SYSHUTDWN.COM:
          @SYS$STARTUP:SSL3$SHUTDOWN.COM

      Review the Installation Guide and Release Notes for post install direction
s.

      Review the Installation Guide and Release Notes for post upgrade verificat
ion suggestions.

      Refer to SYS$HELP:SSL30-7-X86.RELEASE_NOTES for more information.

      It is recommended to run extended IVP tests as a post-installation step.

    VSI X86VMS SSL111 V1.1-1S: SSL111 for OpenVMS X86-64 V1.1-1S (Based on OpenS
SL 1.1.1S)

      Review the Installation Guide and Release Notes for post install direction
s.

      Review the Installation Guide and Release Notes for post upgrade verificat
ion suggestions.

      Refer to SYS$HELP:SSL111-S-X86.RELEASE_NOTES for more information.

    VMSPORTS X86VMS PERL534 T5.34-0

      Post-installation tasks are required for Perl for OpenVMS.


          To use the Perl provided with this kit, run the following set-up
          command procedure, assuming you installed in SYS$COMMON.

            $ @sys$common:[perl-5_34]perl_setup.com

          You may wish to put that command in SYS$MANAGER:SYLOGIN.COM to
          make Perl available to all users on the system.

          Perl includes its own help system called perldoc.  Type

            $ perldoc perldoc

          for the documentation to perldoc itself.  Type

            $ perldoc perldelta

          for the changes that are new in version T5.34-0 of Perl.

          There are many Perl-related resources on the web; point your
          browser at:

            http://www.perl.org

          to get started, and thank you for using Perl for OpenVMS.


    VSI X86VMS DECNET_PLUS V9.2-D: DECnet-Plus V9.2-D for OpenVMS X86

      Release notes are available in SYS$HELP:HPE_DECNET-Plus-V84.RELEASE_NOTES
and SYS$HELP:VSI_DECNET_OSI.RELEASE_NOTES

%PCSI-I-SYSTEM_REBOOT, executing reboot procedure ...

        Shutdown/reboot deferred when this product is
        installed as part of the O/S installation/upgrade


    Running SYS$UPDATE:SYS$MD.COM to update the memory disk...


Created memory disk DKA0:[VMS$COMMON.SYS$LDR]SYS$MD.DSK;1
        - using 184112 blocks in 1 extent with 1018 spare blocks
        - mounted on LDM1447: with volume label MD2310034C4A
        - contains OpenVMS E9.2-1


%LD-I-UNIT, Allocated device is LDM1448:


    The installation is now complete.

    When the newly installed system is first booted, a special
    startup procedure will be run.  This procedure will:

        o  Configure the system for standalone or OpenVMS Cluster operation.
        o  Run AUTOGEN to set system parameters.
        o  Reboot the system with the newly set parameters.


    You may shut down now or continue with other operations.


  Process X86VMS_INSTALL logged out at 10-APR-2023 21:57:53.19

Press Return to continue...
Press ENTER to confirm. The prompt is back at the beginning and reads:
****************************************************************

You can install or upgrade the OpenVMS X86-64 operating system
or you can install or upgrade layered products that are included
on the OpenVMS X86-64 distribution media.

You can also execute DCL commands and procedures to perform
"standalone" tasks, such as backing up the system disk.

Please choose one of the following:

    1)  Upgrade, install or reconfigure OpenVMS X86-64 Version E9.2-1
    2)  Display layered products that this procedure can install
    3)  Install or upgrade layered products
    4)  Show installed products
    5)  Reconfigure installed products
    6)  Remove installed products
    7)  Find, Install or Undo patches; Show or Delete Recovery Data
    8)  Execute DCL commands and procedures
    9)  Shut down this system

Enter CHOICE or ? for help: (1/2/3/4/5/6/7/8/9/?)
This time we want to shutdown. Enter 9. The prompt reads:
Shutting down the system

VSI Dump Kernel SYSBOOT Jan 23 2023 14:03:45
** Error logs not dumped, system disk is write locked.

        SYSTEM SHUTDOWN COMPLETE

**** Hit any key to reboot system ****
You're now done with the installation. Press ENTER to reboot.
First boot of your OpenVMS 9.2 x86
Return to the VirtualBox window, do not close your telnet terminal. You should
be at the UEFI prompt again. This time, boot from the disk where we installed
OpenVMS. This should be the disk that does not show CDROM in the Mapping
Table. In my case, the CDROM was now fs1 and the disk was fs0. The command
is the same:
fs0:\EFI\VMS\VMS_BOOTMGR.EFI
Return to your telnet terminal. Enter the DEVICES command again, you should
now see your freshly installed disk:
BOOTMGR> DEVICES

BOOTABLE DEVICES (System Disks, Installation Kits, other):

  DKA200     (DVD) = FS1    UEFI: E9_2_1       VMS: None         1574  MB  SATA DVD
  DKA0        (HD) = FS0    UEFI: E9_2_1       VMS: X86SYS       61440 MB  SATA Disk
Enter the command BOOT DKA0 to boot from the installed system (the disk we
named X86SYS). A whole bunch of output appears:
Booting...

%%%%%%%%%%% VSI OpenVMS (tm) x86-64 %%%%%%%%%%%


_______________________________________________

      GRAPHICAL OUTPUT HAS BEEN SUSPENDED
      USE A TERMINAL UTILITY FOR ACCESS
_______________________________________________

VSI Primary Kernel SYSBOOT Jan 23 2023 14:03:45

%SYSBOOT-I-VMTYPE, Booting as a VirtualBox (tm) Guest


        VMS Software, Inc. OpenVMS (TM) x86_64 Operating System, E9.2-1
                    Copyright 2023 VMS Software, Inc.

  MDS Mitigation active, variant verw(MD_CLEAR)
%DECnet-I-LOADED, network base image loaded, version = 05.92.04

%DECnet-W-ZEROLEN, length of file is zero -- SYS$SYSROOT:[SYSEXE]NET$CONFIG.DAT

%SMP-I-CPUTRN, CPU #3 has joined the active set.
%SMP-I-CPUTRN, CPU #2 has joined the active set.
%SMP-I-CPUTRN, CPU #1 has joined the active set.

    Installing required known files...

    Configuring devices...

%STARTUP-E-NOPAGFIL, No page files have been successfully installed.
%SYSTEM-I-BOOTUPGRADE, security auditing disabled
%%%%%%%%%%%  OPCOM  10-APR-2023 22:04:14.72  %%%%%%%%%%%
Operator _REMY1$OPA0: has been enabled, username SYSTEM

%%%%%%%%%%%  OPCOM  10-APR-2023 22:04:14.72  %%%%%%%%%%%
Operator status for operator _REMY1$OPA0:
CENTRAL, PRINTER, TAPES, DISKS, DEVICES, CARDS, NETWORK, CLUSTER, SECURITY,
LICENSE, OPER1, OPER2, OPER3, OPER4, OPER5, OPER6, OPER7, OPER8, OPER9, OPER10,
OPER11, OPER12

%%%%%%%%%%%  OPCOM  10-APR-2023 22:04:14.72  %%%%%%%%%%%
Logfile has been initialized by operator _REMY1$OPA0:
Logfile is REMY1::SYS$SYSROOT:[SYSMGR]OPERATOR.LOG;1

%%%%%%%%%%%  OPCOM  10-APR-2023 22:04:14.72  %%%%%%%%%%%
Operator status for operator REMY1::SYS$SYSROOT:[SYSMGR]OPERATOR.LOG;1
CENTRAL, PRINTER, TAPES, DISKS, DEVICES, CARDS, NETWORK, CLUSTER, SECURITY,
LICENSE, OPER1, OPER2, OPER3, OPER4, OPER5, OPER6, OPER7, OPER8, OPER9, OPER10,
OPER11, OPER12

%%%%%%%%%%%  OPCOM  10-APR-2023 22:04:14.85  %%%%%%%%%%%
Message from user SYSTEM on REMY1
%JBC-E-OPENERR, error opening SYS$COMMON:[SYSEXE]QMAN$MASTER.DAT;

%%%%%%%%%%%  OPCOM  10-APR-2023 22:04:14.85  %%%%%%%%%%%
Message from user SYSTEM on REMY1
-RMS-E-FNF, file not found

%LICENSE-F-EMTLDB, license database contains no license records
%SYSTEM-I-BOOTUPGRADE, security server not started
%%%%%%%%%%%  OPCOM  10-APR-2023 22:04:15.05  %%%%%%%%%%%
Message from user SYSTEM on REMY1
TDF-I-SETTDF TDF set new timezone differential

NET$STARTUP, Network not started due to UPGRADE boot
%%%%%%%%%%%  OPCOM  10-APR-2023 22:04:15.30  %%%%%%%%%%%
Message from user SYSTEM on REMY1
%LICENSE-E-NOAUTH, VSI OPENVMS-X86 use is not authorized on this node
-LICENSE-F-NOLICENSE, no license is active for this software product
-LICENSE-I-SYSMGR, please see your system manager


%LICENSE-E-NOAUTH, VSI OPENVMS-X86 use is not authorized on this node
-LICENSE-F-NOLICENSE, no license is active for this software product
-LICENSE-I-SYSMGR, please see your system manager
Startup processing continuing...

%SYSTEM-I-BOOTUPGRADE, Coordinated Startup not performed


    AUTOGEN will now be run to compute the new system parameters.  The system
    will then shut down and reboot, and the installation or upgrade will be
    complete.

    After rebooting you can continue with such system management tasks as:

            Configuring networking software (TCP/IP Services, DECnet, other)
            Using SYS$MANAGER:CLUSTER_CONFIG.COM to create an OpenVMS Cluster
            Creating FIELD, SYSTEST and SYSTEST_CLIG accounts if needed

%AUTOGEN-I-BEGIN, GETDATA phase is beginning.
%AUTOGEN-I-NEWFILE,  Previous contents of SYS$SYSTEM:CLU$PARAMS.DAT have
  been copied to SYS$SYSTEM:CLU$PARAMS.OLD.  You may wish to purge
  SYS$SYSTEM:CLU$PARAMS.OLD.
%AUTOGEN-I-NEWFILE,  Previous contents of SYS$SYSTEM:CLU$PARAMS.DAT have
  been copied to SYS$SYSTEM:CLU$PARAMS.OLD.  You may wish to purge
  SYS$SYSTEM:CLU$PARAMS.OLD.
%AUTOGEN-I-NEWFILE,  Previous contents of SYS$SYSTEM:CLU$PARAMS.DAT have
  been copied to SYS$SYSTEM:CLU$PARAMS.OLD.  You may wish to purge
  SYS$SYSTEM:CLU$PARAMS.OLD.
%AUTOGEN-I-NEWFILE, A new version of SYS$SYSTEM:PARAMS.DAT has been created.
        You may wish to purge this file.
%AUTOGEN-I-END, GETDATA phase has successfully completed.
%AUTOGEN-I-BEGIN, GENPARAMS phase is beginning.
%AUTOGEN-I-NEWFILE, A new version of SYS$MANAGER:VMSIMAGES.DAT has been created.
        You may wish to purge this file.
%AUTOGEN-I-NEWFILE, A new version of SYS$SYSTEM:SETPARAMS.DAT has been created.
        You may wish to purge this file.
%AUTOGEN-I-END, GENPARAMS phase has successfully completed.
%AUTOGEN-I-BEGIN, GENFILES phase is beginning.
%SYSGEN-I-CREATED, SYS$SYSROOT:[SYSEXE]SYS$ERRLOG.DMP;2 created
%SYSGEN-I-CREATED, DKA0:[SYS0.SYSEXE]SYSDUMP.DMP;1 created

        Extending DKA0:[SYS0.SYSEXE]SYSDUMP.DMP to 7864554 blocks will take
        approximately 70 seconds.  Please wait ...
This will take a minute. Output continues:
%SYSGEN-I-EXTENDED, DKA0:[SYS0.SYSEXE]SYSDUMP.DMP;1 extended
                                        ... done.

******************
%AUTOGEN-W-REPORT, Warnings were detected by AUTOGEN.  Please review the
        information given in the file SYS$SYSTEM:AGEN$PARAMS.REPORT
******************

%AUTOGEN-I-REPORT, AUTOGEN has produced some informational messages which
        have been stored in the file SYS$SYSTEM:AGEN$PARAMS.REPORT.  You may
        wish to review the information in that file.

%AUTOGEN-I-END, GENFILES phase has successfully completed.
%AUTOGEN-I-BEGIN, SETPARAMS phase is beginning.
%SYSGEN-W-SETMAX, value set to maximum for parameter GH_EXEC_CODE
%%%%%%%%%%%  OPCOM  10-APR-2023 22:05:16.46  %%%%%%%%%%%
Message from user SYSTEM on REMY1
%SYSGEN-I-WRITECUR, CURRENT system parameters modified by process ID 00000023 in
to file SYS$SYSROOT_MD:[SYSEXE]X86_64VMSSYS.PAR;2

%AUTOGEN-I-SYSGEN, parameters modified
%AUTOGEN-I-END, SETPARAMS phase has successfully completed.
%AUTOGEN-I-BEGIN, REBOOT phase is beginning.

The system is shutting down to allow the system to boot with the
generated site-specific parameters and installed images.

The system will automatically reboot after the shutdown and the
upgrade will be complete.


        SHUTDOWN -- Perform an Orderly System Shutdown
                    on node REMY1


%SHUTDOWN-I-BOOTCHECK, performing reboot consistency check...
%SHUTDOWN-I-CHECKOK, basic reboot consistency check completed

%SHUTDOWN-I-OPERATOR, this terminal is now an operator's console
%SHUTDOWN-I-DISLOGINS, interactive logins will now be disabled
%SET-I-INTSET, login interactive limit = 0, current interactive value = 0
%SHUTDOWN-I-STOPQUEUES, the queues on this node will now be stopped
%%%%%%%%%%%  OPCOM  10-APR-2023 22:05:16.90  %%%%%%%%%%%
Message from user SYSTEM on REMY1
%JBC-E-OPENERR, error opening SYS$COMMON:[SYSEXE]QMAN$MASTER.DAT;

%%%%%%%%%%%  OPCOM  10-APR-2023 22:05:16.90  %%%%%%%%%%%
Message from user SYSTEM on REMY1
-RMS-E-FNF, file not found


SHUTDOWN message on REMY1 from user SYSTEM at REMY1 Batch   22:05:16
REMY1 will shut down in 0 minutes; back up soon.  Please log off node REMY1.
Reboot system with AUTOGENerated parameters


%SHUTDOWN-I-STOPUSER, all user processes will now be stopped
%SHUTDOWN-I-STOPCPU, the secondary processors will now be stopped
%SMP-I-CPUTRN, CPU #1 was removed from the active set.
%SMP-I-CPUTRN, CPU #2 was removed from the active set.
%SMP-I-CPUTRN, CPU #3 was removed from the active set.
%SHUTDOWN-I-REMOVE, all installed images will now be removed
%SET-I-PSXROOSET, system POSIX root set to SYS$SYSDEVICE:[000000]
%SHUTDOWN-I-DISMOUNT, all volumes will now be dismounted
%%%%%%%%%%%  OPCOM  10-APR-2023 22:05:17.31  %%%%%%%%%%%
Message from user SYSTEM on REMY1
STARTUP, REMY1 shutdown was requested by the operator.


VSI Dump Kernel SYSBOOT Jan 23 2023 14:03:45
** Dumping error logs to the system disk (REMY1$DKA0:)
** Error logs dumped to REMY1$DKA0:[SYS0.SYSEXE]SYS$ERRLOG.DMP
** (used 36 out of 96 available blocks)

Restarting the system...
Go back to the VirtualBox window and enter the EFI boot command again:
fs0:\EFI\VMS\VMS_BOOTMGR.EFI
Enter the OpenVMS boot command:
BOOT DKA0
More output from OPCOM and other system messages, but we're finally getting
ready to login.
Booting...

%%%%%%%%%%% VSI OpenVMS (tm) x86-64 %%%%%%%%%%%


_______________________________________________

      GRAPHICAL OUTPUT HAS BEEN SUSPENDED
      USE A TERMINAL UTILITY FOR ACCESS
_______________________________________________

VSI Primary Kernel SYSBOOT Jan 23 2023 14:03:45

%SYSBOOT-I-VMTYPE, Booting as a VirtualBox (tm) Guest


        VMS Software, Inc. OpenVMS (TM) x86_64 Operating System, E9.2-1
                    Copyright 2023 VMS Software, Inc.

  MDS Mitigation active, variant verw(MD_CLEAR)
%DECnet-I-LOADED, network base image loaded, version = 05.92.04

%DECnet-W-ZEROLEN, length of file is zero -- SYS$SYSROOT:[SYSEXE]NET$CONFIG.DAT

%SMP-I-CPUTRN, CPU #1 has joined the active set.
%SMP-I-CPUTRN, CPU #3 has joined the active set.
%SMP-I-CPUTRN, CPU #2 has joined the active set.
%STDRV-I-STARTUP, OpenVMS startup begun at 10-APR-2023 22:07:36.43
%RUN-S-PROC_ID, identification of created process is 00000404
%%%%%%%%%%%  OPCOM  10-APR-2023 22:07:38.27  %%%%%%%%%%%
Operator _REMY1$OPA0: has been enabled, username SYSTEM

%%%%%%%%%%%  OPCOM  10-APR-2023 22:07:38.27  %%%%%%%%%%%
Operator status for operator _REMY1$OPA0:
CENTRAL, PRINTER, TAPES, DISKS, DEVICES, CARDS, NETWORK, CLUSTER, SECURITY,
LICENSE, OPER1, OPER2, OPER3, OPER4, OPER5, OPER6, OPER7, OPER8, OPER9, OPER10,
OPER11, OPER12

%%%%%%%%%%%  OPCOM  10-APR-2023 22:07:38.29  %%%%%%%%%%%
Logfile has been initialized by operator _REMY1$OPA0:
Logfile is REMY1::SYS$SYSROOT:[SYSMGR]OPERATOR.LOG;2

%SET-I-NEWAUDSRV, identification of new audit server process is 0000040A
%%%%%%%%%%%  OPCOM  10-APR-2023 22:07:38.29  %%%%%%%%%%%
Operator status for operator REMY1::SYS$SYSROOT:[SYSMGR]OPERATOR.LOG;2
CENTRAL, PRINTER, TAPES, DISKS, DEVICES, CARDS, NETWORK, CLUSTER, SECURITY,
LICENSE, OPER1, OPER2, OPER3, OPER4, OPER5, OPER6, OPER7, OPER8, OPER9, OPER10,
OPER11, OPER12

%%%%%%%%%%%  OPCOM  10-APR-2023 22:07:38.36  %%%%%%%%%%%
Message from user AUDIT$SERVER on REMY1
%AUDSRV-I-NEWSERVERDB, new audit server database created ( PC 00000000.8001A365)

%%%%%%%%%%%  OPCOM  10-APR-2023 22:07:38.38  %%%%%%%%%%%
Message from user AUDIT$SERVER on REMY1
%AUDSRV-I-REMENABLED, resource monitoring enabled for journal SECURITY

%%%%%%%%%%%  OPCOM  10-APR-2023 22:07:38.39  %%%%%%%%%%%
Message from user AUDIT$SERVER on REMY1
%AUDSRV-I-NEWOBJECTDB, new object database created ( PC 00000000.8001FA80)

%%%%%%%%%%%  OPCOM  10-APR-2023 22:07:38.43  %%%%%%%%%%%
Message from user SYSTEM on REMY1
%JBC-E-OPENERR, error opening SYS$COMMON:[SYSEXE]QMAN$MASTER.DAT;

%%%%%%%%%%%  OPCOM  10-APR-2023 22:07:38.43  %%%%%%%%%%%
Message from user SYSTEM on REMY1
-RMS-E-FNF, file not found

%LICENSE-F-EMTLDB, license database contains no license records
%%%%%%%%%%%  OPCOM  10-APR-2023 22:07:38.53  %%%%%%%%%%%
Message from user SYSTEM on REMY1
%SECSRV-I-SERVERSTARTINGU, security server starting up


%%%%%%%%%%%  OPCOM  10-APR-2023 22:07:38.54  %%%%%%%%%%%
Message from user SYSTEM on REMY1
%SECSRV-I-CIACRECLUDB, security server created cluster intrusion database


%%%%%%%%%%%  OPCOM  10-APR-2023 22:07:38.54  %%%%%%%%%%%
Message from user SYSTEM on REMY1
%SECSRV-I-CIASTARTINGUP, breakin detection and evasion processing now starting u
p


%%%%%%%%%%%  OPCOM  10-APR-2023 22:07:38.61  %%%%%%%%%%%
Message from user SYSTEM on REMY1
TDF-I-SETTDF TDF set new timezone differential

Copyright 2023 VMS Software, Inc.
%NET$STARTUP-W-NONETCONFIG, this node has not been configured to run DECnet-Plus
 for OpenVMS
        use SYS$MANAGER:NET$CONFIGURE.COM if you wish to configure DECnet
%NET$STARTUP-I-OPERSTATUS, DECnet-Plus for OpenVMS operational status is OFF
%DECdtm-F-NODECnet, the TP_SERVER process was not started because either:

o  DECnet-Plus is not started or is not configured, or

o  The SYS$NODE_FULLNAME logical name is not defined

   This could be because when you installed DECnet-Plus and were prompted
   for the system's full name, you specified a local name instead of a
   DECdns or Domain name.

If you want to use DECdtm services, make sure that DECnet-Plus is started and
configured and that SYS$NODE_FULLNAME is defined, then use the following
command to start the TP_SERVER process:

    $ @SYS$STARTUP:DECDTM$STARTUP.COM

%%%%%%%%%%%  OPCOM  10-APR-2023 22:07:39.00  %%%%%%%%%%%
Message from user SYSTEM on REMY1
%LICENSE-E-NOAUTH, VSI OPENVMS-X86 use is not authorized on this node
-LICENSE-F-NOLICENSE, no license is active for this software product
-LICENSE-I-SYSMGR, please see your system manager


%LICENSE-E-NOAUTH, VSI OPENVMS-X86 use is not authorized on this node
-LICENSE-F-NOLICENSE, no license is active for this software product
-LICENSE-I-SYSMGR, please see your system manager
Startup processing continuing...

%STARTUP-I-AUDITCONTINUE, audit server initialization complete
%%%%%%%%%%%  OPCOM  10-APR-2023 22:07:40.02  %%%%%%%%%%%
Message from user AUDIT$SERVER on REMY1
Security alarm (SECURITY) and security audit (SECURITY) on REMY1, system id: 106
6
Auditable event:          Audit server starting up
Event time:               10-APR-2023 22:07:40.00
PID:                      00000403
Username:                 SYSTEM


The OpenVMS system is now executing the site-specific startup commands.

%%%%%%%%%%%  OPCOM  10-APR-2023 22:07:40.45  %%%%%%%%%%%
Message from user AUDIT$SERVER on REMY1
Security alarm (SECURITY) and security audit (SECURITY) on REMY1, system id: 106
6
Auditable event:          Identifier added
Event time:               10-APR-2023 22:07:40.45
PID:                      00000403
Process name:             STARTUP
Username:                 SYSTEM
Process owner:            [SYSTEM]
Image name:               REMY1$DKA0:[SYS0.SYSCOMMON.][SYSEXE]AUTHORIZE.EXE
Identifier name:          SYS$NODE_REMY1
Identifier value:         %X80010000
Attributes:               none
Posix UID:                -2
Posix GID:                -2 (%XFFFFFFFE)

%UAF-I-RDBADDMSG, identifier SYS$NODE_REMY1 value %X80010000 added to rights dat
abase
%%%%%%%%%%%  OPCOM  10-APR-2023 22:07:40.54  %%%%%%%%%%%
Message from user AUDIT$SERVER on REMY1
Security alarm (SECURITY) and security audit (SECURITY) on REMY1, system id: 106
6
Auditable event:          Identifier added
Event time:               10-APR-2023 22:07:40.54
PID:                      00000403
Process name:             STARTUP
Username:                 SYSTEM
Process owner:            [SYSTEM]
Image name:               REMY1$DKA0:[SYS0.SYSCOMMON.][SYSEXE]AUTHORIZE.EXE
Identifier name:          DECW$WS_QUOTA
Identifier value:         %X80010001
Attributes:               none
Posix UID:                -2
Posix GID:                -2 (%XFFFFFFFE)

%UAF-I-RDBADDMSG, identifier DECW$WS_QUOTA value %X80010001 added to rights data
base
%%%%%%%%%%%  OPCOM  10-APR-2023 22:07:40.62  %%%%%%%%%%%
Message from user AUDIT$SERVER on REMY1
Security alarm (SECURITY) and security audit (SECURITY) on REMY1, system id: 106
6
Auditable event:          Identifier added
Event time:               10-APR-2023 22:07:40.62
PID:                      00000403
Process name:             STARTUP
Username:                 SYSTEM
Process owner:            [SYSTEM]
Image name:               REMY1$DKA0:[SYS0.SYSCOMMON.][SYSEXE]IMGDMP_RIGHTS.EXE;
1
Identifier name:          IMGDMP$READALL
Identifier value:         %X90390001
Attributes:               none
Posix UID:                -2
Posix GID:                -2 (%XFFFFFFFE)

%PROCDUMP-I-CREATED, rights identifier IMGDMP$READALL successfully created
%PROCDUMP-I-CREATED, rights identifier IMGDMP$PROTECT successfully created
%%%%%%%%%%%  OPCOM  10-APR-2023 22:07:40.69  %%%%%%%%%%%
Message from user AUDIT$SERVER on REMY1
Security alarm (SECURITY) and security audit (SECURITY) on REMY1, system id: 106
6
Auditable event:          Identifier added
Event time:               10-APR-2023 22:07:40.69
PID:                      00000403
Process name:             STARTUP
Username:                 SYSTEM
Process owner:            [SYSTEM]
Image name:               REMY1$DKA0:[SYS0.SYSCOMMON.][SYSEXE]IMGDMP_RIGHTS.EXE;
1
Identifier name:          IMGDMP$PROTECT
Identifier value:         %X90390002
Attributes:               RESOURCE
Posix UID:                -2
Posix GID:                -2 (%XFFFFFFFE)

%SET-I-INTSET, login interactive limit = 64, current interactive value = 0
%RUN-S-PROC_ID, identification of created process is 00000410
%%%%%%%%%%%  OPCOM  10-APR-2023 22:07:40.83  %%%%%%%%%%%
Message from user SYSTEM on REMY1
%SMHANDLER-S-STARTUP, server management event handler startup

%%%%%%%%%%%  OPCOM  10-APR-2023 22:07:41.55  %%%%%%%%%%%
Message from user SYSTEM on REMY1
%SECSRV-I-PROXYSTARTINGUP, proxy processing now starting up


%%%%%%%%%%%  OPCOM  10-APR-2023 22:07:41.55  %%%%%%%%%%%
Message from user SYSTEM on REMY1
%SECSRV-E-NOPROXYDB, cannot find proxy database file NET$PROXY.DAT
%RMS-E-FNF, file not found


  SYSTEM       job terminated at 10-APR-2023 22:07:42.83

  Accounting information:
  Buffered I/O count:               3028      Peak working set size:      13936
  Direct I/O count:                 1563      Peak virtual size:         278096
  Page faults:                      4052      Mounted volumes:                0
  Charged CPU time:        0 00:00:02.50      Elapsed time:       0 00:00:06.46
Finally. Press ENTER to start the login:
 Welcome to OpenVMS (TM) x86_64 Operating System, Version E9.2-1

Username:
Enter SYSTEM
Password:
Enter the password you provided during installation. Mine is PASSW0RD.
%LICENSE-I-NOLICENSE, no license is active for this software product
%LOGIN-S-LOGOPRCON, login allowed from OPA0:
VMS Software, Inc. OpenVMS (TM) x86_64 Operating System, E9.2-1
$
You can now enter commands, like SHOW SYSTEM:
$ SHOW SYSTEM
OpenVMS E9.2-1  on node REMY1   10-APR-2023 22:10:00.16   Uptime  0 00:02:24
  Pid    Process Name    State  Pri      I/O       CPU       Page flts  Pages
00000401 SWAPPER         HIB     16        0   0 00:00:00.02         0     17
00000405 FASTPATH_SERVER HIB     10        8   0 00:00:00.01       161    202
00000406 IPCACP          HIB     10        8   0 00:00:00.00       138    180
00000407 ERRFMT          HIB      9       47   0 00:00:00.03       186    231
00000409 OPCOM           HIB      9       53   0 00:00:00.05       157    205
0000040A AUDIT_SERVER    HIB      9      127   0 00:00:00.06       242    302
0000040B JOB_CONTROL     HIB     10       26   0 00:00:00.04       177    243
0000040D SECURITY_SERVER HIB     10       38   0 00:00:00.02       286    342 M
00000410 SMHANDLER       HIB      8       50   0 00:00:00.03       270    294
00000411 SYSTEM          CUR   0  7       93   0 00:00:00.05       374    321
List all logged in users:
$ SHOW USERS /FULL
      OpenVMS User Processes at 10-APR-2023 22:10:43.32
    Total number of users = 1,  number of processes = 1

 Username Process Name    PID     Terminal
 SYSTEM   SYSTEM        00000411  OPA0:
List all the files in the current folder:
$ DIR

Directory SYS$SYSROOT:[SYSMGR]

ACCOUNTNG.DAT;1     CLUE$STARTUP_REMY1.LOG;1                IOGEN$PREFIX.DAT;1
NET$INSTALL_IDENTIFIERS.LOG;1           OPERATOR.LOG;2      OPERATOR.LOG;1
SYS$DUMP_CONFIG.DAT;1                   SYS$SMHANDLER.LOG;1 VMSIMAGES.DAT;1

Total of 9 files.

Directory SYS$COMMON:[SYSMGR]

ACME$START.COM;1    ACME$START.TEMPLATE;1
AGEN$NEW_NODE_DEFAULTS.TEMPLATE;1       AGEN$NEW_SATELLITE_DEFAULTS.TEMPLATE;1
AMDS$DIAGNOSTICS.COM;1                  AMDS$DRIVER_ACCESS.DAT;1
AMDS$DRIVER_ACCESS.TEMPLATE;1           AMDS$LOGICALS.COM;1
AMDS$LOGICALS.TEMPLATE;1                AMDS$SYSTARTUP.TEMPLATE;1
CDE$STARTUP.COM;1   CDRECORD.COM;1      CLUSTER_CONFIG.COM;1
CLUSTER_CONFIG_LAN.COM;1                CREATE_SPECIAL_ACCOUNTS.COM;1
CTF$STARTUP.COM;1   DBLSTRTUP.COM;1     DECNET_DNS_REGISTER.COM;1
DECNET_DNS_TOWERS.COM;1                 DECNET_LOC_REGISTER.COM;1
DECNET_REGISTER_DECDNS.COM;1            DECW$ATOMCONTROL.TEMPLATE;1
DECW$CONSOLE.COM;1  DECW$DEFAULT_DESKTOP.COM;1              DECW$DEVICE.COM;1
DECW$DEVICE_CONFIG_COMMON.COM;1         DECW$EURO_APPS_SETUP.TEMPLATE;1
DECW$EURO_SERVER_SETUP.TEMPLATE;1       DECW$GETPARAMS.COM;1
DECW$INSTALL_IMAGES.COM;1               DECW$LBXPROXY.COM;1
DECW$LBXPROXY.DECW$PMCFG;1              DECW$LBXPROXY_SUB.COM;1
DECW$LOGICALS.COM;1 DECW$MWM.COM;1      DECW$PRIVATE_APPS_SETUP.TEMPLATE;1
DECW$SETPARAMS.COM;1                    DECW$STARTAPPS.COM;1
DECW$STARTI18N.COM;1                    DECW$STARTLIBS.COM;1
DECW$STARTSM.COM;1  DECW$STARTUP.COM;1  DECW$START_PROXY.COM;1
DECW$SYLOGIN.TEMPLATE;1                 DNS$CLERK_CLUSTER.NCL;1
DNS$CONFIGURE.COM;1 DTSS$CONFIG.COM;1   DTSS$CONFIG_TEMPLATE.DAT;1
EDTINI.TEMPLATE;1   ICC$ADD_REGISTRY_TABLE.COM;1
ICC$CREATE_SECURITY_OBJECT.COM;1        IOGEN$PREFIX.TEMPLATE;1
ISA_CONFIG.TEMPLATE;1                   ISIS$CONFIGURE.COM;1
ISIS$CONFIGURE_HELP.COM;1               JBC$DST_COMMAND.COM;1
KRB$LOGICALS.COM;1  KRB$SYMBOLS.COM;1   LAT$SYSTARTUP.COM;1
LAT$SYSTARTUP.TEMPLATE;1                LIB$DT_STARTUP.COM;1
LOGIN.COM;1         LOGIN.TEMPLATE;1    NET$APPLICATION_SHUTDOWN.TEMPLATE;1
NET$AUTOGEN.COM;1   NET$CONFIGURE.COM;1 NET$DNS_CLERK_STARTUP.NCL;1
NET$DNS_CLERK_STOP.NCL;1                NET$DTSS_CLERK_STARTUP.NCL;1
NET$EVENT_LOCAL.TEMPLATE;1              NET$LOGICALS.TEMPLATE;1
NET$SHUTDOWN.COM;1  RTTLOAD.COM;1       SECURITY.AUDIT$JOURNAL;1
SMISERVER.COM;1     SSH$RUN_CLEANUP_PROCEDURE.COM;1         SYCONFIG.COM;1
SYCONFIG.TEMPLATE;1 SYLOGICALS.COM;1    SYLOGICALS.TEMPLATE;1
SYLOGIN.COM;1       SYLOGIN.TEMPLATE;1  SYPAGSWPFILES.COM;1
SYPAGSWPFILES.TEMPLATE;1                SYS$DUMP_CONFIG.TEMPLATE;1
SYS$INDICTMENT_POLICY.COM;1             SYS$INDICTMENT_POLICY.TEMPLATE;1
SYS$LOGIN_SWITCH.COM;1                  SYS$NET_SERVICES_TCPIP.COM;1
SYSECURITY.COM;1    SYSECURITY.TEMPLATE;1                   SYSHUTDWN.COM;1
SYSHUTDWN.TEMPLATE;1                    SYSHUTDWN_0010.COM;1
SYSHUTDWN_0010.TEMPLATE;1               SYSTARTUP_VMS.COM;1
SYSTARTUP_VMS.TEMPLATE;1                TCPIP$BINDSETUP.COM;1
TCPIP$BINDSETUP_HELP.TXT;1              TCPIP$BIND_CLUSTER_SETUP.COM;1
TCPIP$BIND_SHUTDOWN.COM;1               TCPIP$BIND_STARTUP.COM;1
TCPIP$BOOTP_SHUTDOWN.COM;1              TCPIP$BOOTP_STARTUP.COM;1
TCPIP$CALLBACKS.COM;1                   TCPIP$CONFIG.COM;1
TCPIP$CUSTOMER_SERVICE_SHUTDOWN.COM;1   TCPIP$CUSTOMER_SERVICE_STARTUP.COM;1
TCPIP$DEFINE_COMMANDS.COM;1             TCPIP$DHCP_CLIENT_SHUTDOWN.COM;1
TCPIP$DHCP_CLIENT_STARTUP.COM;1         TCPIP$DHCP_SHUTDOWN.COM;1
TCPIP$DHCP_STARTUP.COM;1                TCPIP$FAILSAFE_SHUTDOWN.COM;1
TCPIP$FAILSAFE_STARTUP.COM;1            TCPIP$FINGER_SHUTDOWN.COM;1
TCPIP$FINGER_STARTUP.COM;1              TCPIP$FTP_CLIENT_SHUTDOWN.COM;1
TCPIP$FTP_CLIENT_STARTUP.COM;1          TCPIP$FTP_SHUTDOWN.COM;1
TCPIP$FTP_STARTUP.COM;1                 TCPIP$IMAP_SHUTDOWN.COM;1
TCPIP$IMAP_STARTUP.COM;1                TCPIP$INET_DRIVER_SHUTDOWN.COM;1
TCPIP$INET_DRIVER_STARTUP.COM;1         TCPIP$INET_SHUTDOWN.COM;1
TCPIP$INET_STARTUP.COM;1                TCPIP$IP6_SETUP.COM;1
TCPIP$IPSEC_SHUTDOWN.COM;1              TCPIP$IPSEC_STARTUP.COM;1
TCPIP$LBROKER_SHUTDOWN.COM;1            TCPIP$LBROKER_STARTUP.COM;1
TCPIP$LOCKD_SHUTDOWN.COM;1              TCPIP$LOCKD_STARTUP.COM;1
TCPIP$LPD_SHUTDOWN.COM;1                TCPIP$LPD_STARTUP.COM;1
TCPIP$METRIC_SHUTDOWN.COM;1             TCPIP$METRIC_STARTUP.COM;1
TCPIP$NFS_CLIENT_SHUTDOWN.COM;1         TCPIP$NFS_CLIENT_STARTUP.COM;1
TCPIP$NFS_SHUTDOWN.COM;1                TCPIP$NFS_STARTUP.COM;1
TCPIP$NTP_SHUTDOWN.COM;1                TCPIP$NTP_STARTUP.COM;1
TCPIP$PCNFS_SHUTDOWN.COM;1              TCPIP$PCNFS_STARTUP.COM;1
TCPIP$POP_SHUTDOWN.COM;1                TCPIP$POP_STARTUP.COM;1
TCPIP$PORTMAPPER_SHUTDOWN.COM;1         TCPIP$PORTMAPPER_STARTUP.COM;1
TCPIP$PROXY_SHUTDOWN.COM;1              TCPIP$PROXY_STARTUP.COM;1
TCPIP$PWIP_DRIVER_SHUTDOWN.COM;1        TCPIP$PWIP_DRIVER_STARTUP.COM;1
TCPIP$REXEC_SHUTDOWN.COM;1              TCPIP$REXEC_STARTUP.COM;1
TCPIP$RLOGIN_SHUTDOWN.COM;1             TCPIP$RLOGIN_STARTUP.COM;1
TCPIP$RMT_CHECK_ACCESS.COM;1            TCPIP$RMT_SHUTDOWN.COM;1
TCPIP$RMT_STARTUP.COM;1                 TCPIP$RSH_SHUTDOWN.COM;1
TCPIP$RSH_STARTUP.COM;1                 TCPIP$SMTP_SHUTDOWN.COM;1
TCPIP$SMTP_STARTUP.COM;1                TCPIP$SNMP_SHUTDOWN.COM;1
TCPIP$SNMP_STARTUP.COM;1                TCPIP$STATD_SHUTDOWN.COM;1
TCPIP$STATD_STARTUP.COM;1               TCPIP$SYMBOLS.COM;1
TCPIP$TELNETSYM_SHUTDOWN.COM;1          TCPIP$TELNETSYM_STARTUP.COM;1
TCPIP$TELNET_SHUTDOWN.COM;1             TCPIP$TELNET_STARTUP.COM;1
TCPIP$TFTP_SHUTDOWN.COM;1               TCPIP$TFTP_STARTUP.COM;1
TCPIP$UCP_SHUTDOWN.COM;1                TCPIP$UCP_STARTUP.COM;1
TCPIP$V51_CONVERSION.COM;1              TCPIP$XDM_SHUTDOWN.COM;1
TCPIP$XDM_STARTUP.COM;1                 TFF$SYSTARTUP.COM;1
TFF$SYSTARTUP.TEMPLATE;1                UCX$CONFIG.COM;1    UCX$STARTUP.COM;1
USB$STARTUP.COM;1   UTC$TIME_SETUP.COM;1
VMS$AUDIT_SERVER.DAT;1                  VMS$DEFINE_PASSWORD_POLICY.COM;1
VMS$IMAGES_MASTER.DAT;1                 VMSIMAGES.DAT;1     VSI$SUPPORT.COM;1
WELCOME.TEMPLATE;1  WELCOME.TXT;1

Total of 194 files.

Grand total of 2 directories, 203 files.
$
Before continueing with the network and SSH setup, remember that clock / hpet
command? Shutdown the system with the SHUTDOWN command. Then, on an administrative
Windows Command Prompt, enter the command:
"\Program Files\Oracle\VirtualBox\VBoxManage.exe" modifyvm openvms-9.2-raymii --hpet on
Configuring PAKs and networking
The next part of this guide will show you how to install the PAKs (license keys) and how to setup networking / SSH. You can look at my other OpenVMS articles to read more on OpenVMS usage.
Update: 15-4-2023: You can read the next part of the guide here.
Tags: alpha , blog , dec , itanium , openvms , pdp , vax , vms , vsi , x86