Raymii.org

אֶשָּׂא עֵינַי אֶל־הֶהָרִים מֵאַיִן יָבֹא עֶזְרִֽי׃Home | About | All pages | Cluster Status | RSS Feed
OpenVMS 9.2 for x86, Getting Started part 2, auto boot, licenses, PAKs, networking and SSH
Published: 15-04-2023 22:30 | Author: Remy van Elst | Text only version of this article
❗ This post is over three years old. It may no longer be up to date. Opinions may have changed.
Table of Contents
![]()
OpenVMS on x86 is now available for hobbyists! Almost a year after the official release. This is a part 2 of my getting started guide. Part 1 ended with an installed system, this part continues with automatic startup, activating the license files (PAKs) and setting up networking including SSH access.
You can read all my OpenVMS articles here.
This guide is a summarized / shorter version of the official installation guide. It is tailored for hobbyist usage using VirtualBox and helps you to get set up quickly. Please refer to the official documentation for any questions. The official documentation is targeted at VMWare ESXi, this guide is for VirtualBox.
This guide is a follow up on part 1 of my guide. After following that
guide you should have an installed OpenVMS system in VirtualBox. Make sure you also
have the license files(x86community-20240401.zip) from
https://sp.vmssoftware.com.
- Update: 16-4-2023: You can read part 3 of the guide here, it covers installing the WebUI, a web based management tool:
Make a snapshot
Open up VirtualBox, select the shut-down OpenVMS machine and press
CTRL+SHIFT+T, or in the menu bar select Snapshots -> Take Snapshot. Give
it a name like After initial installation and continue.
Do this after every step in the guide or after every customization that you make, if you do make a mistake, you can fall back to the snapshot and not have to start all over again.
Automatic start / bootup
During the installation you had to type VMS_BOOTMGR in the UEFI Shell to get
into the OpenVMS Boot Manager, then you needed to type BOOT DKA0 to start
from the disk. This is cumbersome and on a real server you would want it to
boot automatically. Start the VM and in the EFI Shell> prompt, type EDIT
fs0:efi\boot\startup.nsh to open a basic editor. Enter the following:
VMS_BOOTMGR DKA0 -fl 0,0
Then press CTRL+S to save the file and CTRL+Q to exit the editor.
Reset / restart the VM, then after the UEFI shell has automatically opened the Boot Manager, enter the following commands:
AUTOBOOT DKA0
SAVE
BOOT DKA0
The first line will enable auto boot, the next line tells OpenVMS which
device to (auto) boot from. Complete the boot sequence, login with the
SYSTEM account and then execute the SHUTDOWN command.
The next boot will show the following auto boot:
BOOT MANAGER DEVICE:  DKA0
DEFAULT BOOT COMMAND: BOOT DKA0 0 00000000

[...]

Press <ESC> to stop automatic action or any other key to skip countdown and continue.

5...4...3...2...1...

Booting...
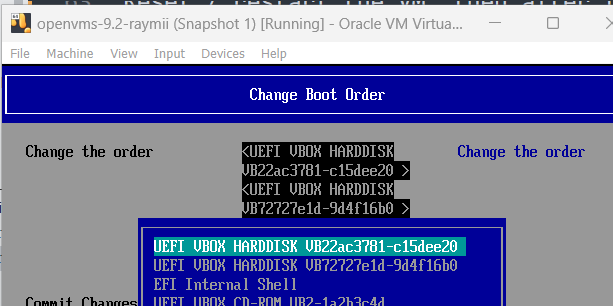
If it fails, you might have to change the VirtualBox Boot Order. Reset the VM, press ESC a few times quickly to get into a different UEFI menu, sort of like a BIOS menu.
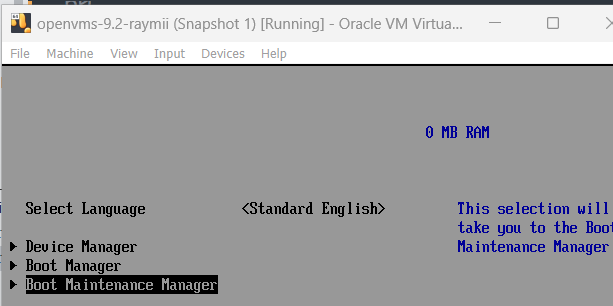
Select Boot Manager Options, then Boot Order,
then Change Boot Order. Use the + and - keys to move the VirtualBox
Hard Disks above the UEFI Shell option, then Save and Continue booting.
Once auto boot is working correctly, make another VirtualBox snapshot.
Telnet settings
OpenVMS requires specific telnet settings. I'm using WSL and the Ubuntu telnet
client, but PuTTY is a great option as well. For a Linux terminal, press and
hold CTRL, then press ]. The prompt changes to telnet>. You need to enter
the command:
unset crlf
Press CTRL+] again and enter another command:
mode char
For PuTTY: Right-click on the window frame of your PuTTY session and select
Change Settings. In Terminal settings, check the following boxes:
- TURN OFF Implicit CR in every LF
- TURN OFF Implicit LF in every CR
- TURN OFF Local Echo
- TURN OFF Local line editing
License installation / PAKs
Boot up your OpenVMS virtual machine and log in using the SYSTEM account.
You should see the following:
%LICENSE-I-NOLICENSE, no license is active for this software product
%LOGIN-S-LOGOPRCON, login allowed from OPA0:
VMS Software, Inc. OpenVMS (TM) x86_64 Operating System, E9.2-1
Last interactive login on Monday, 10-APR-2023 22:08:44.88
The Community License file (x86community-20240401.zip) from
https://sp.vmssoftware.com is a ZIP file containing a long text file. If
you try to copy and paste it into the shell you will get an error:
$ $
%RMS-F-RER, file read error
-SYSTEM-W-DATAOVERUN, data overrun
Four years ago I made an ISO file for the licenses. This time, we'll just
manually activate the OPENVMS-X86-BOE license, which is what we need to setup
networking. Then we'll use OpenSSH to copy over the license file and execute
that script. Much easier and less trouble.
Check the txt file and look for the line OPENVMS-X86-BOE. Copy the
commands, line by line (not the entire command, that will fail):
LICENSE REGISTER OPENVMS-X86-BOE -
Press ENTER. Then paste:
/ISSUER=VSI -
Press ENTER. Then paste:
/AUTHORIZATION=...
Repeat this for every line in the license (PRODUCT, UNTIS, TERMINATION_DATE,
OPTIONS, CHECKSUM).
If you try to check the licenses, you'll note that none are active yet:
SHOW LICENSE
Output:
Active licenses on node REMY1:
%SHOW-I-NOLICENSE, no licenses exist
Load this specific license:
LICENSE LOAD OPENVMS-X86-BOE
Output:
%LICENSE-I-LOADED, VSI OPENVMS-X86-BOE was successfully loaded with 6 units
Now the SHOW LICENSE command will show that is is active:
Active licenses on node REMY1:

------- Product ID --------    ---- Rating ----- -- Version --
Product            Producer    Units PCL   Activ Version Release    Termination
OPENVMS-X86-BOE    VSI             6  1     0      0.0  (none)       1-APR-2024
With this license loaded you can setup networking and OpenSSH. Continue on, after network has been setup, we'll activate the full license file.
Network setup
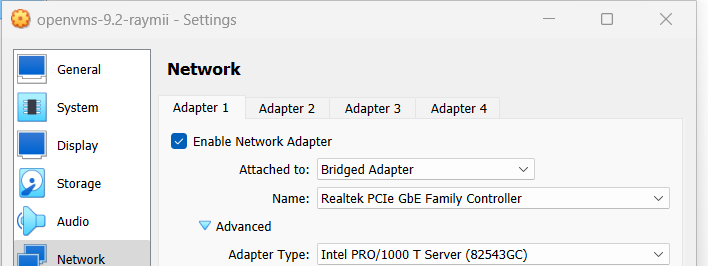
The VM should be shut down to edit the VirtualBox settings. Execute the
SHUTDOWN command to do that. Then, in VirtualBox, open the settings and
navigate to network and change the adapter from NAT to bridged. Select your
main network adapter. Under Advanced, select Intel PRO 1000 T Server as the
Adapter Type.
Bridging makes the VM become a real part of your network, other machines being able to access it. NAT would require port forwarding in VirtualBox which is a bit cumbersome.
After changing the network settings in VirtualBox, boot up the OpenVMS installation.
Login to the system account and execute the following command:
@tcpip$config
Output:
    VSI TCP/IP Services for OpenVMS Configuration Menu

    Configuration options:

             1  -  Core environment
             2  -  Client components
             3  -  Server components
             4  -  Optional components

             5  -  Shutdown VSI TCP/IP Services for OpenVMS
             6  -  Startup VSI TCP/IP Services for OpenVMS
             7  -  Run tests

             A  -  Configure options 1 - 4
            [E] -  Exit configuration procedure

Enter configuration option:
Enter A and press ENTER. Output:
    VSI TCP/IP Services for OpenVMS Core Environment Configuration Menu

    Configuration options:

             1  -  Domain
             2  -  Interfaces
             3  -  Routing
             4  -  BIND Resolver
             5  -  Time Zone

             A  -  Configure options 1 - 5
            [E] -  Exit menu

Enter configuration option:
Enter 1 and press ENTER. Output:
DOMAIN Configuration

Enter Internet domain: spnw.nl
Enter a domain name, I used spnw.nl and press ENTER. You'll be back in the
CORE menu. Select option 2 - Interfaces. Output:
      VSI TCP/IP Services for OpenVMS Interface & Address Configuration Menu

 Hostname Details: Configured=Not Configured, Active=Not Configured

 Configuration options:

   0  -  Set The Target Node (Current Node: REMY1)

   1  -  IE0 Menu (EIA0: TwistedPair 1000mbps)


  [E] -  Exit menu

Enter configuration option:
If you do not see option 1, make sure the VirtualBox network interface is set to
the Adapter Type Intel PRO 1000 T Server. Enter 1 and press ENTER. Output:
  VSI TCP/IP Services for OpenVMS Interface IE0 Configuration Menu (Node: REMY1)

 Configuration options:

         1  - Add a primary address on IE0
         2  - Add an alias address on IE0
         3  - Enable DHCP client to manage address on IE0

        [E] - Exit menu

Enter configuration option:
Press 3, then ENTER. I'm going to use DHCP because that is easier. I can
setup a static IP in my router (via DHCP). Output:
No interface is configured as the DHCP PRIMARY.
    Either configure a DHCP PRIMARY or manually configure
    the system-wide parameters.

    DHCP Client configures system-wide parameters and
    interface-specific parameters.  Only one interface, the
    DHCP "primary" interface, can receive system-wide
    parameters.

Configure IE0 as the DHCP PRIMARY? (Y,N,HELP) [Y]:
Press ENTER to accept the default of Y. Then press E to exit the
Interfaces menu. You're back in the main menu. Press 3 to enter the
Routing menu. Output:
DYNAMIC ROUTING Configuration


        Dynamic routing has not been configured.

        You may configure dynamic ROUTED or GATED routing.
        You cannot enable both at the same time.  If you want
        to change from one to the other, you must disable the
        current routing first, then enable the desired routing.

        If you enable dynamic ROUTED routing, this host will use the
        Routing Information Protocol (RIP) - Version 1 to listen
        for all dynamic routing information coming from other
        hosts to update its internal routing tables.
        It will also supply its own Internet addresses to
        routing requests made from remote hosts.

        If you enable dynamic GATED routing, you will be able to
        configure this host to use any combination of the following
        routing protocols to exchange dynamic routing information
        with other hosts on the network:
            Routing Information Protocol (RIP) - Version 1 & 2
            Router Discovery Protocol (RDISC)
            Open Shortest Path First (OSPF)
            Exterior Gateway Protocol (EGP)
            Border Gateway Protocol (BGP-4)
            Static routes

* Do you want to configure dynamic ROUTED or GATED routing [NO]:
Press ENTER to accept the default of NO. Output:
    A default route has not been configured.
* Do you want to configure a default route [YES]:
Press ENTER to accept the default of YES. Output:
Enter your Default Gateway host name or address:
Enter the IP of your router. Mine is 192.168.1.1. Press ENTER, output:
    192.168.1.1 is not in the local host database.
    If you want to enter the default gateway in the local host
    database, enter its host name. Otherwise, enter <CR>.

Enter the Default Gateway host name []: router
I entered router. Press ENTER. You're now back in the core menu. Enter 4
to enter the BIND DNS Resolver menu. Output:
BIND RESOLVER Configuration

        A BIND resolver has not been configured.

        VSI TCP/IP Services for OpenVMS supports the Berkeley Internet Name
        Domain (BIND) resolver.  BIND is a network service that enables clients
        to name resources or objects and share information with other objects
        on the network.

        Before configuring your system as a BIND resolver, you should
        first be sure that there is at least one system on the network
        configured as either a BIND primary or secondary server for
        this domain.

        You can specify a BIND server by its address or name;
        however, if specified by name, an entry for it must
        exist in the TCPIP$HOST database.

        You will be asked one question for each server.
        Press Return at the prompt to terminate the list.

Enter your BIND server name:
I entered my router's IP address here, 192.168.1.1. On the next server
prompt, I left that empty and pressed ENTER. You're now back in the Core
menu.
Press E to go back to the main TCP/IP menu, then press 6 to start the
TCP/IP services. Bunch of output, but it should end with:
%TCPIP-I-FSIPADDRUP, IE0 192.168.1.23 primary active on node REMY1, interface IE0

Press <ENTER> key to continue ...
192.168.1.23 is the DHCP address. Press ENTER, then press E to exit this
menu.
The last step is to enable auto start of the TCP/IP services, otherwise, after a
reboot, you'll have no networking. Edit the following file: SYS$COMMON:
[SYSMGR]SYSTARTUP_VMS.COM and remove the exclamation point (!) from the
beginning of the following line:
$!$ @SYS$STARTUP:TCPIP$STARTUP.COM
You can edit this file with the following command:
EDIT /EDT SYS$COMMON:[SYSMGR]SYSTARTUP_VMS.COM
You'll enter a line editor. To switch to visual mode, type change followed by
ENTER. You can use the arrow keys to scroll down.
Exit visual mode with CTRL+Z, then type exit to save the file:
*exit
SYS$COMMON:[SYSMGR]SYSTARTUP_VMS.COM;2 418 lines
You should now be able to ping external resources from within OpenVMS:
$ ping 8.8.8.8
PING 8.8.8.8 (8.8.8.8): 56 data bytes2 418 lines
64 bytes from 8.8.8.8: icmp_seq=0 ttl=60 time=20 ms
64 bytes from 8.8.8.8: icmp_seq=1 ttl=60 time=20 ms
64 bytes from 8.8.8.8: icmp_seq=2 ttl=60 time=10 ms
64 bytes from 8.8.8.8: icmp_seq=3 ttl=60 time=10 ms


----8.8.8.8 PING Statistics----
4 packets transmitted, 4 packets received, 0% packet loss
round-trip (ms)  min/avg/max = 10/15/20 ms
Vice-versa, you should also be able to ping the OpenVMS VM, from a Linux machine for example:
$ ping -c 4 192.168.1.23
PING 192.168.1.23 (192.168.1.23) 56(84) bytes of data.
64 bytes from 192.168.1.23: icmp_seq=1 ttl=64 time=0.464 ms
64 bytes from 192.168.1.23: icmp_seq=2 ttl=64 time=0.572 ms
64 bytes from 192.168.1.23: icmp_seq=3 ttl=64 time=0.589 ms
64 bytes from 192.168.1.23: icmp_seq=4 ttl=64 time=0.688 ms

--- 192.168.1.23 ping statistics ---
4 packets transmitted, 4 received, 0% packet loss, time 3003ms
rtt min/avg/max/mdev = 0.464/0.578/0.688/0.081 ms
This is all for the networking setup. Test a reboot to make sure you've set up autostart correctly and don't forget to make a snapshot.
After a reboot you should see the following in the operator console:
%TCPIP-S-STARTDONE, TCPIP$DHCP_CLIENT startup completed
%TCPIP-S-STARTDONE, TCP/IP Services startup completed at 15-APR-2023 21:35:51.99

%EIA0, Link up: 1000 mbit, fdx, flow control (rcv only), 08-00-27-66-2F-C3
SSH Setup
OpenSSH has been integrated into OpenVMS x86-64 V9.2 as a required layered
product and is installed unconditionally. However, before OpenSSH can be used,
a few manual steps are needed after installation. Make sure you've set up
TCP/IP as shown in the previous paragraph.
Execute the following OpenSSH command procedures in the exact order listed:
@sys$common:[openssh.bin]ssh$create_account.com
Output:
   User Accounts and User Identification Codes (UICs)
   --------------------------------------------------

    The OpenVMS OpenSSH installation creates two OpenVMS accounts:
    SSH$SSH, SSH$SSHD. The default UIC group number for these new
    accounts depends on the following:

    o If you are installing the server for the first time, the
      default is the first unused UIC group number, starting
      with 3655.

    o If any of these accounts already exists, then the default
      UIC group number will not be used to change the UIC of
      any existing accounts.

    o If old account TCPIP$SSH already exists, then the default
      UIC group number will be used from TCPIP$SSH account.

    For more information about UIC group numbers, see the
    OpenVMS System Manager's Manual.

Enter default UIC group number for OpenSSH account
Group: [3656]
Accept the default 3656, press ENTER. Lots of output from OPCOM.
@sys$common:[openssh.bin]ssh$create_startup_file.com
Output:
SSH$ROOT is defined as "SYS$SYSDEVICE:[SYS0.SYSCOMMON.OPENSSH.]"
Setting file protections...
  File protections are set
Creating OpenSSH for OpenVMS root definition file SYS$COMMON:[SYS$STARTUP]SSH$DE
FINE_ROOT.COM...
  File created
Save startup files
Setup OpenSSH logical environment
@sys$common:[openssh.bin]ssh$generate_keys.com
Output, looks a lot like regular OpenSSH:
Generating public/private keys:
Generating public/private dsa key pair.
Created directory '/sys$login/ssh'.
Your identification has been saved in /SSH$ROOT/ETC/ssh_host_dsa_key
Your public key has been saved in /SSH$ROOT/ETC/ssh_host_dsa_key.pub
The key fingerprint is:
SHA256:OQediEAOnpg6yL69HiqS7RQxBbsyz6DgeIIpRljgyhE system@REMY1.spnw.nl
The key's randomart image is:
+---[DSA 1024]----+
|.Eoo+            |
|.=.* . . o .     |
|ooB . . o o      |
|B..+     o       |
|@+o     S .      |
|OO .     o       |
|B*=.             |
|*+= .            |
|o+o+.            |
+----[SHA256]-----+
Generating public/private ecdsa key pair.
Your identification has been saved in /SSH$ROOT/ETC/ssh_host_ecdsa_key
Your public key has been saved in /SSH$ROOT/ETC/ssh_host_ecdsa_key.pub
The key fingerprint is:
SHA256:bFJnWSWvMfibCBdjlMH3z3ixBzYKEw5+ZRTqUYxYemM system@REMY1.spnw.nl
The key's randomart image is:
+---[ECDSA 256]---+
|         ++**o.  |
|        oo=*=o   |
|       .ooE=o..  |
|       o.B=* +=. |
|      . S.oooo *o|
|       o o ..o..=|
|          . o  ..|
|                 |
|                 |
+----[SHA256]-----+
Generating public/private rsa key pair.
Your identification has been saved in /SSH$ROOT/ETC/ssh_host_rsa_key
Your public key has been saved in /SSH$ROOT/ETC/ssh_host_rsa_key.pub
The key fingerprint is:
SHA256:3QudzNhe0tHxyYueML70Kwd1r1mKyFZ35esoI2x4094 system@REMY1.spnw.nl
The key's randomart image is:
+---[RSA 3072]----+
|               . |
|              ..+|
|              .oo|
|         . B +.oo|
|        S +oX.+oo|
|          .+=+o =|
|        o..=+= *.|
|       . *===.=. |
|        o.+o=Eo. |
+----[SHA256]-----+
Generating public/private ed25519 key pair.
Your identification has been saved in /SSH$ROOT/ETC/ssh_host_ed25519_key
Your public key has been saved in /SSH$ROOT/ETC/ssh_host_ed25519_key.pub
The key fingerprint is:
SHA256:PAtsDDSTNMtm0BIASlOY2g3OW5+30MKxPGFuc6hGlvY system@REMY1.spnw.nl
The key's randomart image is:
+--[ED25519 256]--+
|++*=*.           |
|oo++o=           |
|o+ +*            |
|. +oo++.         |
|   o B=BS        |
|  . =.#.+o       |
|   + + B..       |
|    o E .        |
|   .             |
+----[SHA256]-----+
@sys$common:[openssh.bin]ssh$install_info.com
Output:
Purging installed files...

Successfully finished

   To automatically start OpenVMS OpenSSH during system startup
   add the following line to the file SYS$MANAGER:SYSTARTUP_VMS.COM
   after the TCPIP startup command procedure:

        $ @SYS$STARTUP:SSH$STARTUP.COM

   Define symbols for all OpenSSH utilities:

        $ @SSH$ROOT:[BIN]SSH$DEFINE_COMMANDS.COM
Start SSH manually to test it with the following command:
@SYS$STARTUP:SSH$STARTUP.COM
Output:
Enabling service...

  Successfully enabled SSHD22 service
Also execute the following command to get a few nice shell aliases:
@SSH$ROOT:[BIN]SSH$DEFINE_COMMANDS.COM ALL
To test OpenSSH, open another Linux terminal or PuTTY session and try to login:
[21:49:50] [remy@gateway] [ ~ ]
$ ssh system@192.168.1.23
system@192.168.1.23's password:

    Last interactive login on Saturday, 15-APR-2023 21:49:44.82
    Last non-interactive login on Wednesday, 17-NOV-1858 00:00:00.00
    1 failure since last successful login

$ show system
OpenVMS E9.2-1  on node REMY1   15-APR-2023 21:49:57.38   Uptime  0 00:08:39
  Pid    Process Name    State  Pri      I/O       CPU       Page flts  Pages
00000401 SWAPPER         HIB     16        0   0 00:00:00.03         0     17
00000404 LANACP          HIB     14       62   0 00:00:00.02       217    268
In the telnet terminal, edit the startup file and make sure OpenSSH is started at boot. The procedure is a lot like enabling TCP/IP.
Edit the following file: SYS$COMMON:[SYSMGR]SYSTARTUP_VMS.COM and add the
OpenSSH start commands after the TCP/IP startup commands, so below the
following line:
@SYS$STARTUP:TCPIP$STARTUP.COM
You can edit this file with the following command:
EDIT /EDT SYS$COMMON:[SYSMGR]SYSTARTUP_VMS.COM
You'll enter a line editor. To switch to visual mode, type change followed by
ENTER. You can use the arrow keys to scroll down.
Add the following lines below the TCP/IP startup command:
@SYS$STARTUP:SSH$STARTUP.COM
@SSH$ROOT:[BIN]SSH$DEFINE_COMMANDS.COM ALL
Exit visual mode with CTRL+Z, then type exit to save the file:
*exit
SYS$COMMON:[SYSMGR]SYSTARTUP_VMS.COM;4 422 lines
Try a reboot and if you did everything correctly, SSH login should be possible right after a reboot.
If you want to setup a different user for SSH access or login with a public key, please click those links. The instructions from 2018 should still work.
Activating the rest of the licenses (PAKs)
Now that we have networking and OpenSSH set up, it's much easier to copy the hobbyist license file over to our OpenVMS installation and execute it.
Make sure you've got networking and OpenSSH setup, as described above. From
another terminal or SCP client, copy over the X86COMMUNITY20240401.TXT
license file:
scp X86Community-20240401.txt system@192.168.1.23:
system@192.168.1.23's password:
X86Community-20240401.txt
In the OpenVMS prompt, execute the file we just copied over:
@X86Community-20240401.txt
Output:
%SHOW-I-NOLICMATCH, no licenses match search criteria
%LICENSE-I-DISABLED, ABS-CLIENT-X86 EVAL-X86COMMUNITY-E202304019999 has been dis
abled
%LICENSE-W-NOENT, no license was loaded for this product - VSI ABS-CLIENT-X86
%LICENSE-I-ENABLED, ABS-CLIENT-X86 EVAL-X86COMMUNITY-E202304019999 has been enab
[...]
That output continues on for a while. A few errors might appear, but afterwards you should be able to see all the licenses activated:
$ show license
Output:
Active licenses on node REMY1:

------- Product ID --------    ---- Rating ----- -- Version --
Product            Producer    Units PCL   Activ Version Release    Termination
ABS-CLIENT-X86     VSI             6  1     0      0.0  (none)       1-APR-2024
ABS-SERVER-X86     VSI             6  1     0      0.0  (none)       1-APR-2024
ACMS               VSI             6  1     0      0.0  (none)       1-APR-2024
ACMS-REM           VSI             6  1     0      0.0  (none)       1-APR-2024
ACMS-RT            VSI             6  1     0      0.0  (none)       1-APR-2024
AVAIL-MAN          VSI             6  1     0      0.0  (none)       1-APR-2024
BASIC              VSI             6  0     1      0.0  (none)       1-APR-2024
C                  VSI             6  0     1      0.0  (none)       1-APR-2024
CARTRIDGE-SERVER-V VSI             6  1     0      0.0  (none)       1-APR-2024
CMS                VSI             6  1     0      0.0  (none)       1-APR-2024
COBOL              VSI             6  0     1      0.0  (none)       1-APR-2024
CXX-V              VSI             6  0     1      0.0  (none)       1-APR-2024
DFG                VSI             6  1     0      0.0  (none)       1-APR-2024
DFS                VSI             6  1     0      0.0  (none)       1-APR-2024
DQS                VSI             6  1     0      0.0  (none)       1-APR-2024
DTM                VSI             6  1     0      0.0  (none)       1-APR-2024
DTR                VSI             6  1     0      0.0  (none)       1-APR-2024
DVNETEXT           VSI             6  1     0      0.0  (none)       1-APR-2024
FMS                VSI             6  1     0      0.0  (none)       1-APR-2024
FMS-RT             VSI             6  1     0      0.0  (none)       1-APR-2024
FORMS              VSI             6  1     0      0.0  (none)       1-APR-2024
FORMS-RT           VSI             6  1     0      0.0  (none)       1-APR-2024
FORTRAN            VSI             6  0     1      0.0  (none)       1-APR-2024
GKS                VSI             6  1     0      0.0  (none)       1-APR-2024
GKS-RT             VSI             6  1     0      0.0  (none)       1-APR-2024
LSE                VSI             6  1     0      0.0  (none)       1-APR-2024
MMS                VSI             6  1     0      0.0  (none)       1-APR-2024
OMNI               VSI             6  1     0      0.0  (none)       1-APR-2024
OPENVMS-X86-BOE    VSI             6  1     0      0.0  (none)       1-APR-2024
OPENVMS-X86-HAOE   VSI             6  1     0      0.0  (none)       1-APR-2024
OSAP               VSI             6  1     0      0.0  (none)       1-APR-2024
PASCAL             VSI             6  0     1      0.0  (none)       1-APR-2024
PCA                VSI             6  1     0      0.0  (none)       1-APR-2024
RMSJNL             VSI             6  1     0      0.0  (none)       1-APR-2024
RTR-CL             VSI             6  1     0      0.0  (none)       1-APR-2024
RTR-SVR            VSI             6  1     0      0.0  (none)       1-APR-2024
SAVE-SET-MANAGER   VSI             6  1     0      0.0  (none)       1-APR-2024
SW-RAID5           VSI             6  1     0      0.0  (none)       1-APR-2024
TDMS               VSI             6  1     0      0.0  (none)       1-APR-2024
TDMS-RT            VSI             6  1     0      0.0  (none)       1-APR-2024
VAXSET             VSI             6  1     0      0.0  (none)       1-APR-2024
VMSCLUSTER         VSI             6  1     0      0.0  (none)       1-APR-2024
VMSCLUSTER-CLIENT  VSI             6  1     0      0.0  (none)       1-APR-2024
VOLSHAD            VSI             6  1     0      0.0  (none)       1-APR-2024
X25                VSI             6  1     0      0.0  (none)       1-APR-2024
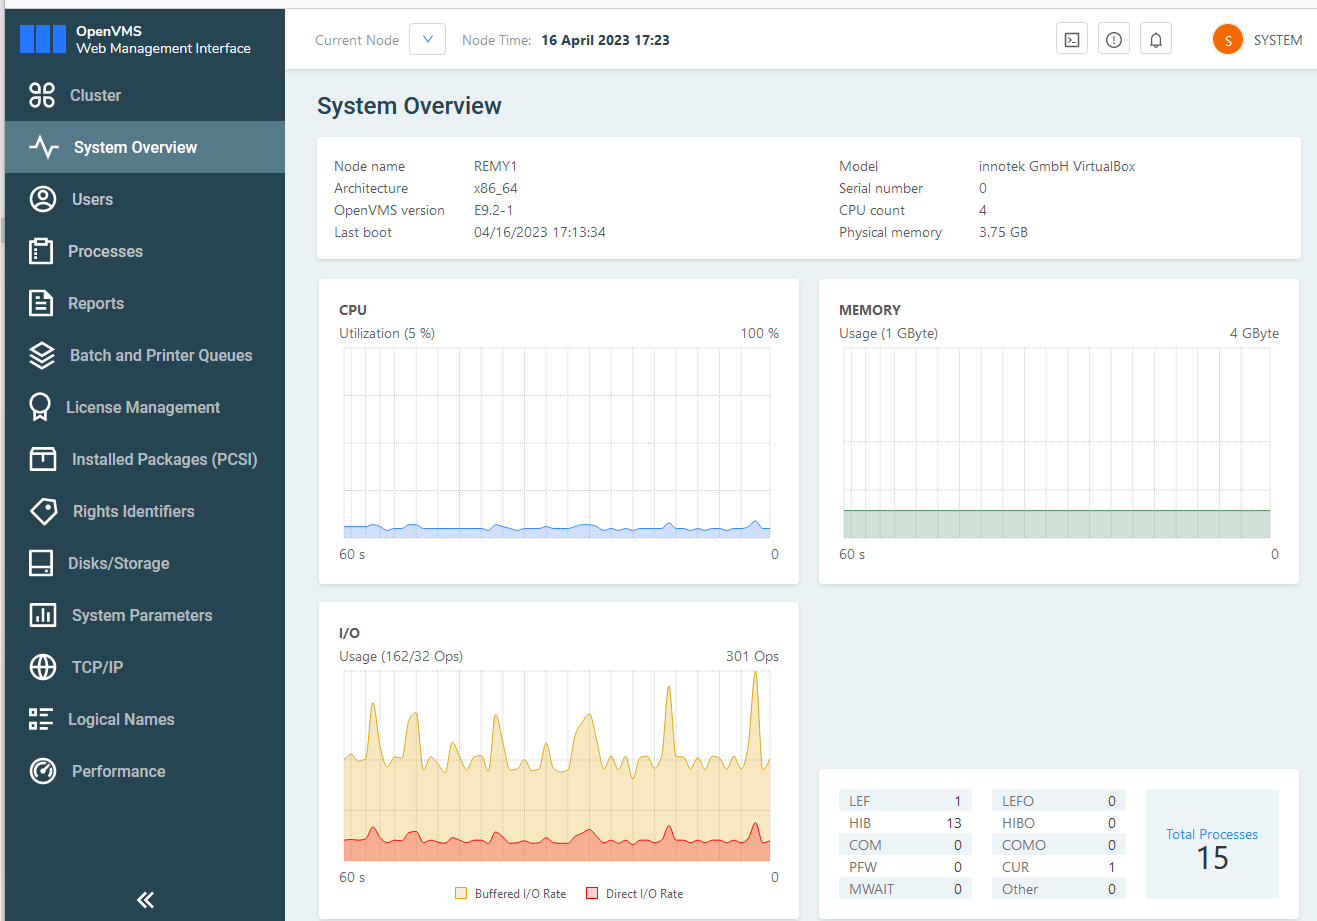
Congratulations! You've set up OpenVMS TCP/IP and OpenSSH and activated the hobbyist licenses. Well done! The next part of this guide covers installing the WebUI, you can read that part here. Here is a screenshot of the WebUI:
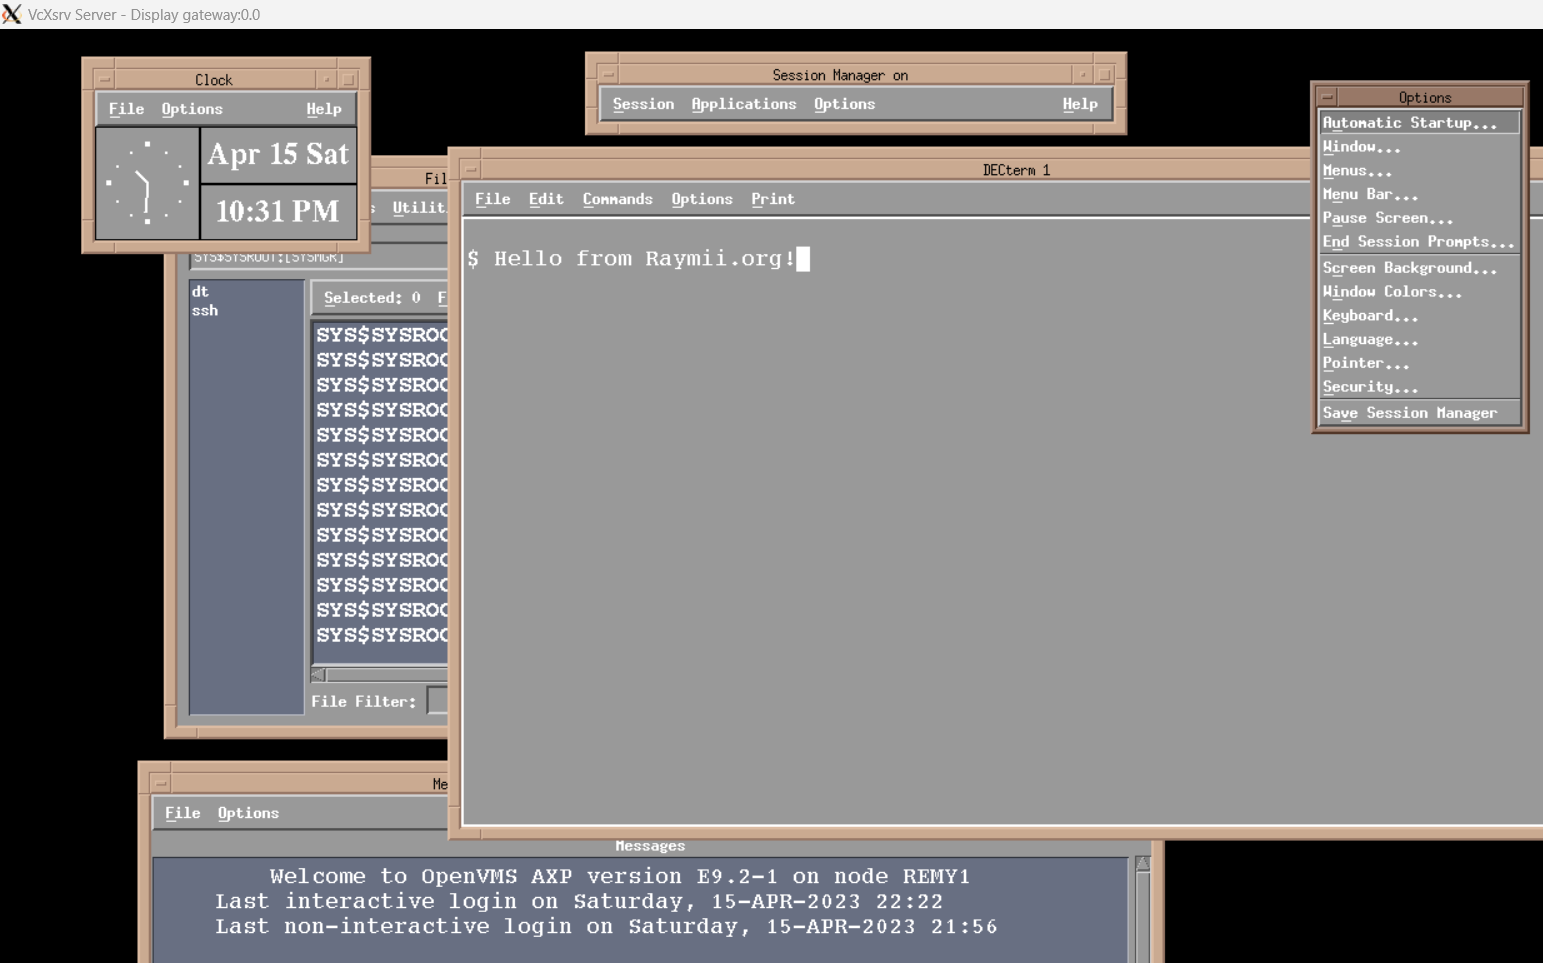
Here's a screenshot of DECWindows, running via X11 forwarding. I'm figuring
out how to start CDE, but that fails for some reason. When I get it working
expect an article on it: