Raymii.org

אֶשָּׂא עֵינַי אֶל־הֶהָרִים מֵאַיִן יָבֹא עֶזְרִֽי׃Home | About | All pages | Cluster Status | RSS Feed
OpenVMS 9.2 for x86, Getting Started part 3, the WebUI
Published: 16-04-2023 22:30 | Author: Remy van Elst | Text only version of this article
❗ This post is over three years old. It may no longer be up to date. Opinions may have changed.
Table of Contents
![]()
OpenVMS on x86 is now available for hobbyists! Almost a year after the official release. This is a part 3 of my getting started guide. Part 2 ended with a working network setup and SSH access. In part 3 we'll do something very exciting, installing the WebUI, a web based management interface for OpenVMS. I'll also share a few smaller tidbits, like how to use the interactive text editor via an ssh session and how to use unzip.
You can read all my OpenVMS articles here.
In part 3 of the OpenVMS on x86 guide we'll install the OpenVMS WebUI
and I'll show you a few smaller tidbits, like how to use the interactive
text editor via an ssh session and how to use unzip. I wanted to also
install a C++ compiler and compile a demo program, but the guide turned out
to be long enough just installing the WebUI and its dependencies.
You need to follow along with my guide, part 1 covering the installation is here and part 2 covering network and ssh is here. I'm going to use SSH to copy over files so you must have that set up, or be comfortable in getting files over via FTP, but you have to set that up yourself.
Part of this guide is based on the official installation documents from VSI. I'm tailoring them for beginners and hobbyists, but please do check the official documentation, it's super comprehensive and you can learn a lot from it.
Boot up your OpenVMS virtual machine, if you've followed the earlier parts of my guide you should have automatic boot setup just as networking and OpenSSH. Login to your OpenVMS machine via SSH for the rest of this guide.
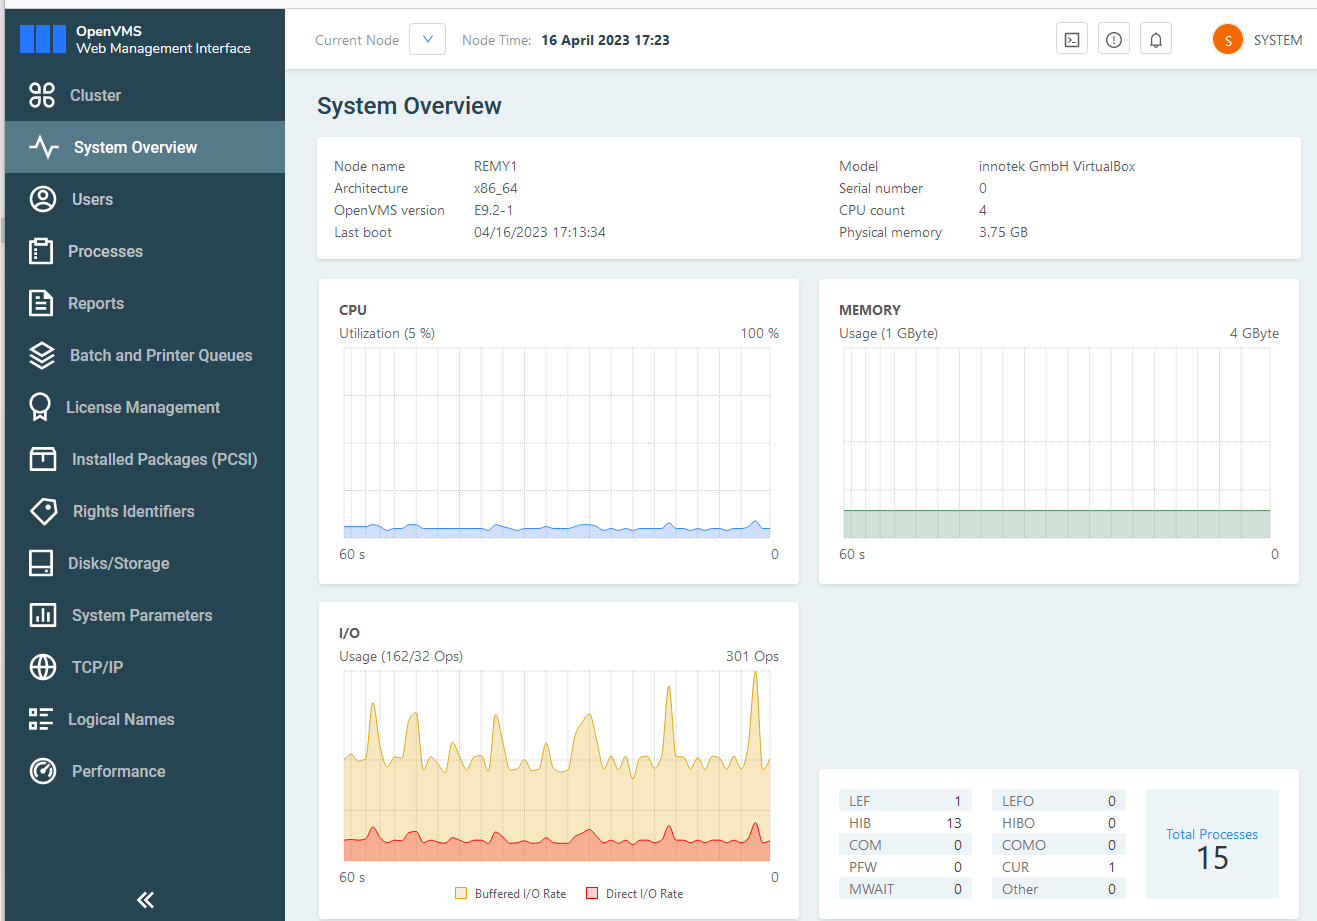
Here is a screenshot of the WebUI, the result you'll have at the end of this guide:
EVE / EDIT via SSH
I'm covering this part first because we're going to be using SSH for most of this guide and being able to edit
If you try to use the EVE or EDIT editor when logged in over SSH, you will
get an error. In the earlier part of this guide, I used the line editor
(EDIT /EDT) via telnet, then with the CHANGE command fired up the screen
editor, but that is cumbersome and fails via SSH.
Lets say you want to create a folder on the main disk for notes, then edit them. Create the folder:
CREATE /DIRECTORY /VERSION_LIMIT=2 REMY1$DKA0:[NOTES]
SET DEFAULT REMY1$DKA0:[NOTES]

DIR
Output:
%DIRECT-W-NOFILES, no files found
The above command creates a folder on node REMY1, disk DKA0, named NOTES
and changes into it (SET DEF).
Remember the file naming scheme is different on OpenVMS:
node$device:[root.][directory]file-name.file-type;version
The CREATE command also limits the number of saved versions of a file.
Using the EDIT command to edit a file:
EDIT today.txt
Will spit out the following error over SSH:
%TPU-E-NONANSICRT, SYS$INPUT must be supported CRT
Use the following command to have your terminal capabilities detected:
SET TERM/INQUIRE
Then retry the EDIT command. You should be in a full screen editor.
CTRL+Z saves the file and exits the editor.
To have this done automatically, edit the file SYSLOGIN.COM in the SYS$LOGIN
folder:
SET DEFAULT SYS$LOGIN
EDIT SYLOGIN.COM
Look for the following DCL symbol assignment:
$ TT_NOINQUIR = "|TW|RT|WT|TK|WS|PY|FT|TN|"
Remote the |FT part to have SSH login terminals be inquired. Remove the |TN
part to have TELNET terminals inquired. Save and exit with CTRL+Z.
Unzip and zip on OpenVMS 9.2 x86
VSI has conveniently included zip and unzip in the default installation.
However, running them with arguments is a bit tedious. The OpenVMS RUN
command does not accept arguments, so running this:
RUN SYS$COMMON:[SYSHLP.UNSUPPORTED.UNZIP]UNZIP.EXE "-V"
will give you the following error message:
$ run SYS$COMMON:[SYSHLP.UNSUPPORTED.UNZIP]UNZIP.exe "-v
%DCL-W-MAXPARM, too many parameters - reenter command with fewer parameters
 \"-v\
To use arguments, and to get a shorter incantation, we must define a "foreign command":
unzip :== $SYS$COMMON:[SYSHLP.UNSUPPORTED.UNZIP]UNZIP.EXE
The leading $ in the equivalence name for the symbol definition is what makes
the DCL symbol a foreign command. If the device and directory are omitted,
SYS$SYSTEM: is assumed.
After this magic incantation, you can run unzip "-v". Example output:
UnZip 6.00 of 20 April 2009, by Info-ZIP.  For more details see: unzip -v.
Usage: unzip [-Z] [-opts[modifiers]] file[.zip] [list] [-x xlist] [-d exdir]
[...]
Compiled with DEC C V7.4-407 for OpenVMS (V8.4-2L1 VAX) on May 27 2021.
You can add the unzip :==... line at the bottom of your SYLOGIN.COM file in
the SYS$LOGIN folder, just like you did with the TERM/INQ command in the
previous paragraph to make it available on each login.
The zip.exe executable is located in the folder SYS$COMMON:[SYSHLP.UNSUPPORTED.ZIP].
OpenVMS WebUI installation
The WebUI depends on Lua and CivetWeb, which we must install and configure
first.
Download both from the VSI Software portal to your machine (not the VM). You're looking for the following two files:
X86VMS-LUA-V0503-5D-1.ZIPX86VMS-CIVETWEB-V0114-0D-1.ZIP
Create a folder in the OpenVMS VM where we'll be storing the installation files:
create /dir DKA0:[SW]
set def DKA0:[SW]
Use scp (or for example FileZilla / WinSCP) to transfer over the zip files.
When using SCP, you can use /SW/ as the folder, like so:
$ scp X86VMS-CIVETWEB-V0114-0D-1.ZIP system@192.168.1.23:/SW/
system@192.168.1.23's password:
X86VMS-CIVETWEB-V0114-0D-1.ZIP  ...        100%   17MB   5.4MB/s   00:03
On the OpenVMS VM you should see the file in the folder we just created:
$ dir
Directory DKA0:[SW]
X86VMS-CIVETWEB-V0114-0D-1.ZIP;1
Total of 1 file.
Repeat this scp copy for the Lua file: X86VMS-LUA-V0503-5D-1.ZIP.
Installing the Lua dependency
Lua is a dependency of CivetWeb so we'll unzip and install Lua first.
On your local machine, unzip the file and read the RELEASE NOTES. They
contain instructions and information. If this guide is out of date, the
release notes will help you along.
Execute the unzip command on OpenVMS as defined earlier:
unzip
Output:
************************************************
*  VSI Lua V5.3.5D for VSI OpenVMS x86 VE9.2   *
*  and later versions. A copy of the Release   *
*    Notes is included in this ZIP file.       *
************************************************
  inflating: MANIFEST.TXT
  inflating: VSI-X86VMS-LUA-V0503-5D-1.PCSI$COMPRESSED
 extracting: VSI-X86VMS-LUA-V0503-5D-1.PCSI$COMPRESSED_VNC
Execute the following command to start the installation:
PRODUCT INSTALL LUA
Output:
Performing product kit validation of signed kits ...
%PCSI-I-VSIVALPASSED, validation of DKA0:[SW]VSI-X86VMS-LUA-V0503-5D-1.PCSI$COMPRESSED;1 succeeded

The following product has been selected:
    VSI X86VMS LUA V5.3-5D                 Layered Product

Do you want to continue? [YES]
Confirm with ENTER. Output:
Configuration phase starting ...

You will be asked to choose options, if any, for each selected product and for
any products that may be installed to satisfy software dependency requirements.

Configuring VSI X86VMS LUA V5.3-5D: Lua for OpenVMS is based on Lua Version 5.3.5

    Copyright 2022 VMS Software Inc. VSI Software Inc.

* This product does not have any configuration options.

Execution phase starting ...

The following product will be installed to destination:
    VSI X86VMS LUA V5.3-5D                 DISK$X86SYS:[VMS$COMMON.]

Portion done: 0%...10%...20%..90%...100%
Once it is done, the following output will be displayed:
The following product has been installed:
    VSI X86VMS LUA V5.3-5D                 Layered Product

VSI X86VMS LUA V5.3-5D: Lua for OpenVMS is based on Lua Version 5.3.5

    Post-installation tasks are required.

    To start the Lua runtime at system boot time, add the following
    lines to SYS$MANAGER:SYSTARTUP_VMS.COM:

        $ file := SYS$STARTUP:LUA$STARTUP.COM
        $ if f$search("''file'") .nes. "" then @'file'

    To stop Lua at system shutdown, add the following lines to
    SYS$MANAGER:SYSHUTDWN.COM:

        $ file := SYS$STARTUP:LUA$SHUTDOWN.COM
        $ if f$search("''file'") .nes. "" then @'file'
As we did earlier, use the editor to add those lines to the file as stated:
EDIT SYS$MANAGER:SYSTARTUP_VMS.COM
Almost at the bottom of the file, before the EXIT line, insert the following:
$ file := SYS$STARTUP:LUA$STARTUP.COM
$ if f$search("''file'") .nes. "" then @'file'
Save with CTRL+Z. If you want to run the Lua interpreter, define the
following forgein commands, just as we did above for zip and unzip:
LUA :== $LUA$ROOT:[BIN]LUA.EXE
LUAC :== $LUA$ROOT:[BIN]LUAC.EXE
You can also manually start it right away with the following command:
@SYS$STARTUP:LUA$STARTUP.COM
Installing the CivetWeb dependency
Repeat the unzip and install process for CivetWeb:
unzip X86VMS-CIVETWEB-V0114-0D-1.ZIP
Output:
**********************************************
*VSI CivetWeb V1.14-0D-1 for systems running *
*    OpenVMS x86 versions E9.2 and later.    *
*  Release Notes are included in the ZIPEXE  *
**********************************************
  inflating: MANIFEST.TXT
  inflating: VSI-X86VMS-CIVETWEB-V0114-0D-1-RNOTES.PDF
  inflating: VSI-X86VMS-CIVETWEB-V0114-0D-1.PCSI$COMPRESSED
 extracting: VSI-X86VMS-CIVETWEB-V0114-0D-1.PCSI$COMPRESSED_VNC
Remember to read the RELEASE NOTES, they contain more information
than this guide.
Start the installation with the following command:
PRODUCT INSTALL CIVETWEB
Output:
Performing product kit validation of signed kits ...
%PCSI-I-VSIVALPASSED, validation of DKA0:[SW]VSI-X86VMS-CIVETWEB-V0114-0D-1.PCSI$COMPRESSED;1 succeeded

The following product has been selected:
    VSI X86VMS CIVETWEB V1.14-0D           Layered Product

Do you want to continue? [YES]
Confirm with ENTER. Output:
Configuration phase starting ...

You will be asked to choose options, if any, for each selected product and for
any products that may be installed to satisfy software dependency requirements.

Configuring VSI X86VMS CIVETWEB V1.14-0D: CivetWeb for OpenVMS is based on CivetWeb Version 1.14

    Copyright 2022 VMS Software Inc. VSI Software Inc.

* This product does not have any configuration options.

Execution phase starting ...

The following product will be installed to destination:
    VSI X86VMS CIVETWEB V1.14-0D           DISK$X86SYS:[VMS$COMMON.]

Portion done: 0%..90%...100%
When the installation is finished the following output is shown:
The following product has been installed:
    VSI X86VMS CIVETWEB V1.14-0D           Layered Product

VSI X86VMS CIVETWEB V1.14-0D: CivetWeb for OpenVMS is based on CivetWeb Version 1.14

    Post-installation tasks are required.

    To start the web server at system boot time, add the following
    lines to SYS$MANAGER:SYSTARTUP_VMS.COM:

        $ file := SYS$STARTUP:CIVETWEB$STARTUP.COM
        $ if f$search("''file'") .nes. "" then @'file'

    To stop Civetweb at system shutdown, add the following lines to
    SYS$MANAGER:SYSHUTDWN.COM:

        $ file := SYS$STARTUP:CIVETWEB$SHUTDOWN.COM
        $ if f$search("''file'") .nes. "" then @'file'

    Note that default installation uses the SYSTEM account to run the
    web server process. It is generally recommended that you run the
    web server as using a less privileged account. This may be done
    by supplying the account name as a parameter to
    civetweb$startup.com or by defining the logical name
    civetweb$user as the desired account name. It is also recommended
    that you change the ownership of the civetweb$root:[000000...]
    directory tree to this account.
Just as earlier, edit the file SYS$MANAGER:SYSTARTUP_VMS.COM and add the two
lines just before the EXIT line:
$ file := SYS$STARTUP:CIVETWEB$STARTUP.COM
$ if f$search("''file'") .nes. "" then @'file'
I'll not apply the other suggestions regarding the SYSTEM user since those
are not really needed for a hobbyist setup where I assume you only expose
the virtual machine in the local trusted network and shut it down when you're
done with it.
You do need to copy some configuration files before starting CivetWeb:
set def civetweb$root:[conf]
set proc/parse_style=extended
copy civetweb^.conf.template civetweb.conf
copy services^.conf.template services.conf
If you receive the following error during the copy command:
%DCL-W-PARMDEL, invalid parameter delimiter - check use of special characters
Make sure you've enabled ODS-5 filename-parsing with the command set proc/parse_style=extended.
Go back to our software folder:
set def DKA0:[SW]
Start CivetWeb manually:
@SYS$STARTUP:CIVETWEB$STARTUP.COM
Check to see if it started correctly:
$ pipe show system | search sys$input civetweb
Output:
00000444 CIVETWEB LEF 6 241 0 00:00:00.14 814 892
You can now go to the following URL in your browser:
http://IP.OF.YOUR.OPENVMS.VM:8082
You should see three files, like the screenshot below:
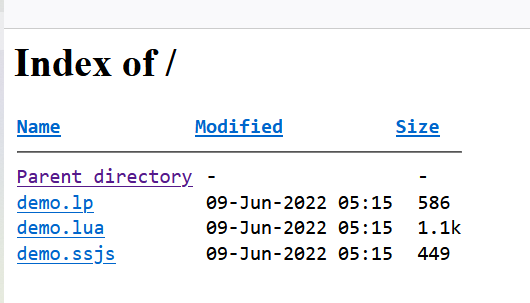
Open one of the pages to see that Lua integration is working:

That was a lot of manual work. I'm used to Linux systems with their package
managers, so the above would be apt install lua or apt install nginx and
everything would be automatically done, config files, startup services,
sometimes even the firewall. But we're learning a lot.
Finally, the WebUI installation
Download the following file from the software portal:
X86VMS-WEBUI-V0401-1-1.ZIP
Use scp or your preferred file transfer tool to copy it over to our
software (DKA0:[SW]) folder:
scp X86VMS-WEBUI-V0401-1-1.ZIP system@192.168.1.23:/SW/
Output:
system@192.168.1.23's password:
X86VMS-WEBUI-V0401-1-1.ZIP         100%   35MB   6.1MB/s   00:05
Remember to read the RELEASE NOTES locally. Unzip the file:
unzip X86VMS-WEBUI-V0401-1-1.ZIP
Output:
Archive:  DKA0:[SW]X86VMS-WEBUI-V0401-1-1.ZIP;1
*************************************************
* VSI WebUI V4.1-1 for VSI OpenVMS x86_64 V9.2  *
* and later. Works with VSI CivetWeb V1.14-0C   *
* and VSI LUA V5.3-5D and later versions.       *
* Release Notes included in the ZIPEXE file.    *
*************************************************
  inflating: MANIFEST.TXT
  inflating: X86VMS-WEBUI-V0401-1-1-RNOTES.PDF
  inflating: VSI-X86VMS-WEBUI-V0401-1-1.PCSI$COMPRESSED
 extracting: VSI-X86VMS-WEBUI-V0401-1-1.PCSI$COMPRESSED_VNC
The release notes indicate that CivetWeb must be installed, but we've taken care of that, so continue on with the installation:
PRODUCT INSTALL WEBUI
Output:
Performing product kit validation of signed kits ...
%PCSI-I-VSIVALPASSED, validation of DKA0:[SW]VSI-X86VMS-WEBUI-V0401-1-1.PCSI$COMPRESSED;1 succeeded

The following product has been selected:
    VSI X86VMS WEBUI V4.1-1                Layered Product

Do you want to continue? [YES]
Confirm with ENTER. Output:
Configuration phase starting ...

You will be asked to choose options, if any, for each selected product and for
any products that may be installed to satisfy software dependency requirements.

Configuring VSI X86VMS WEBUI V4.1-1

    VMS Software Inc. &

* This product does not have any configuration options.

Execution phase starting ...

The following product will be installed to destination:
    VSI X86VMS WEBUI V4.1-1                DISK$X86SYS:[VMS$COMMON.]

Portion done: 0%...10%...20%...50%...60%...90%...100%
Once it is finished the following will be shown:
The following product has been installed:
    VSI X86VMS WEBUI V4.1-1                Layered Product

VSI X86VMS WEBUI V4.1-1

    Post-installation tasks are required.

    After installation you need to update civetweb$root:[conf]civetweb.conf and
    civetweb$root:[conf]services.conf as described in the release notes. After
    making the necessary changes you can restart the web server using the following
    command:

    $ @SYS$STARTUP:WEBUI$RESTART.COM
There are a few things we need to do to get the WebUI up and running. As
we did with CivetWeb and Lua, add the WebUI to system startup
in the file SYS$MANAGER:SYSTARTUP_VMS.COM. Add the following line
to the bottom, just before EXIT:
$ file := @SYS$STARTUP:WEBUI$RESTART.COM
$ if f$search("''file'") .nes. "" then @'file'
To use the WebUI, a user needs special permissions. Even the SYSTEM account,
so lets add those permissions and grant them to the SYSTEM account:
SET DEFAULT SYS$SYSTEM
MCR AUTHORIZE
Output:
UAF>
The prompt has changed to UAF>. Execute the following UAF commands:
add/identifier webui_read
Output:
%UAF-I-RDBADDMSG, identifier WEBUI_READ value %X80010002 added to rights database
Then:
add/identifier webui_write
Output:
%UAF-I-RDBADDMSG, identifier WEBUI_WRITE value %X80010003 added to rights database
Give the SYSTEM account the permissions:
grant/identifier webui_write SYSTEM
Output:
%UAF-I-GRANTMSG, identifier WEBUI_WRITE granted to SYSTEM
Exit the UAF> prompt with the exit command.
There are a few CivetWeb configuration files that must be updated:
set proc/parse_style=extended
set default civetweb$root:[conf]
copy civetweb^.conf.webui civetweb.conf
copy services^.conf.webui services.conf
copy alert_images^.conf.template alert_images.conf
copy threads^.conf.template threads.conf
copy webui^.conf.template webui.conf
set def DKA0:[SW]
(Re)start the WebUI, this command will also automatically restart CivetWeb:
@SYS$STARTUP:WEBUI$RESTART.COM
Output:
%WEBUI-I-SHUTDOWN, shutting down WebUI WebSockets terminal interface
%WEBUI-W-NOTRUN, terminal interface is not running
%CIVETWEB-I-SHUTDOWN, shutting down CivetWeb
%DCL-I-SUPERSEDE, previous value of CIVETWEB$ROOT has been superseded
%DCL-I-SUPERSEDE, previous value of CIVETWEB$SHR has been superseded
%CIVETWEB-I-START, starting Civetweb process
%RUN-S-PROC_ID, identification of created process is 0000044A
%WEBUI-I-START, starting the WebUI WebSockets terminal interface
%RUN-S-PROC_ID, identification of created process is 0000044B
If all went well, open a web browser on your main PC and navigate to the following URL:
http://IP.OF.YOUR.OPENVMS.VM:8082
You should be greeted with the login page of the WebUI (instead of the CivetWeb page from earlier):
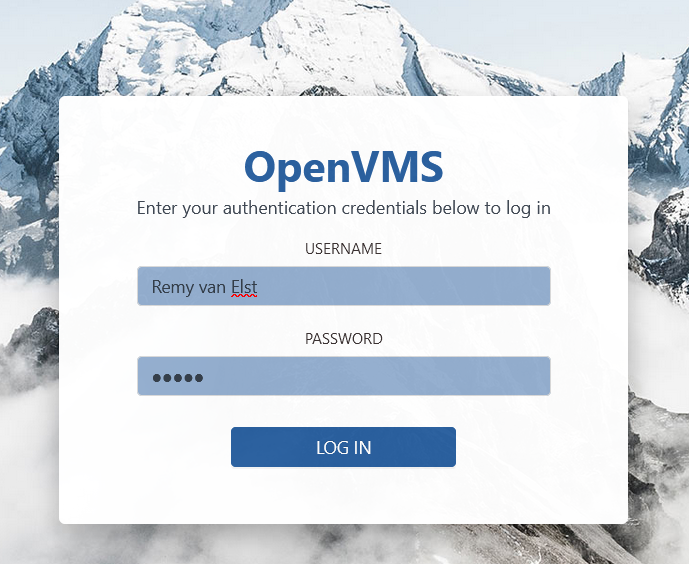
Login with the SYSTEM account and password. If you receive the following error:
Account does not have sufficient permissions
Make sure to setup the permissions as we did earlier.
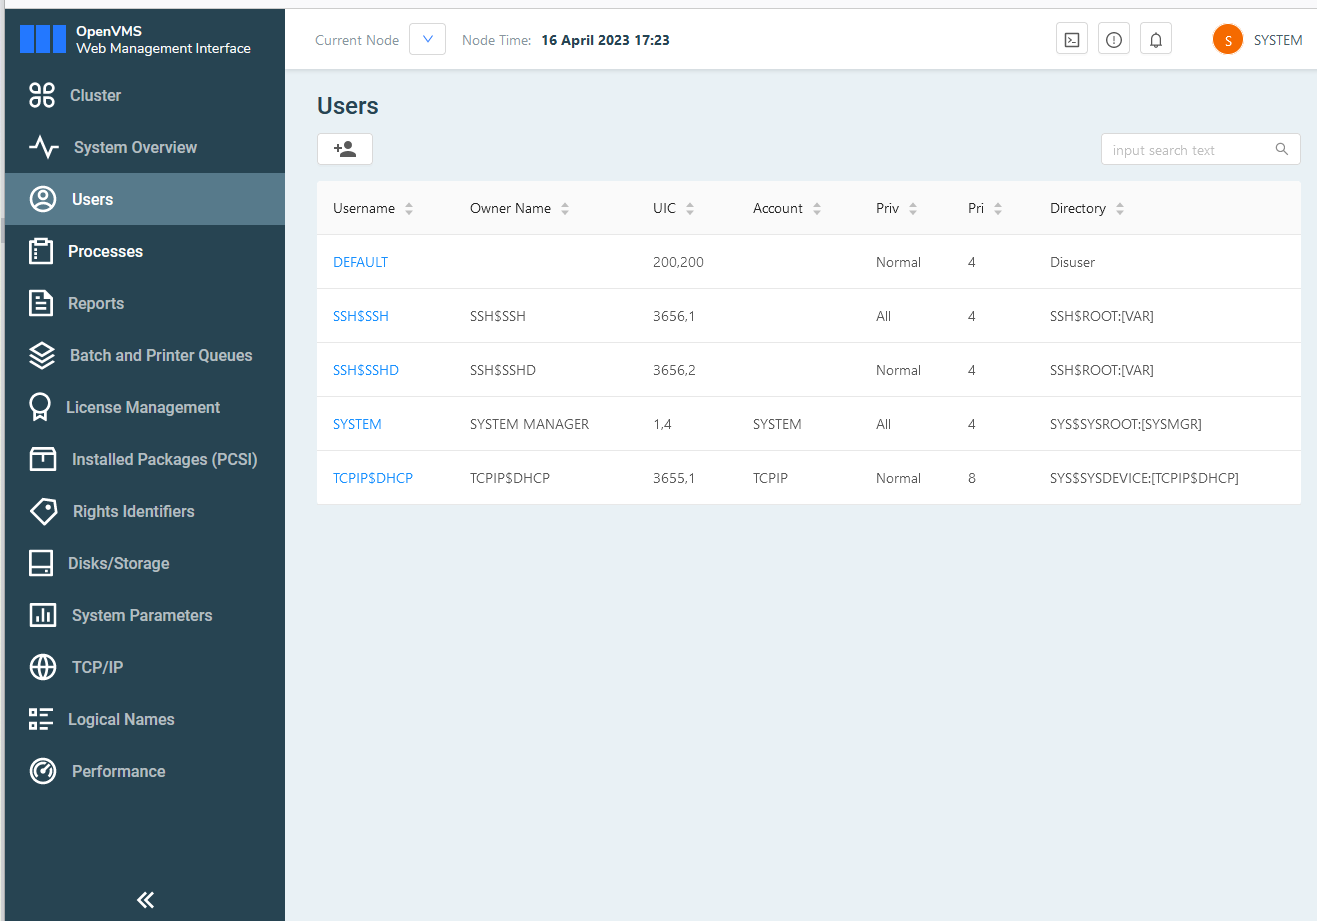
Here is a screenshot of the WebUI running on my VM:
Navigating the WebUI is a bit slow, most pages take a second or two to load. But, don't let that fool you. It is an amazing product that makes managing an OpenVMS system easier, especially for newer system administrators.
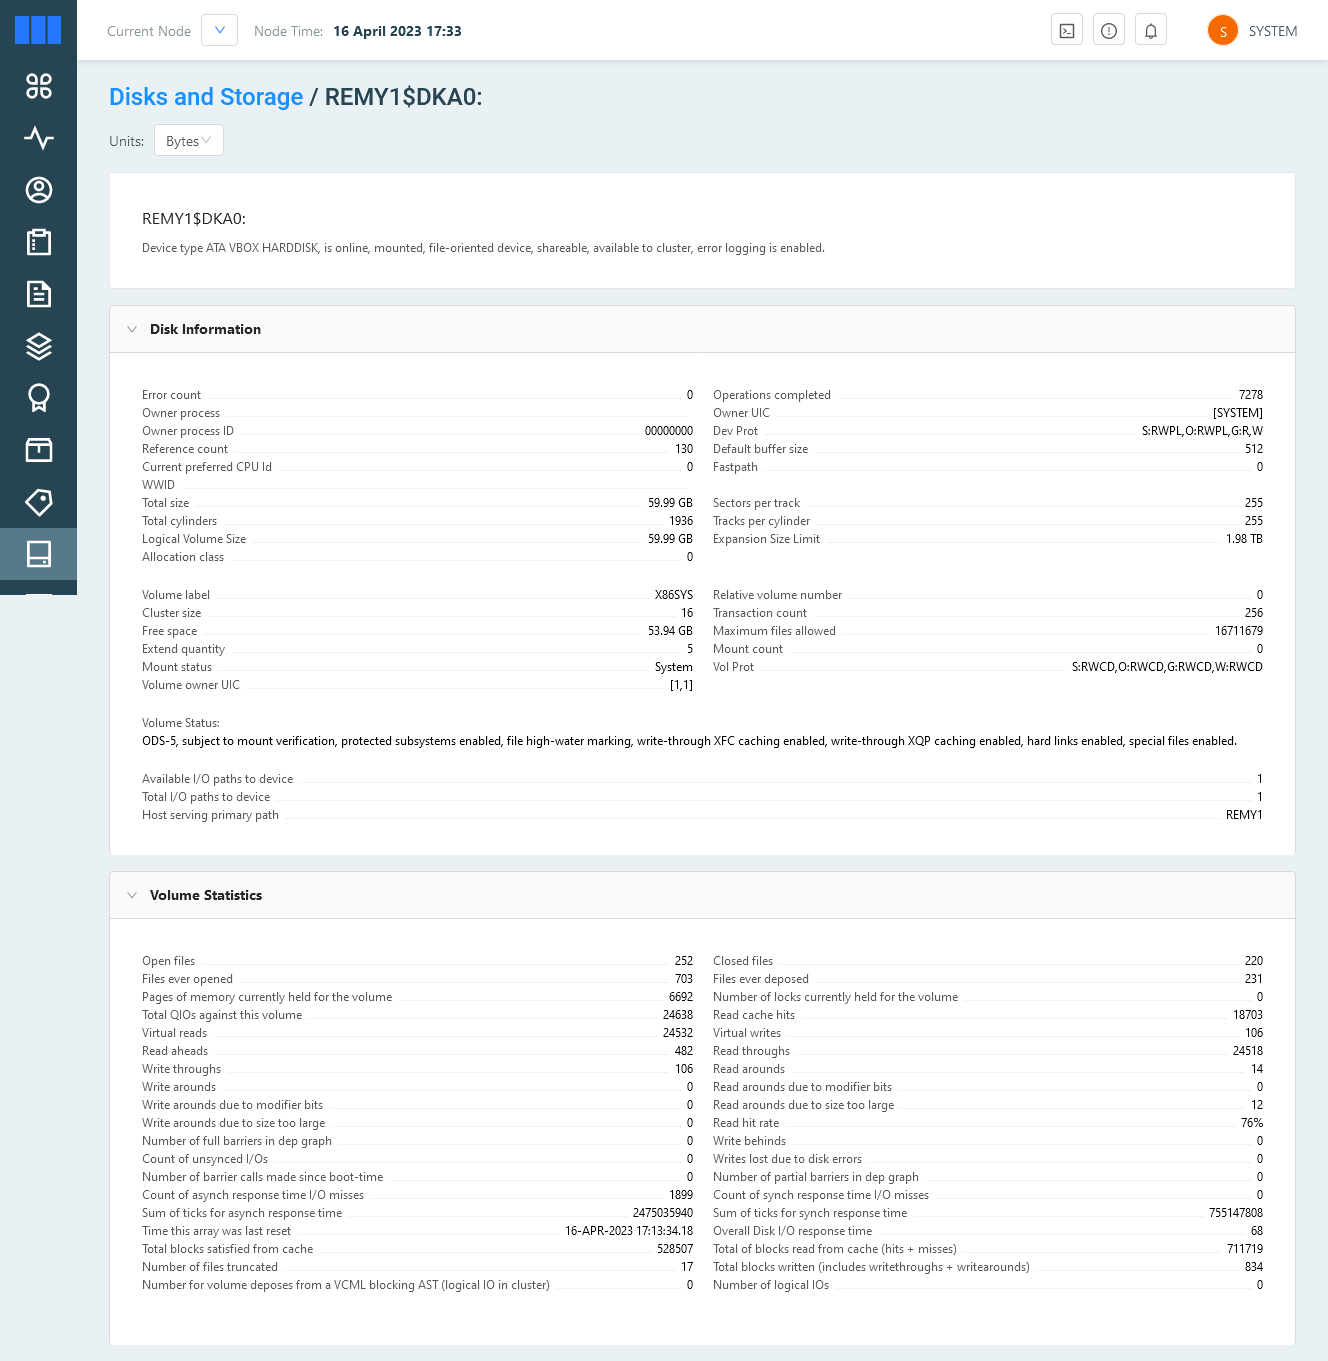
For example, here are two screenshots, one of the disk information screen and one of users screen, the latter allowing you to add users easily.
In the next part of the guide I'm going to setup the C++ compiler and compile some demo code. Once the guide is done I'll post the link here!
Tags: alpha , blog , dec , itanium , openvms , pdp , vax , vms , vsi , x86