Raymii.org

אֶשָּׂא עֵינַי אֶל־הֶהָרִים מֵאַיִן יָבֹא עֶזְרִֽי׃Home | About | All pages | Cluster Status | RSS Feed
IPSEC VPN on Centos 7 with StrongSwan
Published: 30-12-2014 | Author: Remy van Elst | Text only version of this article
❗ This post is over eleven years old. It may no longer be up to date. Opinions may have changed.
Table of Contents
This is a guide on setting up an IPSEC VPN server on CentOS 7 using StrongSwan as the IPsec server and for authentication. It has a detailed explanation with every step. We choose the IPSEC protocol stack because of recent vulnerabilities found in pptpd VPNs and because it is supported on all recent operating systems by default.
Why a VPN?
More than ever, your freedom and privacy when online is under threat. Governments and ISPs want to control what you can and can't see while keeping a record of everything you do, and even the shady-looking guy lurking around your coffee shop or the airport gate can grab your bank details easier than you may think. A self hosted VPN lets you surf the web the way it was intended: anonymously and without oversight.
A VPN (virtual private network) creates a secure, encrypted tunnel through which all of your online data passes back and forth. Any application that requires an internet connection works with this self hosted VPN, including your web browser, email client, and instant messaging program, keeping everything you do online hidden from prying eyes while masking your physical location and giving you unfettered access to any website or web service no matter where you happen to live or travel to.
This tutorial is available for the following platforms:
IPSEC encrypts your IP packets to provide encryption and authentication, so no one can decrypt or forge data between your clients and your server. It also provides a tunnel to send data to the server.
To work trough this tutorial you should have:
- 1 CentOS 7 server with at least 1 public IP address and root access
- 1 (or more) clients running an OS that support IPsec IKEv2 vpns (Ubuntu, Mac OS, Windows 7+, Android 4+).
- Ports 4500/UDP, 500/UDP, 51/UDP and 50/UDP opened in the firewall.
I do all the steps as the root user. You should do to, but only via * -i* or * su -*.
Version History:
- 30-12-2014: updated iOS config
- 25-12-2014: Initial version
No L2TP?
The previous tutorials all used L2TP to set up the VPN tunnel and use IPSEC only for the encryption. With the IKEv2 protocol and recent operating systems (like OS X 10.8+, Android 4+, iOS 6+ and Windows 7+) supporting IKEv2 we can also use IPSEC to set up the tunnel, before we used IPSEC to do that.
This VPN will therefore not work out of the box on older operating systems. See my other tutorials with L2TP on how to do that.
Overview
The tutorial consists out of the following steps:
- Install packages
- Generate certificates
- Configure IPSEC
- Configure Firewall
Android and Windows client configuration is covered at the end of the tutorial.
Install EPEL 7:
Strongswan packages are available in the EPEL. The CentOS/RHEL repo's only ship Libreswan, which is not what we'll use in this tutorial. You can read more about the EPEL here: https://fedoraproject.org/wiki/EPEL, packages can be found here:
Install and enable the EPEL using Yum:
yum install http://ftp.nluug.nl/pub/os/Linux/distr/fedora-epel/7/x86_64/e/epel-release-7-5.noarch.rpm
Install Strongswan
After the EPEL is enabled we can install StrongSwan. StrongSwan is a descendant of FreeS/WAN, just like Openswan or Libreswan. Strongswan however has a very active community and is actively developed, whereas the other ones are less. You can read more about Strongswan on wikipedia or their website.
yum install strongswan
Certificates
The VPN server will identify itself with a certificate to the clients. The clients can use a certificate to authenticate themself, this tutorial however keeps it simple and sets up username and password authentication as well.
On Android with the StrongSwan Application you can just import the .p12 we are
going to create later on. On Windows 7, we'll use EAP to configure a username
and password for our client.
You might want to install haveged to speed up the key generation process:
yum install haveged
systemctl enable haveged
systemctl start haveged
Haveged provides a constant source of entropy and randomness.
Start by creating a self singed root CA. Create a private key:
cd /etc/strongswan
strongswan pki --gen --type rsa --size 4096 --outform der > ipsec.d/private/strongswanKey.der
chmod 600 ipsec.d/private/strongswanKey.der
Next generate a self signed root CA certificate:
strongswan pki --self --ca --lifetime 3650 --in ipsec.d/private/strongswanKey.der --type rsa --dn "C=NL, O=Example Company, CN=strongSwan Root CA" --outform der > ipsec.d/cacerts/strongswanCert.der
You can view the certificate properties with the following command:
strongswan pki --print --in ipsec.d/cacerts/strongswanCert.der
Example output:
cert:      X509
subject:  "C=NL, O=Example Company, CN=strongSwan Root CA"
issuer:   "C=NL, O=Example Company, CN=strongSwan Root CA"
validity:  not before Dec 24 07:40:57 2014, ok
           not after  Dec 21 07:40:57 2024, ok (expires in 3649 days)
serial:    74:3b:96:ab:4c:14:1d:78
flags:     CA CRLSign self-signed
subjkeyId: d8:fb:1f:ae:15:7c:02:4c:d7:95:bc:dd:9c:40:e4:db:33:38:8a:b4
pubkey:    RSA 4096 bits
keyid:     c6:3a:c8:2e:31:cf:12:aa:67:4f:7c:da:65:3c:4f:84:bc:69:46:02
subjkey:   d8:fb:1f:ae:15:7c:02:4c:d7:95:bc:dd:9c:40:e4:db:33:38:8a:b4
Generate the VPN Host key. This is the keypair the VPN server host will use to authenticate itself to clietns. First the private key:
strongswan pki --gen --type rsa --size 2048 --outform der > ipsec.d/private/vpnHostKey.der
chmod 600 ipsec.d/private/vpnHostKey.der
The public key:
strongswan pki --pub --in ipsec.d/private/vpnHostKey.der --type rsa | strongswan pki --issue --lifetime 730 --cacert ipsec.d/cacerts/strongswanCert.der --cakey ipsec.d/private/strongswanKey.der --dn "C=NL, O=Example Company, CN=vpn.example.org" --san vpn.example.com --san vpn.example.net --san 213.187.243.183 --san @213.187.243.183 --flag serverAuth --flag ikeIntermediate --outform der > ipsec.d/certs/vpnHostCert.der
The domain name or IP address of your VPN server, which is later entered in the
clients connection properties, MUST be contained either in the subject
Distinguished Name (CN) and/or in a subject Alternative Name (--san). If this
does not match the clients will fail to connect.
The built in Windows 7 VPN client needs the serverAuth extended key usage flag
in your host certificate as shown above, or the client will refuse to connect.
In addition, OS X 10.7.3 or older requires the ikeIntermediate flag, which we
also add here.
We add the IP address twice, one with an @ in front so that it gets added as
an subjectAltName of the dNSName type and one of the iPAddess type.
Let's view the certificate:
strongswan pki --print --in ipsec.d/certs/vpnHostCert.der
Output:
cert:      X509
subject:  "C=NL, O=Example Company, CN=vpn.example.org"
issuer:   "C=NL, O=Example Company, CN=strongSwan Root CA"
validity:  not before Dec 24 12:14:00 2014, ok
           not after  Dec 23 12:14:00 2016, ok (expires in 729 days)
serial:    70:27:27:e3:58:d1:a7:d3
altNames:  vpn.example.com, vpn.example.net, 213.187.243.183, 213.187.243.183
flags:     serverAuth iKEIntermediate
authkeyId: d1:72:26:da:6b:50:e0:4d:89:f8:39:f9:7f:b9:97:48:04:df:2b:00
subjkeyId: 2b:03:2a:36:d5:6e:37:69:b8:79:0f:36:35:b6:b4:3d:b2:76:9d:2e
pubkey:    RSA 2048 bits
keyid:     60:af:b0:25:bc:19:eb:b6:b4:4c:b0:f9:9f:ee:75:06:78:94:22:6f
subjkey:   2b:03:2a:36:d5:6e:37:69:b8:79:0f:36:35:b6:b4:3d:b2:76:9d:2e
You can also use OpenSSL to see the contents, here is an excerpt:
openssl x509 -inform DER -in ipsec.d/certs/vpnHostCert.der -noout -text
Output:
Certificate:
            Data:
                Version: 3 (0x2)
                Serial Number: 8081471913740838867 (0x702727e358d1a7d3)
            Signature Algorithm: sha1WithRSAEncryption
                Issuer: C=NL, O=Example Company, CN=strongSwan Root CA
                Validity
                    Not Before: Dec 24 11:14:00 2014 GMT
                    Not After : Dec 23 11:14:00 2016 GMT
                Subject: C=NL, O=Example Company, CN=vpn.example.org
                Subject Public Key Info:
                    Public Key Algorithm: rsaEncryption
                        Public-Key: (2048 bit)
        [...]
        X509v3 extensions:
        X509v3 Authority Key Identifier:
            keyid:D1:72:26:DA:6B:50:E0:4D:89:F8:39:F9:7F:B9:97:48:04:DF:2B:00

        X509v3 Subject Alternative Name:
            DNS:vpn.example.com, DNS:vpn.example.net, IP Address:213.187.243.183, DNS:213.187.243.183
        X509v3 Extended Key Usage:
            TLS Web Server Authentication, 1.3.6.1.5.5.8.2.2
        [...]
The private key (/etc/openswan/ipsec.d/private/strongswanKey.der) of the CA
should be moved somewhere safe, possibly to a special signing host without
access to the Internet. Theft of this master signing key would completely
compromise your public key infrastructure. Use it only to generate client
certificates when needed.
Client certificate
Any client will require a personal certificate in order to use the VPN. The process is analogous to generating a host certificate, except that we identify a client certificate by the clients e-mail address rather than a hostname.
We create a keypair for the example user "John".
Private key:
cd /etc/strongswan/
strongswan pki --gen --type rsa --size 2048 --outform der > ipsec.d/private/JohnKey.der
chmod 600 ipsec.d/private/JohnKey.der
Public key:
strongswan pki --pub --in ipsec.d/private/JohnKey.der --type rsa | strongswan pki --issue --lifetime 730 --cacert ipsec.d/cacerts/strongswanCert.der --cakey ipsec.d/private/strongswanKey.der --dn "C=NL, O=Example Company, CN=john@example.org" --san "john@example.org" --san "john@example.net" --outform der > ipsec.d/certs/JohnCert.der
A VPN client needs a client certificate, its private key, and the signing CA certificate. The most convenient way is to put everything in a single signed PKCS#12 file and export it with a paraphrase.
Convert the required keys to PEM formt before converting to a .p12:
cd /etc/strongswan/

openssl rsa -inform DER -in ipsec.d/private/JohnKey.der -out ipsec.d/private/JohnKey.pem -outform PEM

openssl x509 -inform DER -in ipsec.d/certs/JohnCert.der -out ipsec.d/certs/JohnCert.pem -outform PEM

openssl x509 -inform DER -in ipsec.d/cacerts/strongswanCert.der -out ipsec.d/cacerts/strongswanCert.pem -outform PEM
Construct the .p12:
openssl pkcs12 -export -inkey ipsec.d/private/JohnKey.pem -in ipsec.d/certs/JohnCert.pem -name "John's VPN Certificate" -certfile ipsec.d/cacerts/strongswanCert.pem -caname "strongSwan Root CA" -out John.p12
Enter a password twice, then you have a .p12. You can send John.p12 and its
export paraphrase to the person whos going to install it onto the client. In
some cases (iOS for example) you have to separately include the CA certificate
ipsec.d/cacerts/strongswanCert.pem.
Transport this John.p12 file and the password over seperate channels to a
client.
If you need any more user certificate, repeat the above steps with other user data.
IPSEC Configuration
The main ipsec configuration file is located in /etc/strongswan. We are
going to edit it:
vim /etc/strongswan/ipsec.conf
Place the following contents:
# ipsec.conf - strongSwan IPsec configuration file

config setup
    charondebug="ike 2, knl 2, cfg 2, net 2, esp 2, dmn 2,  mgr 2"

conn %default
    keyexchange=ikev2
    ike=aes128-sha256-ecp256,aes256-sha384-ecp384,aes128-sha256-modp2048,aes128-sha1-modp2048,aes256-sha384-modp4096,aes256-sha256-modp4096,aes256-sha1-modp4096,aes128-sha256-modp1536,aes128-sha1-modp1536,aes256-sha384-modp2048,aes256-sha256-modp2048,aes256-sha1-modp2048,aes128-sha256-modp1024,aes128-sha1-modp1024,aes256-sha384-modp1536,aes256-sha256-modp1536,aes256-sha1-modp1536,aes256-sha384-modp1024,aes256-sha256-modp1024,aes256-sha1-modp1024!
    esp=aes128gcm16-ecp256,aes256gcm16-ecp384,aes128-sha256-ecp256,aes256-sha384-ecp384,aes128-sha256-modp2048,aes128-sha1-modp2048,aes256-sha384-modp4096,aes256-sha256-modp4096,aes256-sha1-modp4096,aes128-sha256-modp1536,aes128-sha1-modp1536,aes256-sha384-modp2048,aes256-sha256-modp2048,aes256-sha1-modp2048,aes128-sha256-modp1024,aes128-sha1-modp1024,aes256-sha384-modp1536,aes256-sha256-modp1536,aes256-sha1-modp1536,aes256-sha384-modp1024,aes256-sha256-modp1024,aes256-sha1-modp1024,aes128gcm16,aes256gcm16,aes128-sha256,aes128-sha1,aes256-sha384,aes256-sha256,aes256-sha1!
    dpdaction=clear
    dpddelay=300s
    rekey=no
    left=%any
    leftsubnet=0.0.0.0/0
    leftcert=vpnHostCert.der
    right=%any
    rightdns=8.8.8.8,8.8.4.4
    rightsourceip=10.42.42.0/24

conn IPSec-IKEv2
    keyexchange=ikev2
    auto=add

conn IPSec-IKEv2-EAP
    also="IPSec-IKEv2"
    rightauth=eap-mschapv2
    rightauthby2=pubkey
    rightsendcert=never
    eap_identity=%any

conn CiscoIPSec
    keyexchange=ikev1
    forceencaps=yes
    authby=xauthrsasig
    xauth=server
    auto=add
This configuration has settings for three types of VPN services: IKEv2 + RSA certificate, IKEv2 + EAP, and IKEv1 + Xauth RSA, thus providing compatibility for a wide range of IPsec clients.
iOS clients below iOS 8 need to use ikev1. Apple added support for IKEv2 in
iOS 8, but it needs to be configured using a custom configuration profile.
OS X does not support IKEv2 (not on 10.10 or lower) so they need to use ikev1
as well.
Android 4+ and Windows 7+ support IKEv2 and can use that.
Clients will get the Google DNS servers and an IP address in the 10.42.42.0/24
range. We use a strong ciphersuite.
The leftcert=vpnHostCert.der expands to the path
/etc/strongswan/ipsec.d/certs/vpnHostCert.der.
VPN user accounts and secrets
The users are configured in the /etc/strongswan/ipsec.secrets file.
vim /etc/strongswan/ipsec.secrets
Example content:
: RSA vpnHostKey.der

alice : EAP "YzCgnveYuL429fH"
bob : EAP "E23pOjvW8z248iAp"
hipster: XAUTH "xauth_ikev1_example_password"
In the example above the RSA private key file vpnHostKey.der stored in the
/etc/openswan/ipsec.d/private/ directory is not protected by symmetric
encryption (a password).
The format of the EAP MSCHAPv2 user credentials is:
[<domain>\]<username> : EAP "<plaintext password>"
Add as many users as you like there. The first line allows all users with a valid certificate to use the VPN, the other lines allow users without a certificate to login with a username and password. The space between the username, the colon (:) and EAP needs to be there.
If you have users that need to use IKEv1 with a password and XAUTH you need to seperately configure those. Note that certificate authentication is prefersed, those users do not have to be configured there.
If you need to generate password, OpenSSL can help you there:
 openssl rand -base64 24
 jzHMIj6sqBbSI6LFmXINrwZWkXG9O8GW
Firewall & Packet Routing
Configure the firewall to allow the below ports on the VM. CentOS 7 uses
firewalld to configure iptables, so lets use that. Add the required ports to
the dmz zone, make sure the server NAT's our traffic and activate that zone:
firewall-cmd --zone=dmz --permanent --add-rich-rule='rule protocol value="esp" accept' # ESP (the encrypted data packets)
firewall-cmd --zone=dmz --permanent --add-rich-rule='rule protocol value="ah" accept' # AH (authenticated headers)
firewall-cmd --zone=dmz --permanent --add-port=500/udp #IKE  (security associations)
firewall-cmd --zone=dmz --permanent --add-port=4500/udp # IKE NAT Traversal (IPsec between natted devices)
firewall-cmd --permanent --add-service="ipsec"
firewall-cmd --zone=dmz --permanent --add-masquerade
firewall-cmd --permanent --set-default-zone=dmz
firewall-cmd --reload
firewall-cmd --list-all
Configure sysctl to allow packet forwarding:
vim /etc/sysctl.conf
Add the following:
# VPN
net.ipv4.ip_forward = 1
net.ipv4.conf.all.accept_redirects = 0
net.ipv4.conf.all.send_redirects = 0
Apply with:
sysctl -p
(Or apply with a reboot)
Start the VPN
All the configuration on the server is now done. Enable the VPN at startup:
systemctl enable strongswan
And start it:
systemctl start strongswan
If you get errors like below:
connecting to 'unix:///var/run/charon.ctl' failed: Permission denied
failed to connect to stroke socket 'unix:///var/run/charon.ctl'
You can use the below command to start the VPN if it does not work correctly:
strongswan restart
Client configuration
Windows 7
While the connecting user is authenticated with Username/Password using
MSCHAPv2, the gateway is authenticated in advance using Certificates. Therefore
we need to install the client .p12 certificate.
Certificate
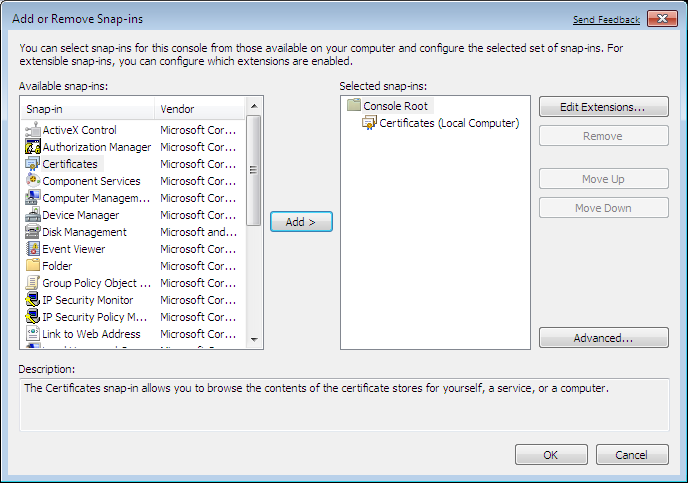
To install the trusted CA certificate locally, call up the Microsoft Management
Console (mmc) and add the Certificates Snap-In:
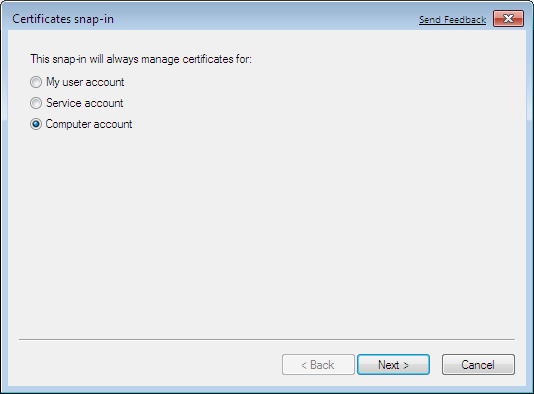
It is of the utmost importance that you select Computer account:
Go into the Certificates (Local Computer) / Trusted Root Certification Authorities / Certificates folder:
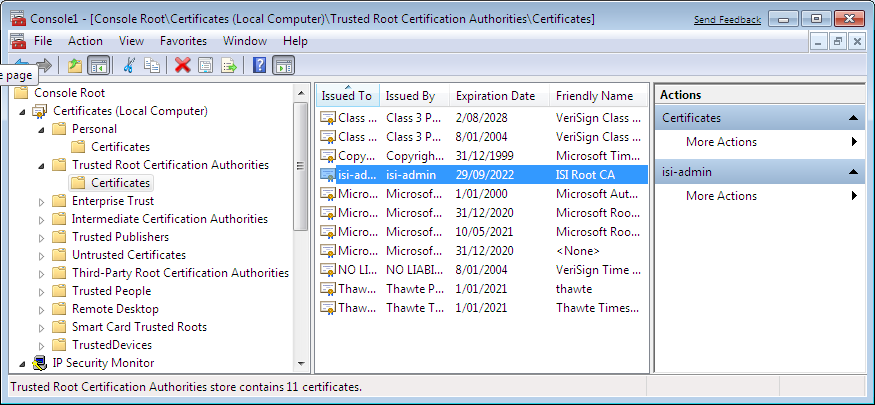
and select the Import action which will start the Certificate Import Wizard:
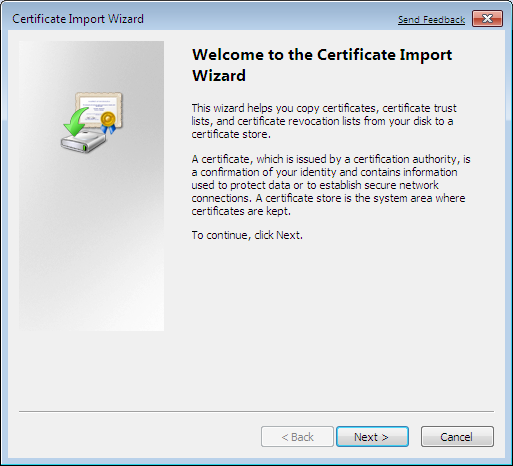
Never double-click on a certificate file because the content will end up in the current user instead of the local computer part of the Windows registry and will not be available for IPsec.
Select the John.p12 certificate file to be imported and install it in the
Trusted Root Certification Authorities store.
Source: https://wiki.strongswan.org/projects/strongswan/wiki/Win7EapCert
Add VPN Connection
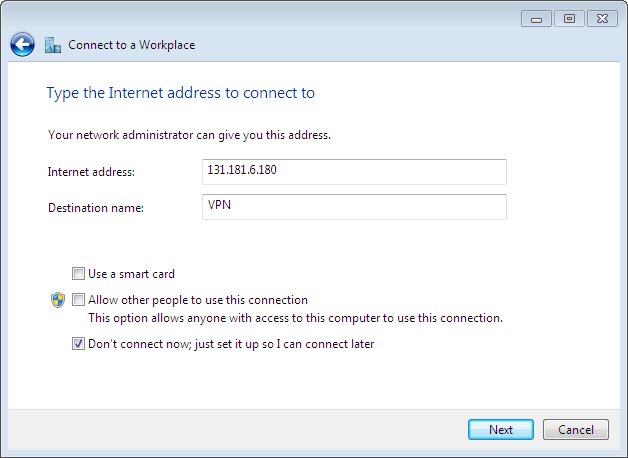
In the Network and Sharing Center choose Set up a new connection or network and as a connection option select Connect to a workplace:

Click on Use my Internet connection (VPN):

Enter the IPv4 or IPv6 internet address or the fully-qualified hostname of the strongSwan VPN gateway. The destination name string can be chosen freely, let's call the connection VPN:
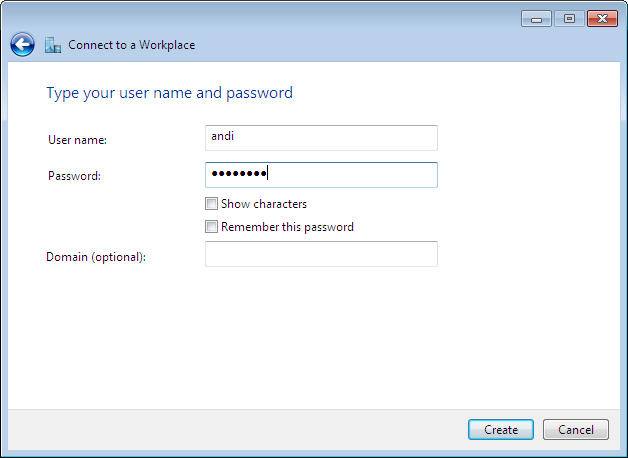
Enter your user name and password. These credentials are used in the MSCHAPv2
authentication exchange. We've configred these credentials in the
ipsec.secrets file.
Windows 7 will try to use IKEv2 to establish the VPN connection. If that fails, it will fall back to other VPN protocols.
To restrict Windows 7 to IKEv2, you might want to change the Type of VPN to IKEv2 in the Security tab of the VPN Properties menu.
Source: https://wiki.strongswan.org/projects/strongswan/wiki/Win7EapConfig
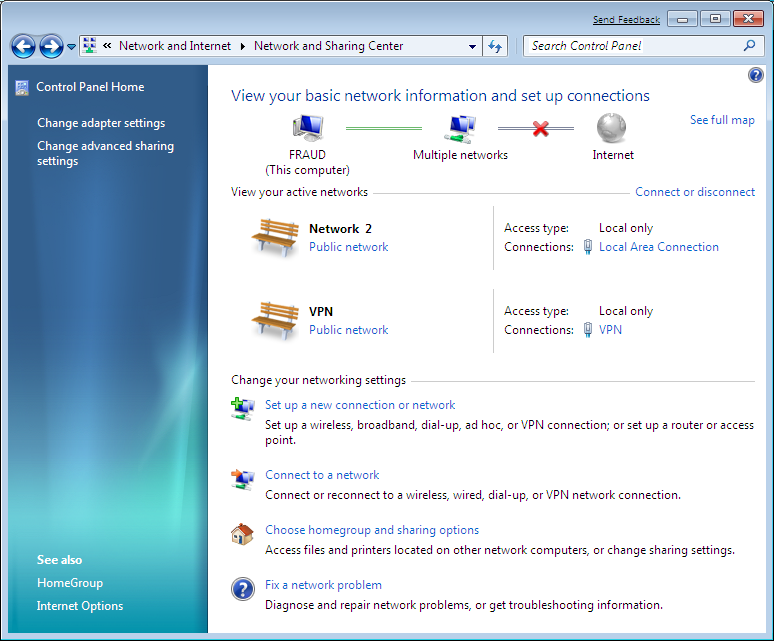
Starting the VPN
VPN connections can be managed either from the Network and Internet / Network and Sharing Center menu:
or more concisely from the Network and Internet / Network Connections menu:
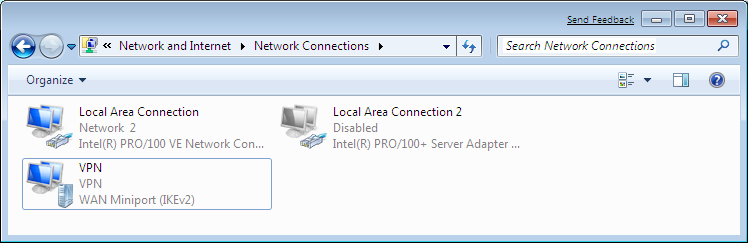
Double click the adapter or click on Connect and the VPN tunnel comes up after which the following status information is available:
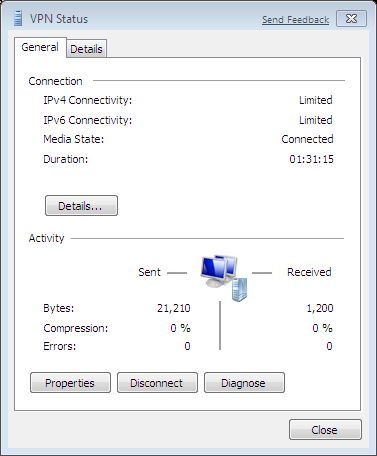
The console command ipconfig /all shows the created virtual VPN interface:
PPP adapter VPN:

   Connection-specific DNS Suffix  . :
   Description . . . . . . . . . . . : VPN
   Physical Address. . . . . . . . . :
   DHCP Enabled. . . . . . . . . . . : No
   Autoconfiguration Enabled . . . . : Yes
   IPv4 Address. . . . . . . . . . . : 10.42.42.2(Preferred)
   Subnet Mask . . . . . . . . . . . : 255.255.255.255
   Default Gateway . . . . . . . . . : 0.0.0.0
   NetBIOS over Tcpip. . . . . . . . : Enabled
Configuring Android
On Android we use the StrongSwan Application: https://wiki.strongswan.org/projects/strongswan/wiki/AndroidVPNClient.
Download the .p12 certificate, but not double tap it or install it.
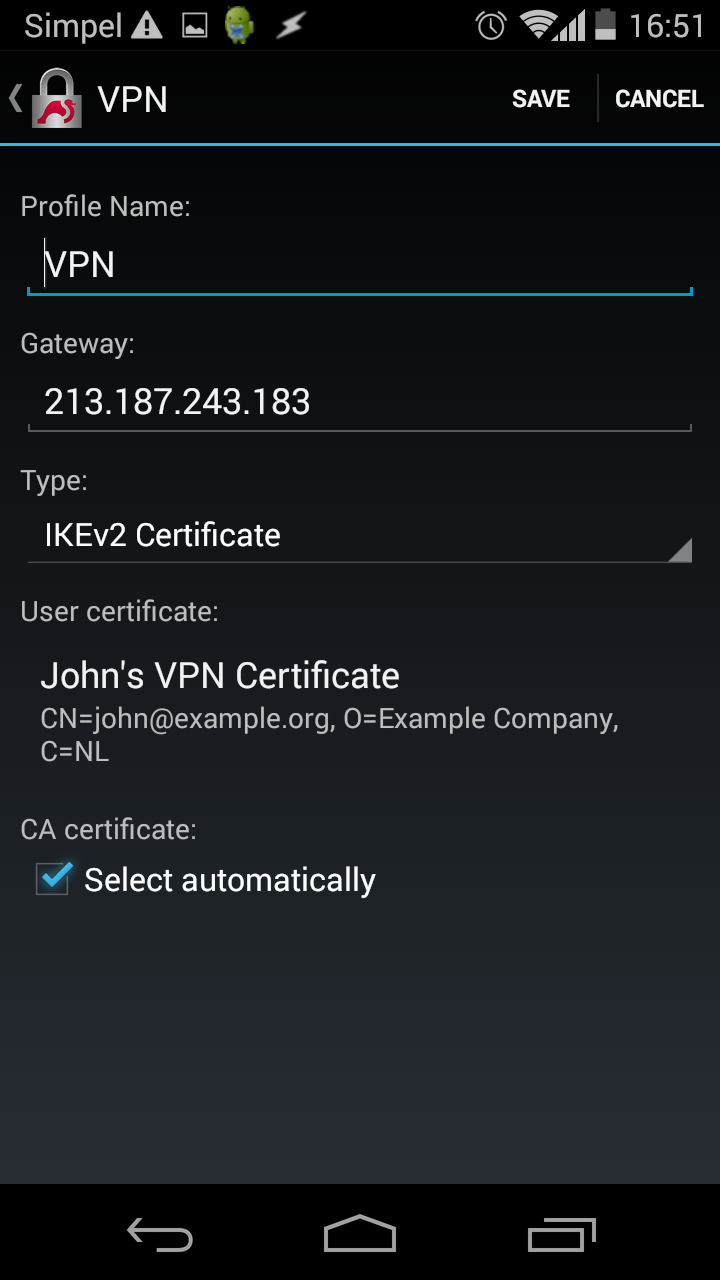
Open the Strongswan app and tap Add VPN Profile
- Profile Name: `VPN
- Gateway
IP/Hostname of VPN server - Type:
IKEv2 Certificate - CA Certificate:
Select automatically
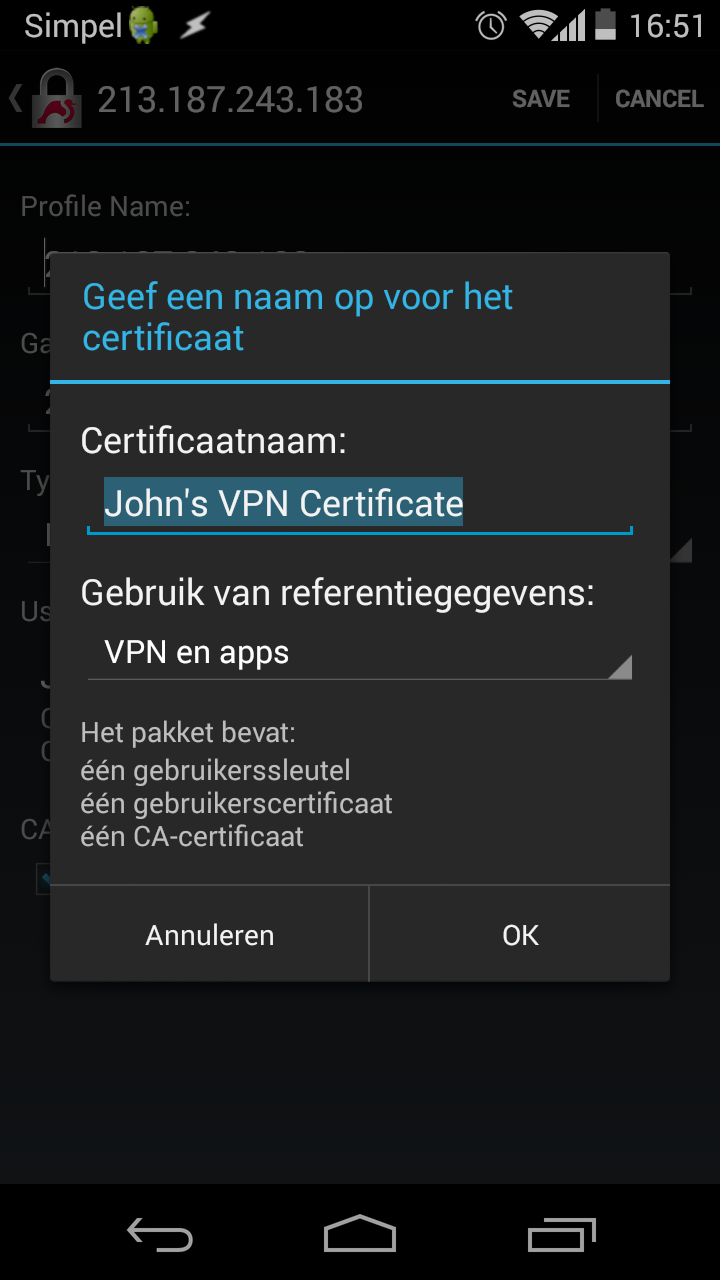
Tap Select user certificate. Tap Install. Navigate to your .p12
certificate and install it. Give the correct password and select the VPN and
Apps usage reference:
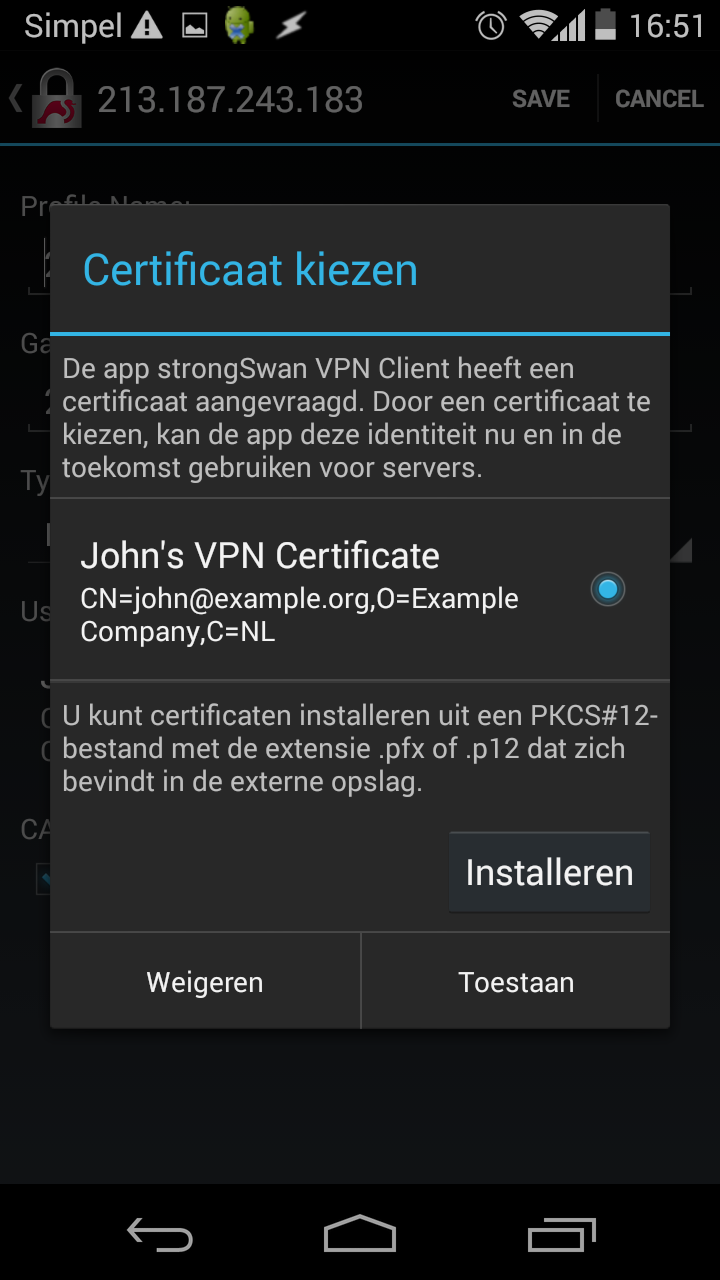
Select that certificate for use:
Tap Save:
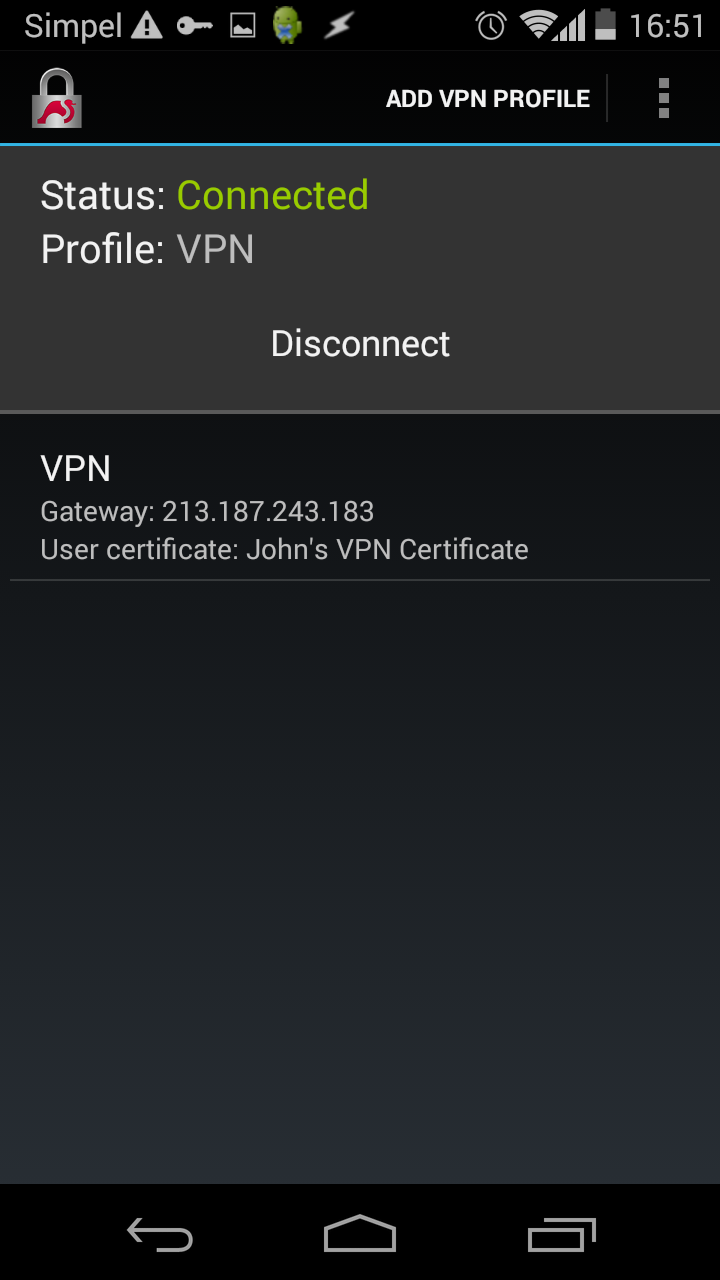
To connect, tap the VPN name and it will connect:
The following command can be used to see if there are clients connected:
strongswan status
With one (android) client connected, it looks like this:
Security Associations (1 up, 0 connecting):
 IPSec-IKEv2[4]: ESTABLISHED 20 seconds ago, 213.187.243.183[C=NL, O=Example Company, CN=vpn.example.org]...198.44.82.171[C=NL, O=Example Company, CN=john@example.org]
 IPSec-IKEv2{2}:  INSTALLED, TUNNEL, ESP in UDP SPIs: c6eadabb_i 58998789_o
 IPSec-IKEv2{2}:   0.0.0.0/0 === 10.42.42.1/32
Sources
Thanks to:
- StrongSwan Wiki and the
- StrongSwan ipsec.conf reference for most of the configuration.
- bertran for the iOS examples.
- zeitgeist for the certificate setup.