Raymii.org

אֶשָּׂא עֵינַי אֶל־הֶהָרִים מֵאַיִן יָבֹא עֶזְרִֽי׃Home | About | All pages | Cluster Status | RSS Feed
Running WPS-8 (Word Processing System) on the DEC(mate) PDP-8i and SIMH
Published: 09-03-2017 | Author: Remy van Elst | Text only version of this article
❗ This post is over eight years old. It may no longer be up to date. Opinions may have changed.
Table of Contents
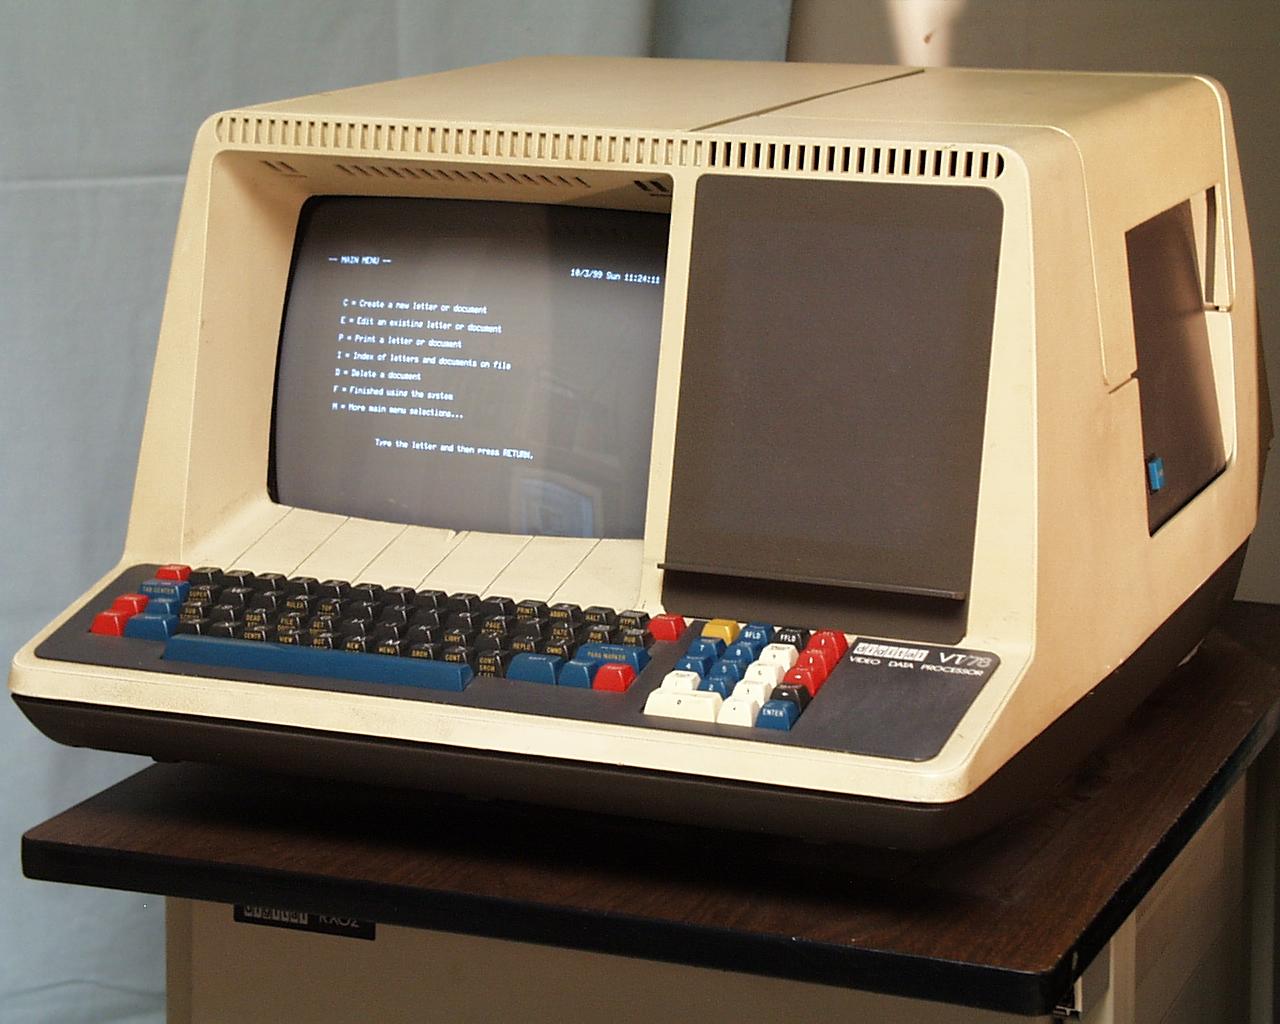
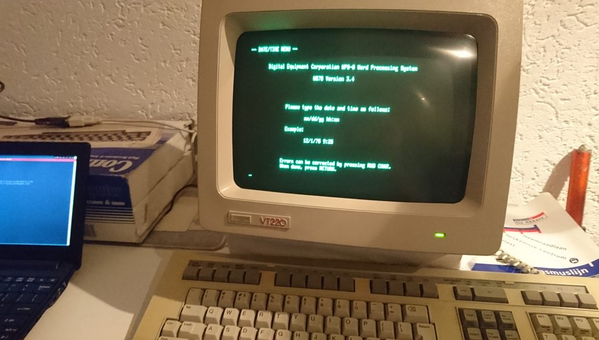
A DEC VT78 running WPS-8 (source)
This article covers running WPS-8 on a modern day emulator. WPS-8 is a word processor by DEC for the PDP-8. The PDP-8 was a very populair 12-bit minicomputer from 1965. WPS-8 was released around 1970, it came bundled with DEC's VT78 terminal. This terminal bundle was also known as the DECmate.
This article covers the setup of the emulator, simh with the correct disk images and terminal settings. It covers basic usage and the features of WPS-8 and it has a section on key remapping. The early keyboards used with WPS-8 have small but incompatible differences with recent keyboards, but nothing that xterm remapping can't fix.
As you might know, I'm a fan of the PDP line of computers and legacy systems in general. Mainframes, homecomputers, you name it and I probably like it. Add flashing lights, panels and big controls to it and you have my attention in no time.
Plus, in previous jobs I've worked on mainframes, VAX and PDP systems and the emulators used to keep those systems running on modern hardware. Think hospitals, banks, insurance companies, train signalling control and the likes. So, the interest did not spawn from nowhere.
Oscar Vermeulen created an amazing replica of the PDP-8/I. It's a front panel with working switches and LED's, plus a simple Raspberry Pi running the SIMH emulator. I've written multiple articles on the PDP and PiDP-8 and I like the device a lot in general.
So why run WPS-8 today you might ask? Well, first of all, because it is fun to play with. Second, to appreciate the modern software we use the present day more. Just imagine you writing your thesis on an ASR-33 teletype or a DECmate. Imagine the wrist and shoulder pain, the review process and all the other nice things we take for granted. The third reason of course is to bewonder how far advanced computers and software was more than 40 years ago. For less than the price of a small car, a business could own a PDP-8 and have their processes digitized, optimized and all the other advantages of a computer. Or just type their letters to look way more fancy.
WPS-8 is very dependent on specific (vt52) terminal features. The article has a few sections on the workarounds required to use WPS-8 on a modern terminal. I've written a small xterm wrapper script around xterm to make this setup easier. Here is a screenshot of WPS-8 running with xterm in simh with a vt220 font:
What is WPS-8
WPS-8 is a Word Processing System that was sold by Digital Equipment Corporation (DEC) for use with their PDP-8 processors (including the VT78, VT278 DECmate, and PC238 DECmate II and PC24P DECmate III microcomputer systems). WPS-8 was DEC's attempt to compete with the IBM-PC and the word processors on those systems.
The standard DECstation configuration, which includes the VT78 (video terminal, mainboard, memory, real time clock and floppy drive interface) and a dual floppy disk was priced at $7995.
Wikipedia has a bit more information on WPS-8.
I've mirrored two WPS-8 manuals here. One is specifically for the DECmate:
- AA-5267C-TA WPS-8 Word Processing System Reference Manual Versions 2.7 and 3.0 Dec 1978.pdf
- AA-K663B-TA Decmate Wordprocessing Reference Manual.pdf
Most of this article on the usage of WPS-8 is taken from these manuals. If you want to know everything there is to know on WPS-8, read them.
SIMH, Blinkenbone or the PiDP-8 or the real deal
You need the simh emulator to run WPS-8 and work with this guide. On
Ubuntu it can be installed with apt:
apt-get install simh
On Arch you can get version 3.9 (as of writing) from the repository:
pacman -Sy simh
I created a PKGBUILD for simh-git in the AUR, if you want to use version
4.
In the below section I'll talk more on how I found out all the specific settings
required to run WPS-8 correctly. If you just want to get started, skip all of
that. Below is the simh ini file used in this article:
set cpu 32K
set cpu  noidle
set tto 7b
;;set console telnet=2323
attach rx0 wps78v3.4.rx01
attach rx1 wps-doc.rx01
boot rx0
exit
The wps78v3.4.rx01 disk file can be downloaded here. I got it from
pdp8.net.
rx1 doesn't have to exist. If simh can't find it, it will create it. Later
on in this guide, we'll format it as a document drive.
The PiDP-8 and BlinkenBone all come with SIMH bundled.
BlinkenBone is a graphical front panel you can run on a Linux/Windows
machine. It includes SIMH and a PDP-8i panel. I've written a guide with
usage instuctions for BlinkenBone. You need to adapt (or copy) the Adventure
files, place the disk images and start the simulator. It should then boot into
WPS-8, but your terminal settings will be incorrect. You can however enjoy the
front panel pattern.
If you have the PiDP-8 then you can use scp to copy the disk image over.
Edit one of the SR toggle boot options with this configuration, add telnet and
you're good to go. Connect your local xterm to that telnet server and you should
get the WPS-8 screen.
If you have a real PDP-8e you can enjoy the front panel MQ pattern, as seen in the video made by Michael Thompson of the Rhode Island Computer Museum.
Terminal emulation and setup
As said earlier, WPS-8 is dependent on old hardware, specifically the
VT-52/VT-78 terminals and keyboards. Modern terminal emulators have little
support or require significant configuration. I managed to find most of the
issues and work around them. Many thanks to the pidp-8 newsgroup for the
terminal emulation part. The xterm manpage and documentation are my new best
friends as well, plus a whole new section of the internet regarding terminal
ascii codes.
I had trouble getting WPS-8 to display correctly. The system started up in the emulator, but it did not look right:
With some help of the pidp-8 newsgroup and mailing with Michael Thompson of the Rhode Island Computer Museum (who tested it on an actual PDP-8/e, many thanks) we got it working.
WPS-8 seems to be very dependent on the DEC VT-52 terminal. There are specific escape codes used, which newer terminals and terminal emulators don't understand or support. In the above image there are a few things that stand out. First, all the text is on one line, instead of neatly formatted. Second, there are only capital letters.
SIMH by default runs in 8-bit mode. The mailinglist suggested trying 7-bit mode.
This requires the following line in the simh.ini file:
set tto 7b
When running SIMH with this option, one point above is solved:
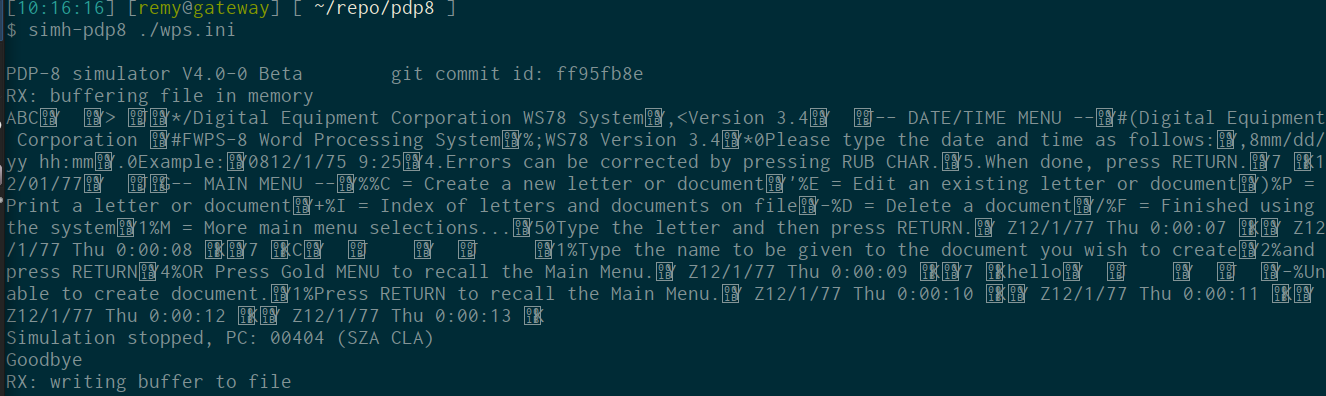
Namely the all capital text. There are normal letters in there but the formatting is still wrong.
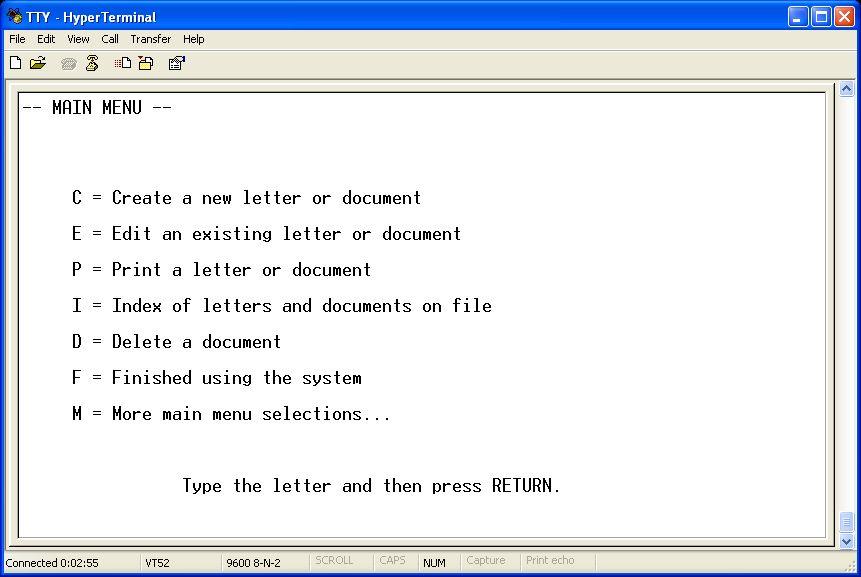
On the mailing list Michael Thompson from the Rhode Island Computer Museum booted up their PDP-8/e with WPS-8 and tested the connection with Microsoft HyperTerminal, which seems to give the correct output:
Chris Smith looked at the second picture of the output and noticed all the squares with numbers in them. Here's what he said:
The 'tto 7b mode' picture is rather enlightening.

All those little squares have 1B in them - but, more specifically, they have 001B.

1B is ASCII decimal 27, which is ... ESCape.

But the 001B notation is rather odd. It's almost as though this is a unicode stream rather than an ASCII stream.

I rather get the impression that this is *not* being interpreted by a VT52 emulator. Such an emulator would have captured all the ESC-Y sequences, and you would not be seeing all of those extra letter Y.

In fact -- a quick check of the VT52 page on Wikipedia suggests that this is real and good VT52 encoding. You just need to get it to an actual emulator.
I tried to set my terminal (xfce-terminal and terminator) to vt52 mode by
exporting TERM=vt52. That did not work, the text stayed garbled.
I have a vt220 at home with the LK201 keyboard and I hooked that up to one of my
machines with simh via an USB to serial cable. serial-agetty is set to
explicity vt52 mode. This is Arch linux specific but you get the gist for
other distro's:
# /lib/systemd/system/serial-getty\@.service
[...]
ExecStart=-/sbin/agetty -h -L 19200 %I vt52
At first that also did not work, but after replacing the usb-serial cable it did:
That left me to figure out why the terminal emulators did not display it correctly.
I suspected that the modern terminal emulators did not implement this vt52
specific codes correctly. Therefore, I started looking into xterm. Consulting
the xterm man page and website on control sequences told me that the Y
code is used only in the vt52 to move the cursor on the screen:
ESC Y Ps Ps
          Move the cursor to given row and column.
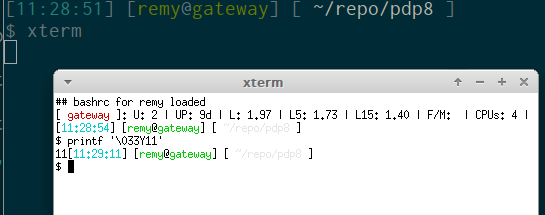
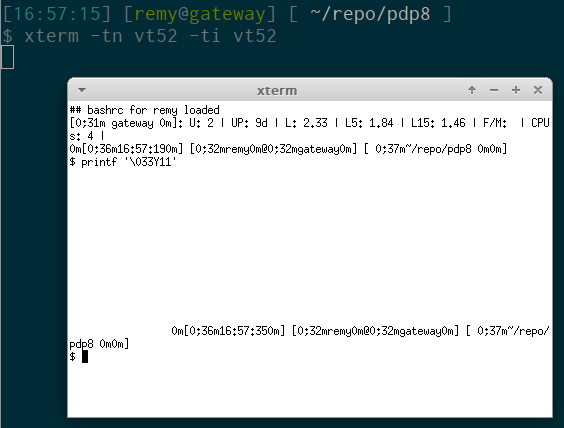
That escape sequence can be tested in your terminal using printf:
printf '\033Y11'
Regular xterm also did not work as expected:
Reading further in to the xterm man page pointed me to the -tn and -ti
options:
   -ti term_id
           Specify the name used by xterm to select the correct response
           to terminal ID queries.  It also specifies the emulation
           level, used to determine the type of response to a DA control
           sequence.  Valid values include vt52, vt100, vt101, vt102,
           vt220, and vt240 (the "vt" is optional).  The default is
           "vt420".  The term_id argument specifies the terminal ID to
           use.  (This is the same as the decTerminalID resource).

   -tn name
           This option specifies the name of the terminal type to be set
           in the TERM environment variable.  It corresponds to the
           termName resource.  This terminal type must exist in the
           terminal database (termcap or terminfo, depending on how xterm
           is built) and should have li# and co# entries.  If the
           terminal type is not found, xterm uses the built-in list
           "xterm", "vt102", etc.
Using both options set to vt52 like below gave the correct result on the
escape code:
xterm -tn vt52 -ti vt52
As you can see, my bash prompt and all fancy stuff like colours are not working. But the escape code works, which is awesome.
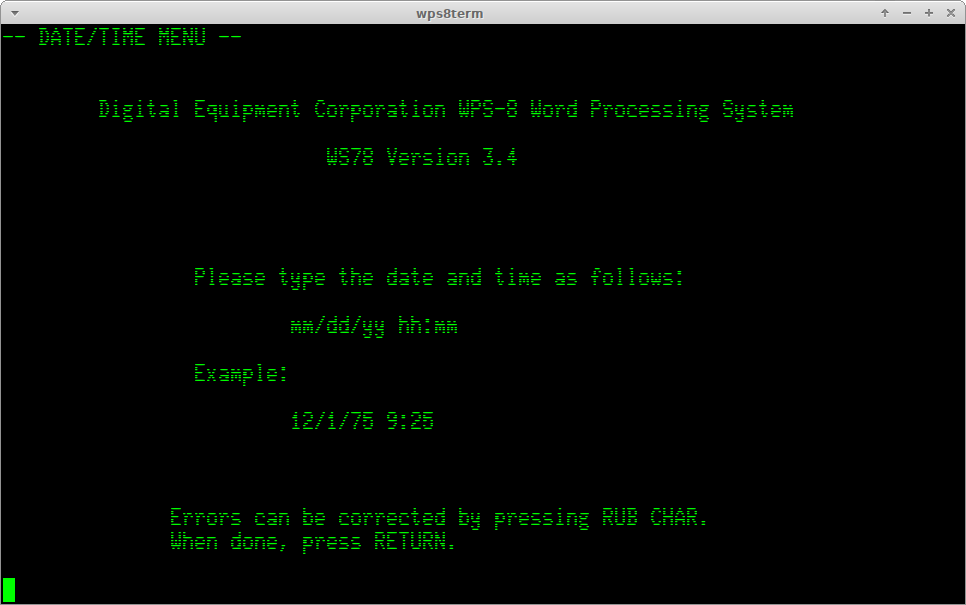
Now the big question, will WPS-8 also show up correctly? Let's take a look:
Behold, in all it's glory. WPS-8 on your modern day terminal emulator!
Scroll down to the section wps8term to find my xterm wrapper script and the
vt220 font. It sets up xterm with the key remappings explained below and starts
up simh.
Key remapping and PF1 / GOLD
The keyboard used with this software had a special GOLD key. It's a function key like CTRL or ALT, but instead of keeping it pressed while you press the other key, like copy (CTRL+C), you pressed and released the gold key, then pressed the function key.
Going back to the menu from the document editor for example is GOLD+M. You press and release the GOLD key, then press M.
Non DECmate/vt78 keyboard like the LK201 had no coloured keys. Instead, they had, above the numeric island, PF1 through PF4. PF1 is the GOLD key
On the terminals where WPS-8 was used, the function keys F1 through F5 were used with the hardware, not mapped to the software. F2 get's you in the hardware setup menu of a VT220 terminal. xterm remaps these keys (PF1 to PF4) to F1 to F4.
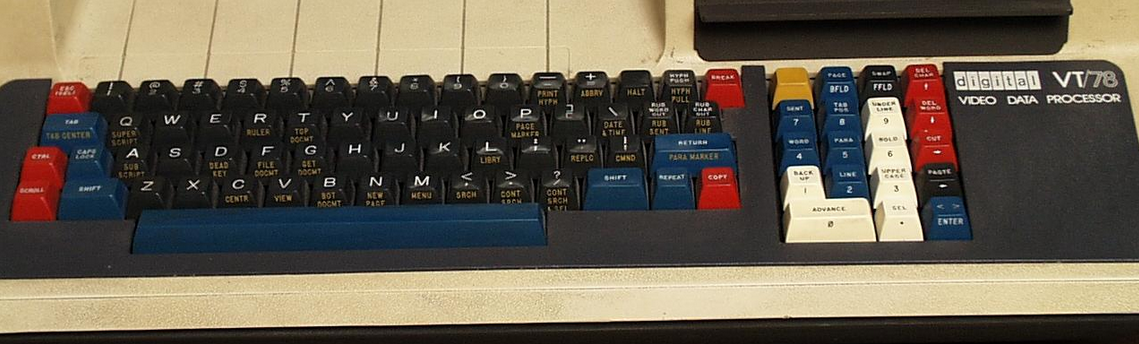
Here is a picture of the keyboard on the vt78 terminal:
This is a schematic view of the VT78 keyboard, with colours and secondary functions:
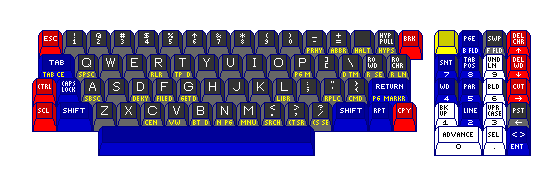
(source)
The backspace key will result in an error on the non-editor screens:
 When typing to the menu use the normal keys on the
 keyboard only.  The line must end with RETURN.
 RUB CHAR and RUB WORD can also be used.

 Please press RETURN and try again.
The working way to get a backspace is to press CTRL and backspace. The actual character sent is the delete character.
Moving around with the arrow keys is not supported. The manual states that the
arrow keys are not used in the word processor. Using them can put extra
characters in your document, the manual states.
There are a few alternatives however. Listed below under Mini keyboard functions are the numeric isle function keys. These, if you have an actual vt52 (or vt220), can be used to move around. The GOLD key can also be used with the regular keypad for movement:
- GOLD B: Move to the bottom of the document
- GOLD T: Move to the top of the document
Furthermore you can use the search option. I wrote an xterm key translation (remap) script specifically for use with WPS-8. It remaps the arrow keys as well as the numpad. See below for more info.
wps8term
On the xterm website there is a script named vmsterm. This implements
key remapping so that the numeric isle on your keyboard mimics the PF1-PF4 keys,
it remaps the Backspace to send the correct RUB OUT CHAR (ascii 127) and other
specific keys. It is intended for usage with VMS (PDP11 -> VAX -> VMS).
I used this script and the showkey command on my own vt220 in vt52 mode to
get the correct keycodes for the numeric function keys. It works in the specific
vt52 mode required for WPS-8. It remaps the arrow keys as well:
- UP: LINE
- DOWN: LINE
- LEFT: BACKUP
- RIGHT: ADVANCE
See below for a full explanation on the meaning of these specific keys. This mapping allows you to use left and right to go back one character and left/right + up/down to advance or go back one line at a time.
This is a screenshot of xterm without using wps8term:

When using WPS-8, you will notice a lot of the keys not working, like the arrow keys or the Backspace. The remapping in the script fixes all of that.
You can get wps8term from the github repo or this site.
The font used in the screenshots can be found here. It is included in the repository as well. If you don't have the font installed xterm will default to a monospace-like font.
Mini keyboard functions
The numeric island is called the minikeyboard in the manual. It lists, per key, the function it has. The table is listed here for reference. It will help you with editing documents, as for example you can use copy and paste.
<> (Angle brackets) Used with the ADVANCE or BACK UP keys to position cursor
after the next or previous right angle bracket
ADVANCE Used with the distance keys (described in Table 5) to advance the
cursor through a document. Other uses are described in this man- ual as
appropriate.
BACK UP Used with the distance keys (described in Table 5) to move the cursor
in reverse through a document. Other uses are described in this manual as
appropriate.
BOLD Makes text bolded. See Chapter 6, Bold Text.
CUT Cuts text out of a document and puts it into the paste area. See Chapter
7, Cut.
DEL CHAR Deletes the character at the cursor.
DEL WORD Deletes the character at the cursor and all the following charac-
ters, punctuation, and spaces up to the next word.
GOLD KEY Activates the feature indicated by the gold lettering on the front of
the main keyboard keys. See Table 3. Also used with the keys on the minikeyboard
to perform special functions. See Table 4.
LINE Used with ADVANCE to move the cursor to the first character of the next
line and successive lines. Used with BACK UP to move the cursor to the start of
the line the cursor is on and preceding lines. Also used with the highlighting
feature (Chapter 6} and select feature (Chapter 7).
PAGE Used with ADVANCE or BACK UP to move the cursor to the next or preceding
page ending mark. Also used with the high- lighting feature (Chapter 6) and
select feature (Chapter 7).
PARA Used with ADVANCE or BACK UP to move the cursor to the beginning of the
next paragraph or preceding paragraph. Also used with the highlighting feature
(Chapter 6) and select feature (Chapter 7).
PASTE Puts text saved in the paste area into the document at the cursor.
SEL Selects a piece of text for cutting or highlighting. See Chapter 7,
Select, and Chapter 6.
SENT Used with ADVANCE or BACK UP to move the cursor one sentence forward or
in reverse. Also used with the highlighting feature (Chapter 6) and select
feature (Chapter 7).
TAB POS Used with ADVANCE or BACK UP to move the cursor one tab position
forward or in reverse. Also used with the highlighting feature (Chapter 6) and
select feature (Chapter 7).
UNDERLINE Underlines text. See Chapter 6, Underline Text.
UPPER CASE Capitalizes text (puts text in uppercase letters). See Chapter 6,
Capitalize Text.
WORD Used with ADVANCE or BACK UP to move the cursor one word forward or in
reverse. Also used with the highlighting feature (Chapter 6) and select feature
(Chapter 7).
Using WPS-8
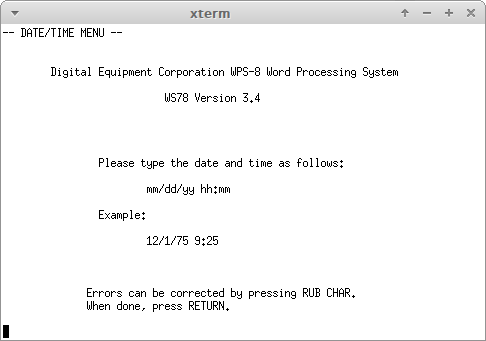
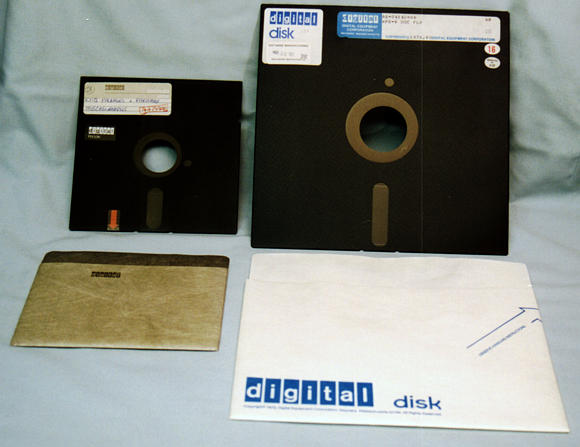
After you've set up the date and time, you can almost start editing documents. We need to format a diskette first. The documents are not saved on the terminal itself but on a floppy disk. The DECmate system uses RX02 floppies. The image below shows on the left an rx02 floppy and on the right an rx50 floppy:
In the main menu, either type the M option two times, or just type MC
followed by a Return. You are now in the Diskette Maintenance Menu:
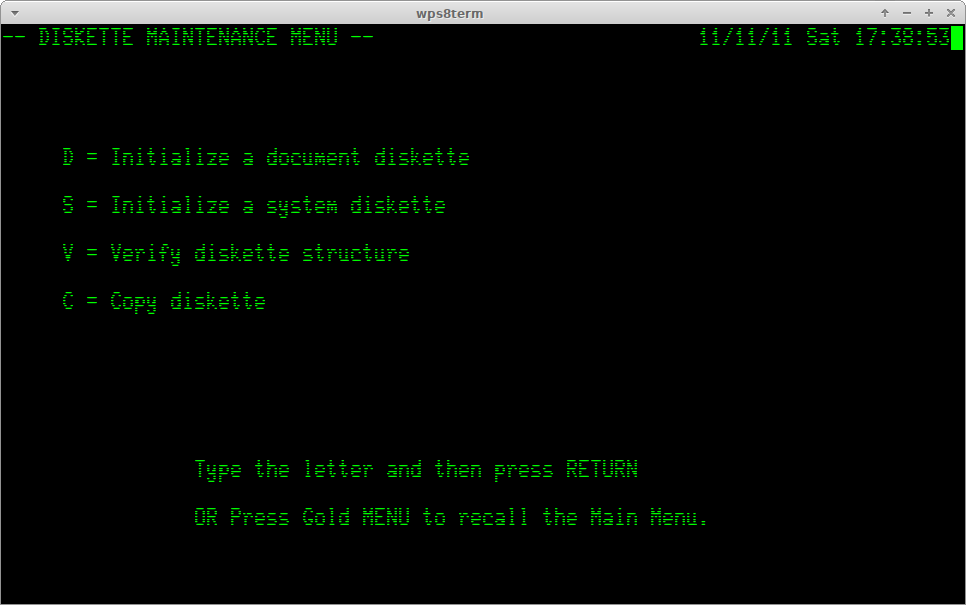
The option D can be used to format a document diskette. In the simh config
we defined this as rx1, the file is wps-doc.rx01. The disk needs to be
formatted before we can use it. If you have other disk files you can attach and
verify them as well with this menu.
A single diskette holds, according to the manual, about 100 to 125 pages of text.
After formatting the disk you need to go back to the main menu to create a new
document. Press and release (P)F1, then press M. Remember, F1 is the
GOLD key, M is for Menu.
Your first document
In the Main Menu, give the C option to create a document. Give it a name,
press RETURN and you will be in the editor.
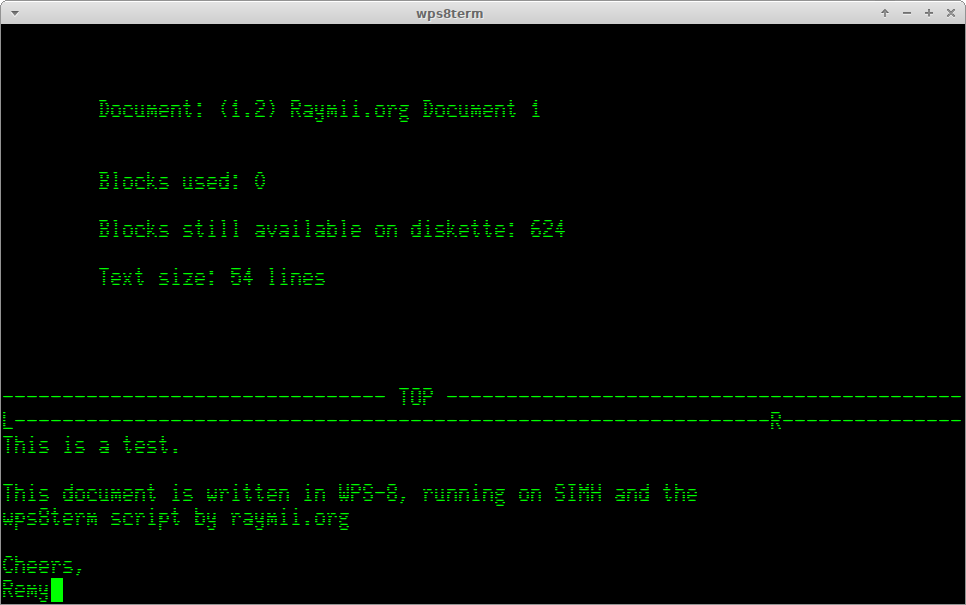
Go ahead and type up your document. Write up a letter to a long lost friend, your pen-pal inmate or the love of your life. Or, like me, just a test document.
At any time you can call up the special Document Edit menu with the GOLD + M
key:

If you want to center a line, use GOLD + C. If you want to insert a new page,
press GOLD + N.
Saving
A document can be saved to diskette in editing mode either by going back to the
menu (GOLD + M) and then again GOLD M. Or, you can use GOLD F to File the
document you are editing after making all your changes on the diskette. There
is no auto save functon, so if you power off the emulator your unsaved changes
are gone.
Searching
Searching for a phrase can be done via the GOLD , (comma). Enter a phrase and press ENTER. The cursor will be placed at the phrase if it's found. To continue to the next occurence of the phrase, press GOLD . (dot).
File management
The file management can be a bit cumbersome on WPS-8. You have no integrated
file manager where you can do all operations. Instead you have seperate
Create, Edit, Index and Delete menu's.
Editing and Deleting existing documents require the document name or number. To
see the list of all documents, use option I.
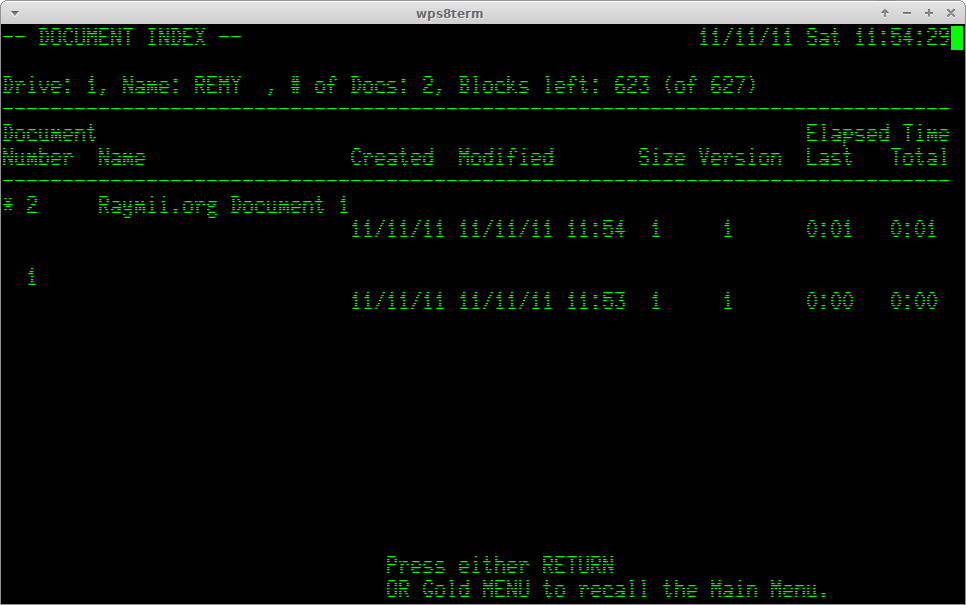
We see an overview with 1 actual document, it has document number 2. There is also document number 1, more on that later. Don't ever edit that document.
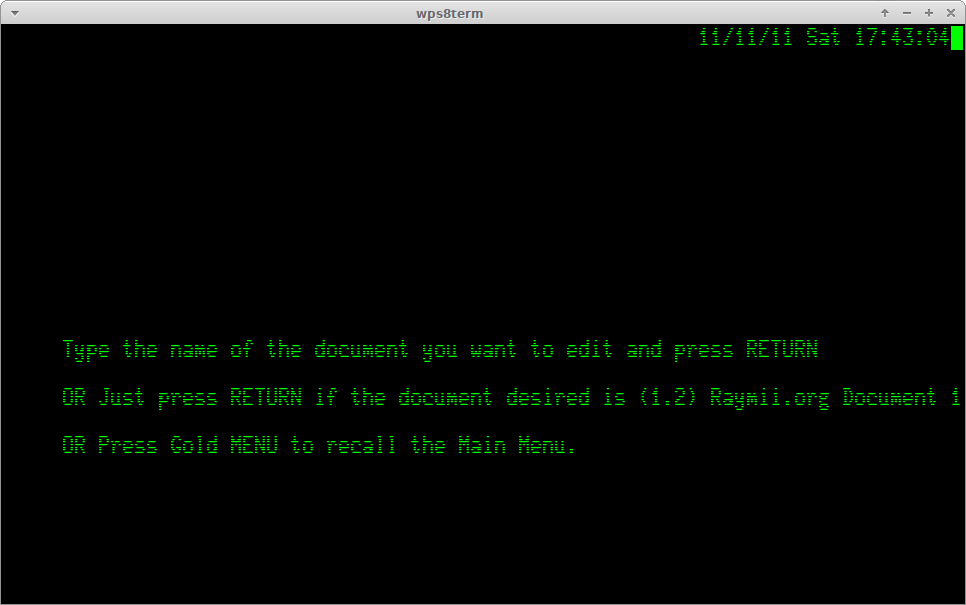
Remember the document filename, or the document number. Use E to open the edit
existing document menu. It will ask you for the document name or number. I the
above case I can enter 2, or the full name. If you have edited a document
earlier and have not shut the system down, it will remember that filename and
ask you. If that is the case, a simple RETURN opens that document.
The list of documents is also stored as a document. The document has no name,
but the number is 1. If you go to the Edit menu and enter 1 as the filename,
you get the document itself. The manual states, in CAPITALS, that THE TEXT THAT
DECMATE INSERTS IN THIS DOCUMENT SHOULD NEVER BE ERASED, otherwise you might
not be able to access your documents on the diskette. It also states that it's
better not to edit that document.
Printing
WPS-8 supports a few different types of printers, of which none were working in
simh. I filed a bug and in the latest 4.0 beta release printing to the
DD (document draft) printer works in simh. This allows you to get your
documents out of the system, onto the host where the emulater runs on.
On Arch Linux I maintain the simh-git package. When 4.0 is released I'm sure it will go into the community repo, but for now you do need to compile the beta version if you want to print.
In your simh.ini file make sure the following two lines are enabled for
printing support:
set LPT enable
attach LPT printer.txt
This file will be created by the emulator and it will get the contents of the printed documents in it, along with a boatload of newlines.
Reusable text - library for abbreviations and paragraphs
If you regularly create documents with a lot of the same text or you often use the same long words or sentences, the WPS-8 system has a great feature to help you with that. The system allows you to create abbreviations that expand to a bigger word or sentence, and paragraphs that expand to a bigger section of text on multiple lines.
Let's say you're typing a guide on the WPS-8 system and you don't want to type
Word Processing System all the time. You can add the abbreviation wp, which
when inserted will be expanded to Word Processing System.
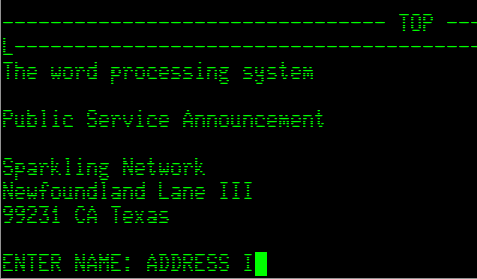
Or you might just want to add the company address on a letter. Create a
paragraph named ADR1 and insert it.
WPS-8 used two user-definable documents to store the abbreviations and
paragraphs, in my disk image those are 199 for the abbreviations and 200 for
the paragraphs. You can edit these by, from the main menu, choose C (create)
if it's the first time you add a paragraph/abbreviation, or E if you later
want to add a paragraph/abbreviation, and enter 199 or 200 as the document
name.
The VT78 keyboard used the gold key and one of the function keys to insert
abbreviations, and the gold key and L to insert a paragraph.
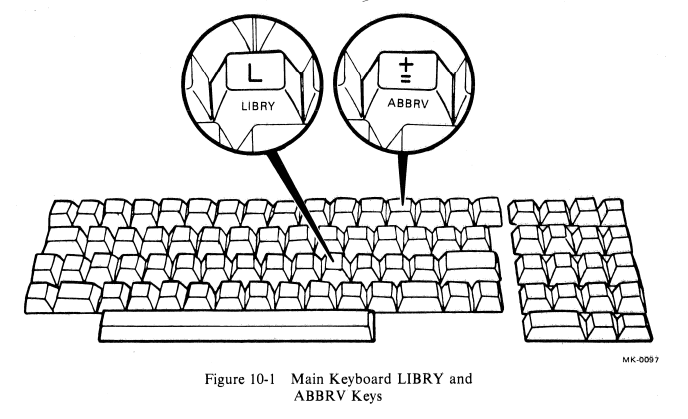
I found out that you can use the paragraph document for abbreviations as well. That was nice because remapping the function key was cumbersome and didn't seem to work for me.
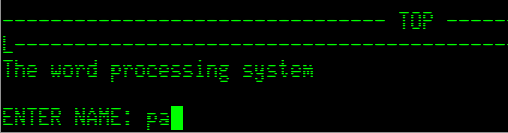
To add a paragraph, or an abbreviation, open up the library document 200 as
described above. The format for an abbreviation is as follows:
<<wp>>Word Processing System<<>>
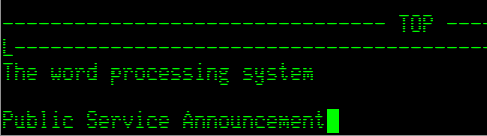
<<pa>>Public Service Announcement<<>>
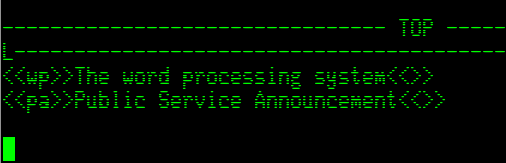
The abbreviation itself should be betwee << and >> and must be two letters
long. The expansion can be up to 120 characters. It must end with <<>> and a
newline.
The format for a paragraph is as follows:
<<ADDR1>>
Sparkling Network
Newfoundland Lane III
99231 CA Texas
<<>>

<<LIPSUM>>
Lorem ipsum dolor sit amet, consectetuer adipiscing elit.
Aenean commodo ligula eget dolor. Aenean massa.
Cum sociis natoque penatibus et magnis dis parturient montes,
nascetur ridiculus mus. <<>>
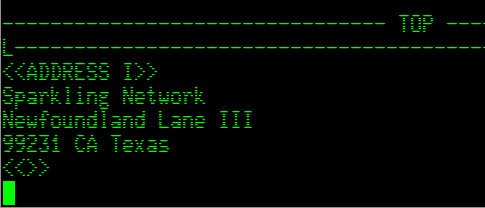
The name must not be longer than 16 letters and the paragraph must end with
<<>>.
Inserting a paragraph or an abbreviation in a document can then be done with
GOLD+L.
From the document menu (GOLD+M) you can also set another document to be the
library document:
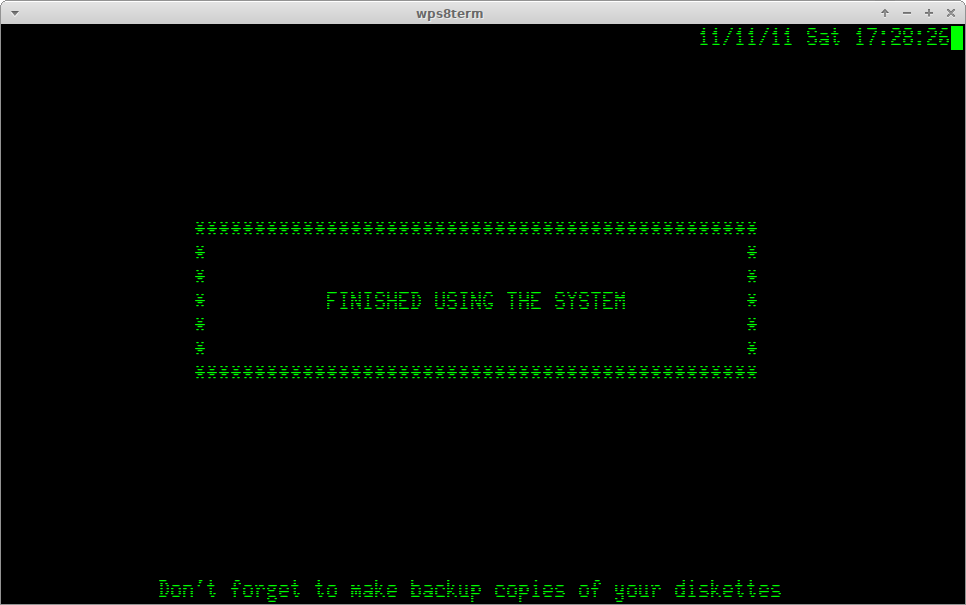
Finished using the system
The manual states that only when you are leaving your WPS-8 system for a few
hours or are done for the day you should turn off the system. In the main menu
(PF1 + M) press F for option Finish. The screen will display a message like
below:
You can return to the main menu by pressing RETURN, for example, when you just
go for your lunch break. Or you can turn off the system.
Using the Finish menu clears the Paste area before displaying the above
screen. If you are editing confidential documents, remove the diskette with the
documents on it. Because the Paste area is cleared, nobody can see the contents
anymore.