Raymii.org

Quis custodiet ipsos custodes?Home | About | All pages | Cluster Status | RSS Feed
Let's Encrypt with DirectAdmin or other Web Control Panels
Published: 11-1-2015 | Last update: 24-02-2016 | Author: Remy van Elst | Text only version of this article
❗ This post is over nine years old. It may no longer be up to date. Opinions may have changed.
Table of Contents
Let's Encrypt is a new certificate authority, recognized by all major browsers. They make it a breeze to set up TLS certificates for your web server. And for free! Let's Encrypt is supported by major players like Mozilla, Akamai, Cisco, the EFF, the Internet Security Research Group and others. Let's Encrypt provides free, automatic and secure certificates so that every website can be secured with an SSL certificate.
Note: Directadmin has this build in since version 1.50.I've written a new guide to set it up via the built in automatic way here. This article is still relevant for the manual way or other controlpanels, but the automatic way is way more easy.
Changelog:
- 24-02-2016: add link to new automatic guide
- 10-12-2015: add
-dmultiple times for SAN certificate - 07-12-2015: add
--webrootoption so you don't have to stop the server - 05-12-2015: add symlink part and client is out of closed beta.
- 07-11-2015: first tutorial
This article shows you how to setup Let's Encrypt with the DirectAdmin web control panel. The guide is generic, so it works for other controlpanels as well.
Recently I removed all Google Ads from this site due to their invasive tracking, as well as Google Analytics. Please, if you found this content useful, consider a small donation using any of the options below. It means the world to me if you show your appreciation and you'll help pay the server costs:
GitHub Sponsorship
PCBWay referral link (You get $5, I get $20 after you've placed an order)
Digital Ocea referral link ($200 credit for 60 days. Spend $25 after your credit expires and I'll get $25!)
First we talk a little bit on what Let's Encrypt is and how it works. We close off with the actual certificate generation and installation.
For now it works with the beta, and required some linux knowledge and root access to the hosting server. So this guide might change later on when the final version is released. Also, Let's Encrypt tries to be as automatic as possible. It however is not able to update the Apache (webserver) configuration for Directadmin just yet. We therefore manually generate the certificate and use Directadmin to place it under a website.
In the future this will hopefully be automated away. We do symlink the certificate files after creation so that will make renewing them easier.
This guide also works for any generic web service where you need a certificate
(PEM) and a private key (PEM) file. The tutorial uses the certOnly option
which gets us these files. You can skip the DirectAdmin part and place (symlink)
the files in your Apache, NGINX or Lighttpd configuration and be done with it.
What is Let's Encrypt
Let's Encrypt is a new certificate authority, recognized by all major browsers. They make it a breeze to set up TLS certificates for your web server. And for free! Let's Encrypt is supported by major players like Mozilla, Akamai, Cisco, the EFF, the Internet Security Research Group and others. Let's Encrypt provides free, automatic and secure certificates so that every website can be secured with an SSL certificate.
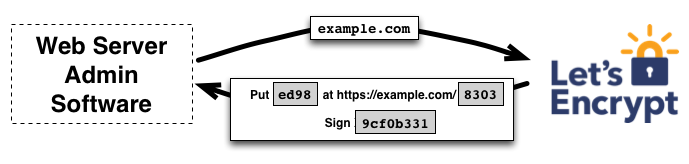
For Let's Encrypt to issue you a certificate, you must prove to them that you control the domain. If we own the domain, we can do this with a series of challenge-response transactions, which is part of the ACME protocol. Let's Encrypt explains this process well.
With the ACME protocol there is an automated way to securely generate, renew and revoke certificates.
The key principles behind Lets Encrypt are:
- Free: Anyone who owns a domain name can use Lets Encrypt to obtain a trusted certificate at zero cost.
- Automatic: Software running on a web server can interact with Lets Encrypt to painlessly obtain a certificate, securely configure it for use, and automatically take care of renewal.
- Secure: Lets Encrypt will serve as a platform for advancing TLS security best practices, both on the CA side and by helping site operators properly secure their servers.
- Transparent: All certificates issued or revoked will be publicly recorded and available for anyone to inspect.
- Open: The automatic issuance and renewal protocol will be published as an open standard that others can adopt.
- Cooperative: Much like the underlying Internet protocols themselves, Lets Encrypt is a joint effort to benefit the community, beyond the control of any one organization.
Beta Program
Let's Encrypt is in beta right now. This means it might not work, or might not work as expected. So don't use it on production just yet.
If you really need an SSL certificate, GoGetSSL provides the cheapest ones, $3 something for a whole year comodo domain validation certificate. Other providers as well, no sponsoring here. (no referral link)
Since the 3rd of december 2015 the closed beta is over and you don't need an invite anymore. There are limit's on the API though:
- Rate limit on registrations per IP: 10 per 3 hours
- Rate limit on certificates per Domain: 5 per 7 days
~~Read the article here on the beta program: https://community.letsencrypt.org/t/beta-program-announcements/1631 and follow the instructions to sign up. I've got my invitation about 3 days after I signed up, yours might be faster.~~
Installing the Let's Encrypt Client
The installation is pretty straightforward. It does require SSH access to your Directadmin host, so that might not be available if you're on a shared hosting server. There is a manual way to authenticate the domain, that is also explained. You can run the client somewhere else and place the result, via SFTP, on your shared hosting account to complete the challenge.
First make sure you have git installed:
# ubuntu & debian
apt-get install git
# centos & redhat
yum install git
Clone the Let's Encrypt code:
git clone https://github.com/letsencrypt/letsencrypt
cd letsencrypt
Since December 2015 the client supports the --webroot option, so your
webserver doesn't need to be brought down.
The below part doesn't apply anymore.
~~Now, Let's Encrypt binds to the HTTP port (80) to do the Domain Validatiopn sequence. You must stop your web server for a few moments to do this. Your website will be offline, but it will be for a minute at max.~~ ~~Directadmin also has a service monitor where we must indicate that HTTPD is offline, otherwise it will restart it and the process might fail:~~
sed -i 's/httpd=ON/httpd=OFF/g' /usr/local/directadmin/data/admin/services.status
service httpd stop
~~If you don't want or are not able to take down all sites or bind to port 80, scroll down below for a manual command.~~
If you are not able to execute the client on the actual webserver, a shared hosting account without ssh or are behind a firewall or loadbalancer, read on below for a manual method.
You need to provide your webroot path. The client places the authentication
challenge files there to do the actual certificate domain ownership validation.
You can find that in your webserver configuration. For directadmin it's like
this: /home/USERNAME/domains/DOMAIN.EXT/public_html.
Also don't forget to fill in your correct email address.
Execute the Let's Encrypt command to get the certificate:
./letsencrypt-auto --server https://acme-v01.api.letsencrypt.org/directory certonly --agree-tos --email 'user@domain.tld' --webroot --webroot-path '/home/certmon/domains/certificatemonitor.org/public_html/' -d certificatemonitor.org -d www.certificatemonitor.org
If you are using an older Python version, for example Python 2.6 on CentOS 6,
add the --debug option as the client will tell you.
If you need a certificate with multiple subdomains or with www.domain.tld and
domain.tld, specify the -d domain option multiple times. Make sure the
webroot is the same. If you only need one domain, change the example and remove
the last -d option.
The client will then do a bit of work with the Lets Encrypt service to validate domain ownership.
If all goes well it will print out the below message:
Version: 1.1-20080819
Version: 1.1-20080819

IMPORTANT NOTES:
 - Congratulations! Your certificate and chain have been saved at
   /etc/letsencrypt/live/certificatemonitor.org/fullchain.pem. Your cert
   will expire on 2016-03-06. To obtain a new version of the
   certificate in the future, simply run Let's Encrypt again.
 - If like Let's Encrypt, please consider supporting our work by:

   Donating to ISRG / Let's Encrypt:   https://letsencrypt.org/donate
   Donating to EFF:                    https://eff.org/donate-le
If not, try again. Otherwise you might be hit by a beta bug.
Now turn on the webserver:
sed -i 's/httpd=OFF/httpd=ON/g' /usr/local/directadmin/data/admin/services.status
service httpd start
I had to disable the CloudFlare protection service, before that I got the following error:
FailedChallenges: Failed authorization procedure. www.certificatemonitor.org (dvsni): tls :: The server experienced a TLS error during DV :: Failed to connect to host for DVSNI challenge, certificatemonitor.org (dvsni): tls :: The server experienced a TLS error during DV :: Failed to connect to host for DVSNI challenge
You now have the certificate from Let's Encrypt. Lets proceed with the installation.
Manual mode
If you have a loadbalancer or something else where you run the client NOT on the
actual webserver, you can use the -a manual command line flag. You enter your
email and domain, then the program displays the following:
Make sure your web server displays the following content at
http://www.certificatemonitor.org/.well-known/acme-challenge/1Qm[...]NHr0 before continuing:

1Qm[...]SA8

Content-Type header MUST be set to text/plain.

If you don't have HTTP server configured, you can run the following
command on the target server (as root):

mkdir -p /tmp/letsencrypt/public_html/.well-known/acme-challenge
cd /tmp/letsencrypt/public_html
printf "%s" 1Qm[...]SA8 > .well-known/acme-challenge/1Qm[...]Hr0
# run only once per server:
$(command -v python2 || command -v python2.7 || command -v python2.6) -c \
"import BaseHTTPServer, SimpleHTTPServer; \
SimpleHTTPServer.SimpleHTTPRequestHandler.extensions_map = {'': 'text/plain'}; \
s = BaseHTTPServer.HTTPServer(('', 80), SimpleHTTPServer.SimpleHTTPRequestHandler); \
s.serve_forever()"
You need not to press ENTER just yet. Create or upload the page requested to
your domain and test it in a browser (via SFTP, for example). You might want to
use the python command. You can also use curl:
curl http://www.certificatemonitor.org/.well-known/acme-challenge/1Qm[...]NHr0
If you get the requested string back you're good to go. Press ENTER on the
prompt and the validation will occur. If you placed the file on the correct
place, it will succeed with the same output as above. If it failed, you will
receive an Authorization Error.
If you use the python script or watch your logs, you'll see something like this doing the verification:
outbound1.letsencrypt.org - - [07/Nov/2015 15:34:01] "GET /.well-known/acme-challenge/1Qm[...]Hr0 HTTP/1.1" 200 -
After succeeding, read on to install the certificates.
Installing the certificates
We generated a certificate, Let's Encrypt validated us and returned the certificates, all automatically. The certificates are placed on your system and you can check them with the following command:
ls -la /etc/letsencrypt/live/certificatemonitor.org/
Replace certificatemonitor.org with your own domain. Output:
total 8
drwx------ 3 root root 4096 Nov  7 07:26 ..
lrwxrwxrwx 1 root root   49 Nov  7 07:34 privkey.pem -> ../../archive/certificatemonitor.org/privkey2.pem
lrwxrwxrwx 1 root root   51 Nov  7 07:34 fullchain.pem -> ../../archive/certificatemonitor.org/fullchain2.pem
lrwxrwxrwx 1 root root   47 Nov  7 07:34 chain.pem -> ../../archive/certificatemonitor.org/chain2.pem
lrwxrwxrwx 1 root root   46 Nov  7 07:34 cert.pem -> ../../archive/certificatemonitor.org/cert2.pem
As we can see they symlinked the files there. If you configure your own webserver manually, you can give these files as the location in your apace or nginx config. When you renew the certificate later on, you don't have to update the webserver config, just a reload/restart.
Get the contents of the certificate, private key and chain with the following commands. Remember to replace certificatemonitor.org with your domain:
cat /etc/letsencrypt/live/certificatemonitor.org/cert.pem
cat /etc/letsencrypt/live/certificatemonitor.org/privkey.pem
cat /etc/letsencrypt/live/certificatemonitor.org/chain.pem
Save the contents in a text editor somewhere, you need these in DirectAdmin.
After you've installed the certificates in the controlpanel (DirectAdmin), we need to symlink those files to the Lets Encrypt files so that auto renewal works better. We do need to first install them via the control panel so that the configuration gets updated in the correct way. Most controlpanels overwrite manual changes.
Login to your Directadmin control panel and navigate to your website. Under "Advanced Features" click "SSL Certificates".
Select the radio button for the Paste a pre-generated certificate and key
option. In the textfield below, first paste the contents of the cert.pem file.
Below that, paste the contents of the privkey.pem file.
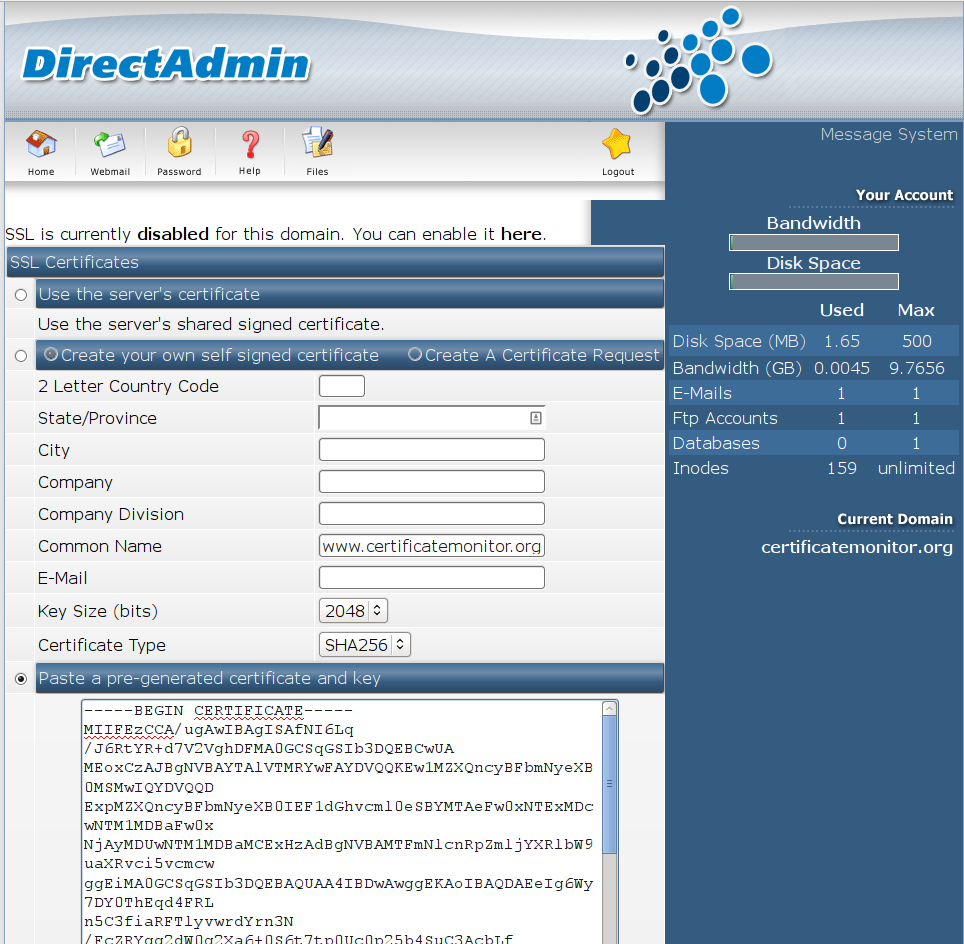
Click the Save button. Now go back to the main domain screen, and navigate to
"Advanced Features" --> "SSL Certificates" again. Scroll down and open the link
Click Here to paste a CA Root Certificate. Mark the checkbox Use a CA Cert.
and paste the contents of the chain.pem file there:
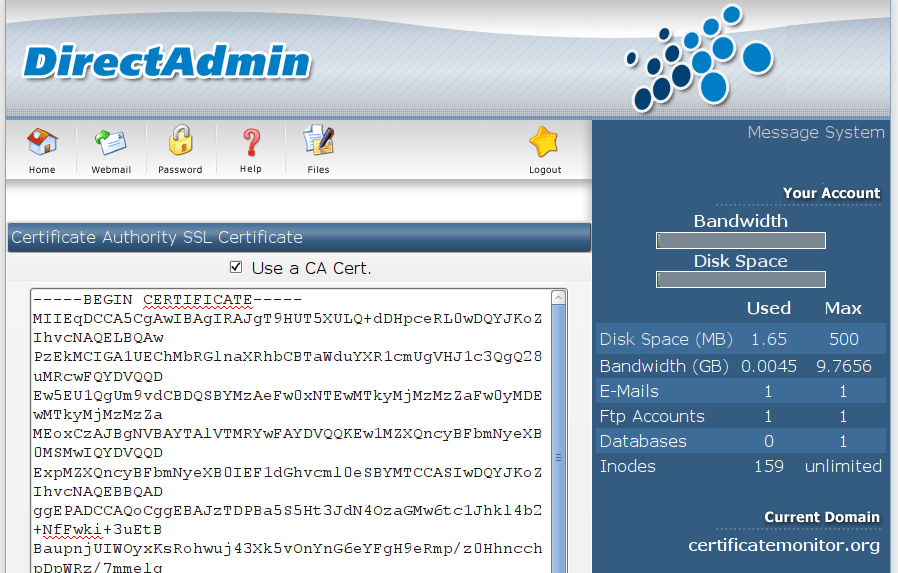
Click the Save button.
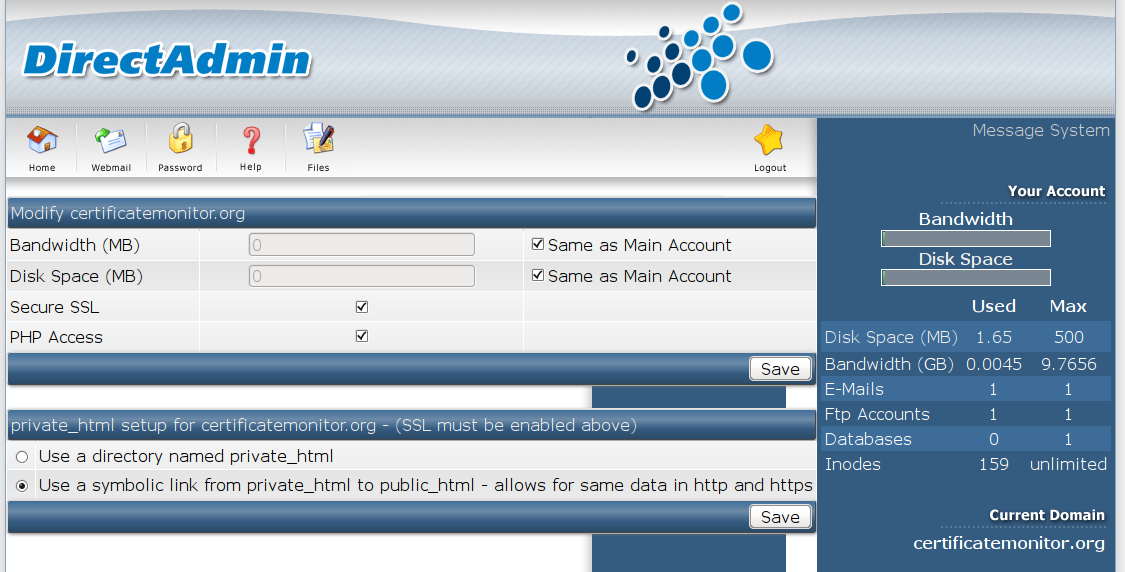
If you haven't already enabled SSL for your domain, do that now. Navigate to the
main domain screen. Click "Domain Setup". Open your domain. Mark the Secure
SSL checkbox and click the Save button. Now, under private_html setup for
certificatemonitor.org - (SSL must be enabled above) mark the radio button Use
a symbolic link from private_html to public_html - allows for same data in http
and https and click the save button again:
Now navigate to https://yourdomain and behold Let's Encrypt in all it's glory.
Well, actually, you should just see your own website with a valid SSL
certificate:
You can check it with an SSL validator like the SSL server test from qually labs or my own SSL test: https://ssldecoder.org.
Make sure to also setup a secure cipherlist and other secure SSL settings. Read up on the current best practice here: https://cipherli.st.
For other Control Panels, like cPanel, VestaCP, Plesk and Webmin, this process is the same. Look up their documentation on installing a certificate, and use the files Let's Encrypt generated for you.
We're now going to symlink the certificates so that auto renewal works when the Let's Encrypt client supports it. Because we symlink, the files will be updated automatically. We do need to first install the certificates the control-panel way, otherwise our manual changes might be overwritten.
You need to check the apache configuration to find the certificate file paths.
Use httpd -S to get the current configuration in use. Some distro's use
apachectl -S instead of httpd -S:
httpd -S 2>&1 | grep 443 | grep certificatemonitor
Example output:
port 443 namevhost www.certificatemonitor.org (/usr/local/directadmin/data/users/certmon/httpd.conf:55)
Use the following command to get the SSL certificate file locations from the config file:
grep SSL /usr/local/directadmin/data/users/certmon/httpd.conf
Example output:
SSLEngine on
SSLCertificateFile /usr/local/directadmin/data/users/certmon/domains/certificatemonitor.org.cert
SSLCertificateKeyFile /usr/local/directadmin/data/users/certmon/domains/certificatemonitor.org.key
SSLCACertificateFile /usr/local/directadmin/data/users/certmon/domains/certificatemonitor.org.cacert
With the following commands we symlink the certificates to the Let's Encrypt path:
# remember, ln -s syntax is: ln -s /path/to/file /path/to/symlink
ln -s /etc/letsencrypt/live/certificatemonitor.org/cert.pem /usr/local/directadmin/data/users/certmon/domains/certificatemonitor.org.cert
ln -s /etc/letsencrypt/live/certificatemonitor.org/privkey.pem /usr/local/directadmin/data/users/certmon/domains/certificatemonitor.org.key
ln -s /etc/letsencrypt/live/certificatemonitor.org/chain.pem /usr/local/directadmin/data/users/certmon/domains/certificatemonitor.org.cacert
If you get an error about a file already existing, remove the files first before creating the symlink.
Tha's it! You're done, you've installed a valid Lets Encrypt certificate for your domain. Awesome!.
Just one more important thing.
Renewing your certificate
After 90 day's, your certificate expires. With Let's Encrypt, that is not a problem. Why? Because the goal of the project is to automate this whole process. When the product is finished and out of beta, it will renew the certificate automatically when it is about to expire, so you don't have to do anything.
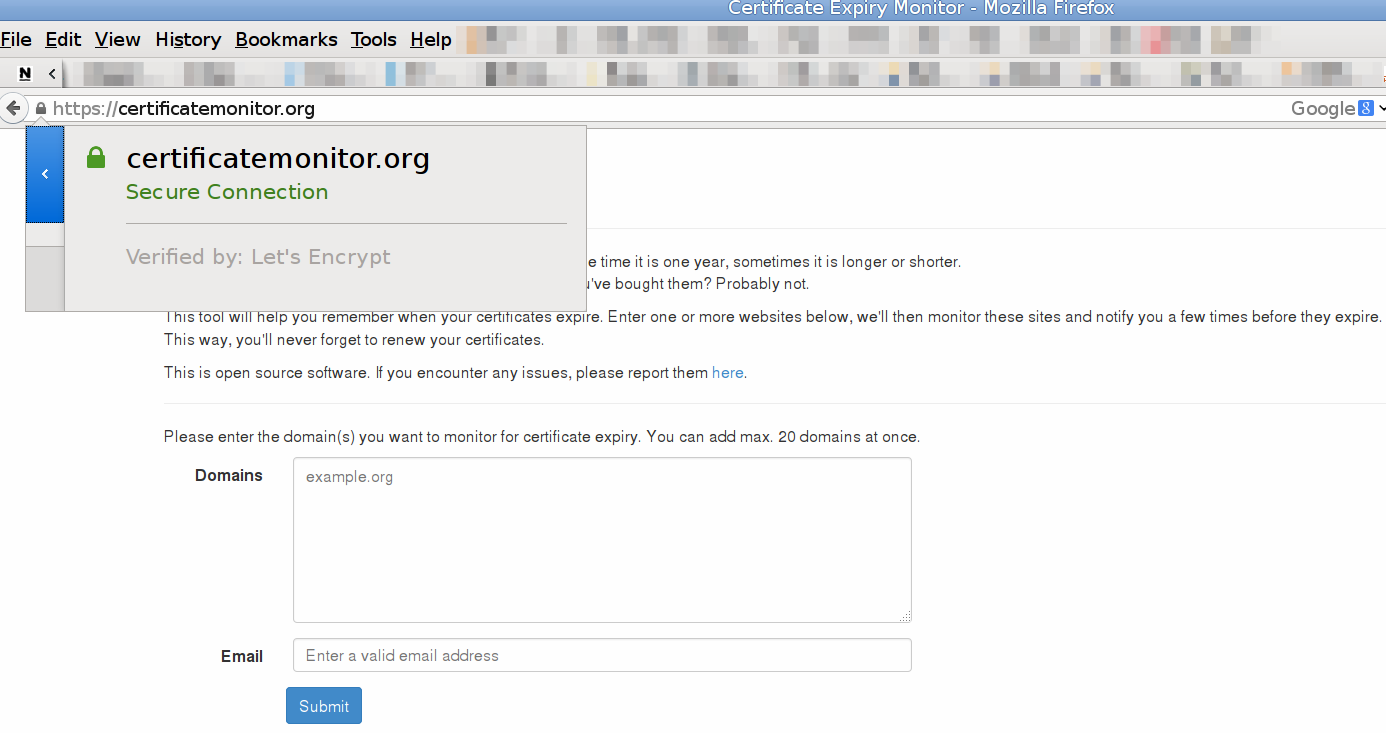
For now, that is not the case, since we're running the beta. Your certificate will expire in 90 days. Make sure to setup a reminder in your calendar a few days before, or use my certificate expiry reminder service: https://certificatemonitor.org/. (That will send you a few mails before your certificate expires).
When the 90 days are almost up, come back to this page and execute the Let's
Encrypt command again with the correct domain and webroot options. You'll be
asked if you want to renew, agree, and the certificate will be renewed. Then
restart the webserver via a service httpd restart. Repeat is for all
certificates.
If you still have any questions or suggestions, shoot me a message. Check the About page for my details.
Tags: apache , articles , centos , certificate , cpanel , directadmin , nginx , openssl , plesk , ssl , tls