Raymii.org

אֶשָּׂא עֵינַי אֶל־הֶהָרִים מֵאַיִן יָבֹא עֶזְרִֽי׃Home | About | All pages | Cluster Status | RSS Feed
Installing OpenVMS 8.4 Alpha inside AXPbox on Debian 10 / Ubuntu 20.04 with networking
Published: 04-11-2020 | Last update: 08-11-2020 | Author: Remy van Elst | Text only version of this article
❗ This post is over five years old. It may no longer be up to date. Opinions may have changed.
Table of Contents
![]()
In my previous article I announced the fork of the es40 emulator to AXPbox
by Tomáš including bug fixes and rework allowing it to install OpenVMS 8.4 without
problems. Since then I've contributed a few patches and doc updates, now NetBSD boots
as well (the patches for netbsd were from other es40 forks). I've also looked into
getting networking setup, since that is a bit of a tedious process due to pcap and
linux, pcap being used for network emulation. SIMH (among others, a great VAX emulator)
suffers from the same problems with networking. This guide will show you how to install
AXPbox and get OpenVMS 8.4 ready and running with networking inside AXPbox. It's a rather
long guide with a lot of information and output.
In this guide I'll cover:
- Getting OpenVMS 8.4 from VSI
- Compilation and setup of AXPbox
- Configuring AXPbox,
- Installing OpenVMS inside AXPbox
- OpenVMS Configuration
- Adding a user to OpenVMS
- Setting up networking in OpenVMS
- Port forwarding to the virtual machine
- Setup SSH, FTP and telnet
- Downloading and installing curl
I do recommend you to read the AXPbox wiki Installation Guide, in the future that might be more up to date on installing OpenVMS.
This guide is a big and comprehensive one, we cover a lot of ground. Use the table of contents above to skip to a part you're interested in. The order of topics is specifically so you can follow along. And if you're able, do contribute back to AXPbox, it's our only hope for an open source Alpha emulator.
Preface on networking and using a virtual machine
I'll start off with a bit about networking. It took me a long time and help
from Tomas to figure out what was happening and why. A short summary is
that AXPbox uses libpcap to emulate networking. On Linux, packets made by
axpbox, are not received by the host system. That means, that if you run
AXPbox on your desktop, your desktop will not be able to communicate with
AXPbox, but other systems on the network will be. This issue can be resolved
by using 2 network interfaces on your host system (one for axpbox and one for
regular networking) or by a virtualbox setup which we'll explain further.
This issue is documented by SIMH, they have the same setup for networking (although, simh also support tun/tap and vde, which do not suffer from this problem).
In the simh docs:
On Windows using the WinPcap interface, the simulated computer can "talk" to the host computer on the same interface. On other platforms with libpcap (linux, mac OS), the simulated computer can not "talk" to the host computer via the selected interface, since simulator transmitted packets are not received by the hosts network stack. The workaround for this is to use a second NIC in the host and connect them both into the same network; then the host and the simulator can communicate over the physical LAN.
And in the SIMH FAQ PDF:
2.11 - My Linux, OSX or other Unix host can't communicate with the PDP-11 or VAX over Ethernet; why?
The network stacks on these systems don't naturally receive packets which are transmitted with the pcap_sendpacket API...
I also had issues with bridged network adapters. I'm used to creating a bridge
for when using KVM virtual machines, and giving each VM it's own tapX
interface, they can access the network directly that way.
Because of the above, if you want to use networking (which you probably will, it's awesome to play with clustering) and have only 1 NIC in your PC, I recommend you use a virtual machine with two separate network adapters. In this guide I'm using Ubuntu 20.04 on my desktop, which runs Virtualbox (I choose that over KVM for ease of use in this guide).
Virtualbox has a Debian 10 virtual machine with 2 virtual network adapters,
the first is in the virtualbox NAT network, that one will be used by OpenVMS,
the second is bridged into my own LAN, that one is used to SSH into the Debian
VM from Ubuntu.
This Debian 10 virtual machine runs AXPbox, so it's a bit of virtual machine inception going on. Have your spinning top ready.
OpenVMS inside AXPbox can connect to the internet, and via virtualbox you can create port forwards back into OpenVMS. That will be explained later on in the network section, including screenshots.
I had issues with 2 bridges interfaces, OpenVMS couldn't connect
to my router and my host PC couldn't connect to OpenVMS, but Tomas has had
that setup working with KVM, so that might work, but for the sake of a reproducible
tutorial, I'll be focusing on this Virtualbox NAT setup.
When I plugged in a USB NIC adapter and configured AXPbox to use that, connectivity worked as expected. If you have multiple separate network cards in your PC, you don't need the VM setup.
**Summarizing, install Virtualbox, install a Debian 10 VM with 2 NIC's, one NAT and one Bridged, or use multiple NIC's in your PC..
If you're comfortable with KVM you can do that as well, the network setup should be easy enough with the theory and explanation above.
Getting OpenVMS 8.4-2 from VSI (Hobbyist program)
Currently there is only one legal option to get OpenVMS installation media, the VSI Community License program. Fill out the form there and you'll get an e-mail with login credentials to the VSI SFTP server.
Login in to the SFTP server and download the file named ALPHA0842L1.ZIPEXE.
This is a self-extracting archive for OpenVMS Alpha, but it can be extracted
normally using unzip or an archive manager on any operating system. After
unzipping you should have the file ALPHA0842L1.ISO.
$ unzip ALPHA0842L1.ZIPEXE
Archive:  ALPHA0842L1.ZIPEXE
warning [ALPHA0842L1.ZIPEXE]:  120320 extra bytes at beginning or within zipfile
  (attempting to process anyway)
  inflating: ALPHA0842L1.ISO

$ md5sum ALPHA0842L1.ISO
e19f1123bdb565d9f9bb736be5314c46  ALPHA0842L1.ISO

$ md5sum ALPHA0842L1.ZIPEXE
2228fc25d9640a16a57bada6d8c609ec  ALPHA0842L1.ZIPEXE
You will also receive an email containing your license, PAK files. Save that as well.
HP Enterprise OpenVMS 8.4 and a bit of time travel
Alternatively you can use ALPHA084.ISO from the now concluded HPE OpenVMS
Hobbyist Program. You do need a different license PAK though, from HPE, and
you need to set the date inside the Debian virtual machine to back when your
HPE hobbyist license was still valid. For hobbyist use, it will work
fine inside AXPbox.
Here is a site hosting that HP ISO and here is another one, but I'm not sure how long those will stay alive. Google the filename or resort to less legal internet protocols to get a copy of this ISO.
$ md5sum ALPHA084.ISO
55248b10ca08a350731daa12cc253b8c  ALPHA084.ISO
Reset the time inside the Debian VM:
systemctl stop systemd-timesyncd;
systemctl disable systemd-timesyncd;
date --set 2018-10-18;
hwclock --set --date 2018-10-18
Reset the time inside OpenVMS:
SET TIME=18-OCT-2018:13:00:00
Now that you've got the ISO and license, continue on building and installing the emulator.
Compiling AXPbox
I'll assume you do these steps inside the Debian 10 virtual machine you've setup. They work the same for Ubuntu 20.04.
First install required dependencies to compile AXPbox:
apt install libpcap-dev build-essential unzip libx11-dev libsdl-dev cmake
libpoco-dev libxt-dev git
Clone the repository:
# I'm building commit d7e7c93
git clone https://github.com/lenticularis39/axpbox
Create a build folder and navigate into it:
cd axpbox
mkdir build
cd build
Run cmake to generate the files for make:
cmake .. -DCMAKE_BUILD_TYPE="Release"
Run make to start the actual compile
make -j$(($(nproc) + 1))
Output, make sure that pcap found appears if you want networking
-- pcap found. Networking support enabled
-- sdl found. SDL graphics support enabled
-- x11 found. x11 graphics support enabled
-- C++ compiler flags  :  -O3 -march=native -DNDEBUG
-- C compiler flags    :  -O3
-- Linker flags        :
-- Configuring done
-- Generating done
-- Build files have been written to: /root/git/axpbox/build
Scanning dependencies of target axpbox
[  1%] Building CXX object CMakeFiles/axpbox.dir/src/AliM1543C.cpp.o
[  3%] Building CXX object CMakeFiles/axpbox.dir/src/AliM1543C_ide.cpp.o
[  4%] Building CXX object CMakeFiles/axpbox.dir/src/AliM1543C_usb.cpp.o
[...]
[ 95%] Building CXX object CMakeFiles/axpbox.dir/src/gui/scancodes.cpp.o
[ 96%] Building CXX object CMakeFiles/axpbox.dir/src/gui/sdl.cpp.o
[ 98%] Building CXX object CMakeFiles/axpbox.dir/src/lockstep.cpp.o
[100%] Linking CXX executable axpbox
[100%] Built target axpbox
You now have the emulator built and ready for configuration:
./axpbox
Output:
AXPBox Alpha Emulator (version 0.1)
Usage: ./axpbox run|configure <options>
Prepare the license ISO
If you have your PAK from VSI (product activation key) with the hobbyist
license, it's handy to build an ISO and later on after the installation,
mount that and run the ALPHA_COMMUNITY_LICENSE_PAK_XX_XXXX.COM script on
OpenVMS, than it is to copy and paste. Not all terminal emulators handle it
well (too fast) and with the HP license, it's way to long to copy and paste.
The VSI license seems shorter.
First copy the OpenVMS license script (.COM) to the Debian VM. Then create
the ISO:
# create a folder for the script
mkdir license
# copy the license script into that folder
cp ALPHA_COMMUNITY_LICENSE_PAK_SEP_2020.COM license
# generate an ISO of that folder
genisoimage -V license -o pak.iso license
Output:
Total translation table size: 0
Total rockridge attributes bytes: 0
Total directory bytes: 0
Path table size(bytes): 10
Max brk space used 0
175 extents written (0 MB)
Later on when we're finished installing OpenVMS we'll activate this license from the ISO. Read more on OpenVMS scripts, ISO and record format here
Download the SRM ROM
Summarized, the SRM rom is sort of a BIOS, but for Alpha and OpenVMS requires this to boot. It was available from HP, but not anymore, so I mirrored it. Create a rom folder and download the file there:
mkdir rom && cd rom
wget https://raymii.org/s/inc/downloads/es40-srmon/cl67srmrom.exe
cd ..
Quoting Grootersnet with more information on SRM and PALcode:
14.3.2 What does SRM mean? What is PALcode?
The abbreviation SRM is derived from the Alpha System Reference Manual, the specification of the Alpha architecture and the associated firmware.
PALcode is a name assigned to a particular set of functions provided by the SRM firmware. PALcode is used to provide low-level functions required by higher-level operating system or application software, functions which may not be directly available in Alpha hardware. PALcode is implemented using available Alpha instructions and using the Alpha processor, though PALcode operates in a mode which simplifies programming. PALcode is also permitted access to processor-specific and otherwise internal features of a particular Alpha microprocessor implementation; microprocessor-specific features which are not easily accessible to operating system or application code.
We're almost ready to install OpenVMS. After compiling and preparing, all that is left is configuring AXPbox.
Configuring AXPbox - es40.cfg
AXPbox has an interactive configuration prompt which you can invoke with
./axpbox configure. It will ask you a set of questions, and you can read
more about it on the project wiki. For the purpose of this guide, please
use the below configuration.
Place the below contents in a file named es40.cfg in the same folder as the binary.
sys0 = tsunami
{
  memory.bits = 28;
  rom.srm = "rom/cl67srmrom.exe";
  rom.decompressed = "rom/decompressed.rom";
  rom.flash = "rom/flash.rom";
  rom.dpr = "rom/dpr.rom";

  cpu0 = ev68cb
  {
    speed = 800M;
    icache = true;
    skip_memtest_hack = true;
  }

  serial0 = serial
  {
    port = 21264;
    action = "";
  }

 pci0.15 = ali_ide
 {
   disk0.0 = file
   {
     file =          "disk0.img";
     serial_number = "VMS";
     rev_number    = "8.4";
     model_number  = "OpenVMS8.3";
     read_only     = false;
     cdrom         = false;
     autocreate_size = 6000M;
   }
   disk1.0 = file
   {
     file          = "ALPHA0842L1.ISO";
     read_only     = true;
     cdrom         = true;
   }
 }


pci1.1 = dec21143
{
        adapter = "enp0s3";
        mac = "08-00-DE-AD-BE-EF";
}


  pci0.7 = ali
  {
    mouse.enabled = false;
    vga_console = false;
  }

  pci0.19 = ali_usb
  {
  }
}
Change the adapter = "enp0s3" line to match your virtualbox NAT adapter.
That is, not the NIC with the IP of the Debian VM you're connecting to, but
the one with the internal Virtualbox network. In my case enp0s8 is the
bridged adapter and enp0s3 is the NAT adapter.
Make sure the ALPHA0842L1.ISO installation ISO is in the same folder as the
binary and this config file. If you forget to place that file, you'll get a
crash:
pci0.15(ali_ide).disk1.0(file): Could not open file ALPHA0842L1.ISO!
Emulator Failure: Runtime exception: pci0.15(ali_ide).disk1.0(file): File
does not exist and no autocreate_size set:
/root/git/axpbox/src/DiskFile.cpp, line 124 Segmentation fault
I have my setup with 1800MHz cpu.speed and 30 memory.bits (1 GB instead of
256MB). For this guide I'll recommend the defaults (800MHz and 256MB).
If you want to skip the memory test at startup (saves a few minutes of
booting), add the following underneath the icache line in the cpu block:
skip_memtest_hack = true;
Update 08-11-2020: Tomáš did a bugfix, skip_memtest_hack now works during
installation.
The disk will be automatically created at first start of the emulator:
pci0.15(ali_ide).disk0.0(file): Could not open file disk0.img!
pci0.15(ali_ide).disk0.0(file): writing 6000 1kB blocks: 100%
pci0.15(ali_ide).disk0.0(file): 6000 MB file disk0.img created.
pci0.15(ali_ide).disk0.0(file): Mounted file disk0.img, 12288000 512-byte
blocks, 15360/16/50.
You can also manually create it, but that shouldn't be needed:
truncate -s 6G disk0.img
If everything is setup correctly, the emulator should prompt you to connect to a telnet port:
serial0(serial): Waiting for connection on port 21264.
Continue on to the OpenVMS installation part.
OpenVMS Installation
Connect to the telnet port as specified by the emulator prompt (replace
10.0.0.8 by the IP of your Debian VM).
$ telnet 10.0.0.8 21264
Trying 10.0.0.8...
Connected to 10.0.0.8.
Escape character is '^]'.
This is serial port #0 on ES40 Emulator

OpenVMS PALcode V1.98-104, Tru64 UNIX PALcode V1.92-105

starting console on CPU 0
[...]
     256 MB of System Memory
Testing the System
Testing the Network
AlphaServer ES40 Console V7.3-1, built on Feb 27 2007 at 12:57:47
P00>>>
If you see the P00>>> prompt, continue on. If you get a crash, disconnect or
segfault, check the emulator tab, it has an error what is wrong.
Find out which device has the installation ISO:
P00>>>show dev
Output:
dqa0.0.0.15.0              DQA0                    OpenVMS8 .3
dqb0.0.1.15.0              DQB0               ALPHA084 2L1.ISO
dva0.0.0.1000.0            DVA0
ewa0.0.0.1.1               EWA0              08-00-DE-AD-BE-EF
In our case, DQB0 has the install disk and DQA0 is our root disk. Boot the
install ISO:
P00>>>boot DQB0
Output:
(boot dqb0.0.1.15.0 -flags 0)
block 0 of dqb0.0.1.15.0 is a valid boot block
reading 1230 blocks from dqb0.0.1.15.0
bootstrap code read in
base = 200000, image_start = 0, image_bytes = 99c00(629760)
initializing HWRPB at 2000
initializing page table at ff56000
initializing machine state
setting affinity to the primary CPU
jumping to bootstrap code


    OpenVMS (TM) Alpha Operating System, Version V8.4-2L1
                    Copyright 2016 VMS Software, Inc.
There will be some more output:
    Installing required known files...

    Configuring devices...

%EWA0, Auto-negotiation mode set by console
%EWA0, Link state: UP
%EWA0, Auto-negotiation (internal) starting
%EWA0, Full Duplex 100baseTX connection selected
When that's done, takes a while, the installer menu pops up:
    ****************************************************************

    You can install or upgrade the OpenVMS ALPHA operating system
    or you can install or upgrade layered products that are included
    on the OpenVMS ALPHA distribution media (CD/DVD).

    You can also execute DCL commands and procedures to perform
    "standalone" tasks, such as backing up the system disk.

    Please choose one of the following:

        1)  Upgrade, install or reconfigure OpenVMS ALPHA Version V8.4-2L1
        2)  Display layered products that this procedure can install
        3)  Install or upgrade layered products
        4)  Show installed products
        5)  Reconfigure installed products
        6)  Remove installed products
        7)  Find, Install or Undo patches; Show or Delete Recovery Data
        8)  Execute DCL commands and procedures
        9)  Shut down this system

Enter CHOICE or ? for help: (1/2/3/4/5/6/7/8/9/?)
Enter 1.
Some information about patches on the disk pops up:
    The following PATCH kits are present on the OpenVMS ALPHA
    distribution media.


----------------------------------- ----------- ----------
PRODUCT                             KIT TYPE    KIT FORMAT
----------------------------------- ----------- ----------
VSI AXPVMS TCPIP_NFS_PAT V5.7-ECO5A Patch       Compressed
VSI AXPVMS TCPIP_SSH_PAT V5.7-ECO5D Patch       Compressed
----------------------------------- ----------- ----------

2 products found

    Please consult the OpenVMS ALPHA Installation and Upgrade Manual,
    the Release Notes, and the Cover Letter to determine if any or
    all of these patches may be required for your system.

Press Return to continue...
Press return as said. You will be asked if you want to format the disk:
 ***********************************************************

    This procedure will ask a series of questions.

          () - encloses acceptable answers
          [] - encloses default answers

    Type your response and press the <Return> key.  Type:

          ? - to repeat an explanation
          ^ - to change prior input (not always possible)
          Ctrl/Y - to exit the installation procedure

    There are two choices for installation/upgrade:

    Initialize - Removes all software and data files that were
        previously on the target disk and installs OpenVMS ALPHA.

    Preserve -- Installs or Upgrades OpenVMS ALPHA on the target disk
        and retains all other contents of the target disk.

   * Note: You cannot use preserve to install OpenVMS ALPHA on a disk on
        which any other operating system is installed.  This includes
        implementations of OpenVMS for other architectures.

Do you want to INITIALIZE or to PRESERVE? [PRESERVE]
Since this is a new installation, enter INITIALIZE.
Choose the disk you want to install on:
    You must enter the device name for the target disk on which
    OpenVMS ALPHA will be installed.

Enter device name for target disk: (? for choices) ?

Device                  Device           Error   Volume          Free  Trans Mnt
 Name                   Status           Count    Label         Blocks Count Cnt
DQB0:                   Mounted wrtlck       0 ALPHA0842L1         936    81   1
DQB1:                   Offline              1
DVA0:                   Offline              0
DQA0:                   Online               0
DQA1:                   Offline              1
DAD0:                   Online               0


Enter device name for target disk: (? for choices) DQA0
In our case that's DQA0.
If you're going to cluster, every disk must have a unique name. I tend to go with the system hostname as system disk name. In this tutorial, it's fine to just press Return for the default:
Enter volume label for target system disk: [ALPHASYS]
You will now be prompted which filesystem you want to use:
The target system disk can be initialized with On-Disk Structure
Level 2 (ODS-2) or Level 5 (ODS-5).  (? for more information)

Do you want to initialize with ODS-2 or ODS-5? (2/5/?) 5
Enter 5. (Unless you want to mount this disk image on a VAX.)
ODS, meaning on disk structure, is part of the Files-11 filesystem. Compare it with ext2/3/4.
Files-11is the general term for five separate file systems, known as on-disk "structure (ODS) levels 1 through 5.- ODS-1 is the flat file system used by the RSX-11 OS, supported by older VMS systems for RSX compatibility, but never used to support VMS itself; it has been largely superseded by ODS-2 and ODS-5.
- ODS-2 is the standard VMS file system, and remains the most common file system for system disks (the disk on which the operating system is installed).
- Although seldom referred to by their ODS level designations, ODS-3 and ODS-4 are the Files-11 support for the CD-ROM ISO 9660 and High Sierra Format file systems, respectively.
- ODS-5 is an extended version of ODS-2 available on Alpha and IA-64 platforms which adds support for case-preserving filenames with non-ASCII characters and improvements to the hierarchical directory support.
Hardlinks are fine, so enter Yes:
Do you want to enable hard links? (Yes/No/?) yes
Next is a confirmation question, enter Yes:
    You have chosen to install OpenVMS ALPHA on a new disk.

    The target system disk, DQA0:, will be initialized
    with structure level 5 (ODS-5).
    Hard links WILL be enabled.
    The disk will be labeled ALPHASYS.
    Any data currently on the target system disk will be lost.

Is this OK? (Yes/No) yes
Some more output:
Initializing and mounting target....

Creating page and swap files....
Enter a password for the SYSTEM user. Make it a good one since this is the same as the
root account on linux, or Administrator on Windows.
You must enter a password for the SYSTEM account.

The password must be a minimum of 8 characters in length, and
may not exceed 31 characters.  It will be checked and verified.
The system will not accept passwords that can be guessed easily.

The password will not be displayed as you enter it.

Password for SYSTEM account:

Re-enter SYSTEM password for verification:
If you're interested, OpenVMS can give users Secondary Passwords.
For now, enter No on the clustering questions:
Will this system be a member of an OpenVMS Cluster? (Yes/No) No

Will this system be an instance in an OpenVMS Galaxy? (Yes/No) No
Next are two DECnet networking questions. First some more information on this, background theory. Because we're setting up a cluster in a future article, we must account for that now.
For the SCSNODE name - the hostname, if you will - you'll have to remember
to use only 6 characters or less. The SCSSYSTEMID is a bit more complex.
It's calculated through the formula X * 1024 + Y, where X is the DECnet
area number, and Y the DECnet node number in that area.
Since we're starting from scratch, we can use X=1; for the node numbers, it
makes sense to think this through properly. Useful tip: use the last octet of
the IP address you want to assign to this machine! Since I want to give IPs
10.0.2.131 and 10.0.2.132 to the nodes, I'll give this one Y=131 and the
next one Y=132. This leaves us with a SCSSYSTEMID of 1155 for this
install, and DECnet code 1.131. The other VM, later on for clustering, will
get 1156 as SCSSYSTEMID and DECnet code 1.132.
This node will be named u1 and the second node later on u2. Why? Because
it's short.
For your system to operate properly, you must set two parameters:
SCSNODE and SCSSYSTEMID.

SCSNODE can be from 1 to 6 letters or numbers.  It must contain at
least one letter.

If you plan to use DECnet, SCSNODE must be the DECnet Phase IV
node name, or the DECnet-Plus (Phase V) node synonym.

If you have multiple OpenVMS systems, the SCSNODE on each system
must be unique.
Enter the hostname:
Enter SCSNODE: u1

If you plan to use DECnet, SCSSYSTEMID must be set based on the
DECnet Phase IV address.
Choose Yes:
    Do you plan to use DECnet? (Yes/No) [Yes]

    DECnet Phase IV addresses are in the format

        DECnet_area_number.DECnet_node_number

    DECnet_area_number is a number between 1 and 63.
    DECnet_node_number is a number between 1 and 1023.

    If you plan to use DECnet WITHOUT Phase IV compatible addresses,
    enter 0.0.
Enter the DECnet code, in our case 1.132:
Enter DECnet (Phase IV) Address: [1.1] 1.132
Output:
  SCSSYSTEMID will be set to 1156.

  This was calculated as follows:

      (DECnet_area_number * 1024) + DECnet_node_number
Next is the date and time setup. I'm in the Netherlands, so my timezone is in Europe:
  Configuring the Local Time Zone

TIME ZONE SPECIFICATION -- MAIN Time Zone Menu            "*" indicates a menu

  0* GMT
  1* AFRICA          17) EST             33) IRAN            49) PORTUGAL
  2* AMERICA         18) EST5EDT         34) ISRAEL          50) PRC
  3* ANTARCTICA      19* ETC             35) JAMAICA         51) PST8PDT
  4* ARCTIC          20* EUROPE          36) JAPAN           52) ROC
  5* ASIA            21) FACTORY         37) KWAJALEIN       53) ROK
  6* ATLANTIC        22) GB-EIRE         38) LIBYA           54) SINGAPORE
  7* AUSTRALIA       23) GB              39) MET             55) TURKEY
  8* BRAZIL          24) GMT-0           40* MEXICO          56) UCT
  9* CANADA          25) GMT             41* MIDEAST         57) UNIVERSAL
 10) CET             26) GMT0            42) MST             58* US
 11* CHILE           27) GMTPLUS0        43) MST7MDT         59) UTC
 12) CST6CDT         28) GREENWICH       44) NAVAJO          60) W-SU
 13) CUBA            29) HONGKONG        45) NZ-CHAT         61) WET
 14) EET             30) HST             46) NZ              62) ZULU
 15) EGYPT           31) ICELAND         47* PACIFIC
 16) EIRE            32* INDIAN          48) POLAND

Press "Return" to redisplay, enter "=" to search or "?" for help, or
Enter 20:
Select the number above that best represents the desired time zone: 20
Output:
EUROPE Time Zone Menu                                     "*" indicates a menu

  0* RETURN TO MAIN TIME ZONE MENU
  1) AMSTERDAM       17) HELSINKI        33) NICOSIA         49) TALLINN
  2) ANDORRA         18) ISLE_OF_MAN     34) OSLO            50) TIRANE
  3) ATHENS          19) ISTANBUL        35) PARIS           51) TIRASPOL
  4) BELFAST         20) JERSEY          36) PODGORICA       52) UZHGOROD
  5) BELGRADE        21) KALININGRAD     37) POLAND          53) VADUZ
  6) BERLIN          22) KIEV            38) PORTUGAL        54) VATICAN
  7) BRATISLAVA      23) LISBON          39) PRAGUE          55) VIENNA
  8) BRUSSELS        24) LJUBLJANA       40) RIGA            56) VILNIUS
  9) BUCHAREST       25) LONDON          41) ROME            57) VOLGOGRAD
 10) BUDAPEST        26) LUXEMBOURG      42) SAMARA          58) WARSAW
 11) BUSINGEN        27) MADRID          43) SAN_MARINO      59) ZAGREB
 12) CHISINAU        28) MALTA           44) SARAJEVO        60) ZAPOROZHYE
 13) COPENHAGEN      29) MARIEHAMN       45) SIMFEROPOL      61) ZURICH
 14) DUBLIN          30) MINSK           46) SKOPJE
 15) GIBRALTAR       31) MONACO          47) SOFIA
 16) GUERNSEY        32) MOSCOW          48) STOCKHOLM

Press "Return" to redisplay, enter "=" to search or "?" for help, or
Choose Amsterdam by entering 1
Select the number above that best represents the desired time zone: 1
Confirm by entering YES:
You selected EUROPE / AMSTERDAM as your time zone.
Is this correct? (Yes/No) [YES]:
A few questions about daylight saving time, if you selected a timezone that has that:
    Configuring the Time Differential Factor (TDF)


    Default Time Differential Factor for standard time is 1:00.
    Default Time Differential Factor for daylight saving time is 2:00.

    The Time Differential Factor (TDF) is the difference between your
    system time and Coordinated Universal Time (UTC).  UTC is similar
    in most respects to Greenwich Mean Time (GMT).

    The TDF is expressed as hours and minutes, and should be entered
    in the hh:mm format.  TDFs for the Americas will be negative
    (-3:00, -4:00, etc.); TDFs for Europe, Africa, Asia and Australia
    will be positive (1:00, 2:00, etc.).

This time zone supports daylight saving time.
Enter No:
Is this time zone currently on daylight saving time? (Yes/No): no
Accept the default of 1.00:
Enter the Time Differential Factor [1:00]:

    NEW SYSTEM TIME DIFFERENTIAL FACTOR = 1:00

Is this correct? [Y]: y
Skip the PAK license, we'll do that after we finished installing:
    If you have Product Authorization Keys (PAKs) to register,
    you can register them now.

Do you want to register any Product Authorization Keys? (Yes/No) [Yes] No
With the old es40 emulator on Ubuntu 16.04 this is how far we came. Amazing that AXPbox handles this so well without crashing.
Accept the defaults on all the next questions, yes we want all the good stuff:
    The following products are part of the the OpenVMS installation;
    they will be installed along with the OpenVMS operating system:

        o Availability Manager (base) for OpenVMS Alpha
        o CDSA for OpenVMS Alpha
        o KERBEROS for OpenVMS Alpha
        o SSL for OpenVMS Alpha (based on OpenSSL V0.9.8)
        o SSL1 V1.0 for OpenVMS Alpha (based on OpenSSL V1.0.2)
        o Performance Data Collector (base) for OpenVMS Alpha
        o HP Binary Checker for OpenVMS Alpha

    You can also install the following optional products along with the
    OpenVMS operating system:

        o DECwindows Motif for OpenVMS Alpha
        o DECnet-Plus for OpenVMS Alpha
        o DECnet Phase IV for OpenVMS Alpha
        o TCP/IP Services for OpenVMS

    If you want to change your selections, you can do so later in the
    installation by answering "NO" to the following question:

        "Do you want the defaults for all options?"
Yes DECwindows:
    Do you want to install DECwindows Motif for OpenVMS Alpha V1.7-F?
(Yes/No) [Yes]
Yes DECnet:
    Beginning with OpenVMS V7.1, the DECnet-Plus kit is provided with
    the OpenVMS operating system kit.  DECnet Phase IV applications are
    supported by DECnet-Plus.

    DECnet Phase IV is also provided as an option.

    If you install DECnet-Plus and TCP/IP you can run DECnet
    applications over a TCP/IP network.  Please see the OpenVMS
    Management Guide for information on running DECnet over TCP/IP.

    Do you want to install DECnet-Plus for OpenVMS Alpha V8.4-D?
(Yes/No) [Yes]
Yes TCP/IP:
    Do you want to install TCP/IP Services for OpenVMS V5.7-13ECO5F?
(Yes/No) [Yes]
We don't need a detailed description:
    The installation operation can provide brief or detailed descriptions.
    In either case, you can request the detailed descriptions by typing ?.

Do you always want detailed descriptions? (Yes/No) [No]
Some information on not being able to validate signed kits:
The system was booted from a device containing the OpenVMS Alpha distribution.
Validation of signed kits is not supported in this restricted environment.
Accept the default options again with a YES:
The following product has been selected:
    VSI AXPVMS OPENVMS V8.4-2L1            Platform (product suite)

Configuration phase starting ...

You will be asked to choose options, if any, for each selected product and for
any products that may be installed to satisfy software dependency requirements.

Configuring VSI AXPVMS OPENVMS V8.4-2L1: OPENVMS and related products Platform

    Copyright 2015-2016 VMS Software, Inc.

    VMS Software, Inc.

Do you want the defaults for all options? [YES]
A big blob of text, give it a big YES:
Availability Manager (base) for OpenVMS Alpha

CDSA for OpenVMS Alpha

KERBEROS for OpenVMS Alpha

SSL for OpenVMS Alpha (based on OpenSSL V0.9.8)

  VSI AXPVMS SSL V1.4-502A: SSL V1.4 for OpenVMS Alpha (Based on OpenSSL 0.9.8ze)

    VSI SSL is not Backward Compatible!


        The VSI SSL Version 1.4 for OpenVMS is based on the 0.9.8ze baselevel of
        OpenSSL. Some of the OpenSSL API, data structure and command are changed
        from the previous HP SSL version 1.3 (Based on OpenSSL 0.9.7e).

        If you were running a version of HP SSL prior to Version 1.4 and your
        application is dependent upon the SSL, you must recompile and relink your
        code after you upgrade to Version 1.4.

        You must recompile and re-link your code with the latest SSL header files
        and shareable images if you see the following error:

        $ run ssl_test
        %DCL-W-ACTIMAGE, error activating image SSL$LIBSSL_SHR32
        -CLI-E-IMGNAME, image file
        DWLLNG$DKA500:[SYS0.SYSCOMMON.][SYSLIB]SSL$LIBSSL_SHR32.EXE
        -SYSTEM-F-SHRIDMISMAT, ident mismatch with shareable image
        $

        Following list of HP products/components that are dependent on HP SSL.
        Look at the product website for these products that is compatible with
        HP SSL Version 1.4

                LDAP
                ENCRYPT
                Stunnel
                HP System Management Homepage (HP SMH) for OpenVMS
                HP WBEM Services for OpenVMS Integrity servers
                HP OpenView Operations Agent for OpenVMS
                OpenView Performance Agent (OVPA) for OpenVMS
                Secure Web Server
                ABS
                HP Enterprise Directory

        If any of the product dependent upon the above list of products, also
        will not work.

        For example:
        -          iCAp/nPar depends upon HP WBEMServices also will not work
        -          "$ backup/encrypt command  which is in turn dependant on
                        Encrypt will not work

        Links to the above products are available in the HP SSL home page.
        http://h71000.www7.hp.com/openvms/products/ssl/ssl.html


        Do you want to continue? [YES]
No need to review the options here:
    SSL1 V1.0 for OpenVMS Alpha (based on OpenSSL V1.0.2)

    Performance Data Collector (base) for OpenVMS Alpha

    HP Binary Checker for OpenVMS Alpha

Do you want to review the options? [NO]
And finally, after what seems ages, we're ready for liftoff:
Execution phase starting ...
One more summary, and it's chugging along installing:
The following products will be installed to destinations:
    VSI AXPVMS AVAIL_MAN_BASE V8.4-2L1     DISK$ALPHASYS:[VMS$COMMON.]
    VSI AXPVMS CDSA V2.4-320A              DISK$ALPHASYS:[VMS$COMMON.]
    VSI AXPVMS DECNET_OSI V8.4-D           DISK$ALPHASYS:[VMS$COMMON.]
    VSI AXPVMS DWMOTIF V1.7-F              DISK$ALPHASYS:[VMS$COMMON.]
    VSI AXPVMS DWMOTIF_SUPPORT V8.4-2L1    DISK$ALPHASYS:[VMS$COMMON.]
    VSI AXPVMS HPBINARYCHECKER V1.1-A      DISK$ALPHASYS:[VMS$COMMON.]
    VSI AXPVMS KERBEROS V3.1-152A          DISK$ALPHASYS:[VMS$COMMON.]
    VSI AXPVMS OPENVMS V8.4-2L1            DISK$ALPHASYS:[VMS$COMMON.]
    VSI AXPVMS SSL V1.4-502A               DISK$ALPHASYS:[VMS$COMMON.]
    VSI AXPVMS SSL1 V1.0-2JA               DISK$ALPHASYS:[VMS$COMMON.]
    VSI AXPVMS TCPIP V5.7-13ECO5F          DISK$ALPHASYS:[VMS$COMMON.]
    VSI AXPVMS TDC_RT V2.3-1220            DISK$ALPHASYS:[VMS$COMMON.]
    VSI AXPVMS VMS V8.4-2L1                DISK$ALPHASYS:[VMS$COMMON.]

Portion done: 0%
This part took over 2 hours on my machine, so grab a cup of your favorite beverage.
If you are installing the VSI version of OpenVMS, you may get this error during install:
Portion done: 0%...10%

%PCSI-E-OPENOUT, error opening DISK$ALPHASYS:[VMS$COMMON.][SYSHLP]HELPLIB.HLB; as output
-RMS-E-FNF, file not found
%PCSI-E-OPFAILED, operation failed
Terminating is strongly recommended.  Do you want to terminate? [YES] no

%PCSI-E-OPENIN, error opening DISK$ALPHASYS:[VMS$COMMON.][SYSLIB]DCLTABLES.EXE; as input
-RMS-E-FNF, file not found
%PCSI-E-OPFAILED, operation failed
Terminating is strongly recommended.  Do you want to terminate? [YES] no
Portion done: 20%...30%...40%...50%
%PCSI-I-PRCOUTPUT, output from subprocess follows ...
%SYSTEM-F-ACCVIO, access violation, reason mask=00, virtual address=00000000001AE104, PC=000000007FDC5324, PS=0000001B

%PCSI-E-MODREPLERR, error replacing module DUMP in library DISK$ALPHASYS:[VMS$COMMON.][SYSLIB]DCLTABLES.EXE
-SYSTEM-F-ACCVIO, access violation, reason mask=!XB, virtual address=!XH, PC=!XH, PS=!XL
%PCSI-E-OPFAILED, operation failed
Terminating is strongly recommended.  Do you want to terminate? [YES] no
This is not unique to AXPbox, it happens in AlphaVM, too - just ignore it,
make sure to give it a NO.
Portion done: 60%...70%...80%...90%
%PCSI-I-PRCOUTPUT, output from subprocess follows ...
% - Execute SYS$MANAGER:TCPIP$CONFIG.COM to proceed with configuration of
%   HP TCP/IP Services for OpenVMS.
%
Portion done: 100%
Another summary, Return is your friend:
The following products have been installed:
    VSI AXPVMS AVAIL_MAN_BASE V8.4-2L1     Layered Product
    VSI AXPVMS CDSA V2.4-320A              Layered Product
    VSI AXPVMS DECNET_OSI V8.4-D           Layered Product
    VSI AXPVMS DWMOTIF V1.7-F              Layered Product
    VSI AXPVMS DWMOTIF_SUPPORT V8.4-2L1    Layered Product
    VSI AXPVMS HPBINARYCHECKER V1.1-A      Layered Product
    VSI AXPVMS KERBEROS V3.1-152A          Layered Product
    VSI AXPVMS OPENVMS V8.4-2L1            Platform (product suite)
    VSI AXPVMS SSL V1.4-502A               Layered Product
    VSI AXPVMS SSL1 V1.0-2JA               Layered Product
    VSI AXPVMS TCPIP V5.7-13ECO5F          Layered Product
    VSI AXPVMS TDC_RT V2.3-1220            Layered Product
    VSI AXPVMS VMS V8.4-2L1                Operating System

VSI AXPVMS OPENVMS V8.4-2L1: OPENVMS and related products Platform

    VSI AXPVMS KERBEROS V3.1-152A

      Configure and set up Kerberos

      If Kerberos will be run on this system, but has not been
      used previously, you need to perform the following steps.

       o Run the Kerberos configuration procedure:

          @SYS$STARTUP:KRB$CONFIGURE.COM

       o Add the following line to SYS$MANAGER:SYSTARTUP_VMS.COM:

          $ @SYS$STARTUP:KRB$STARTUP

       o Add the following line to SYS$MANAGER:SYLOGIN.COM:

          $ @SYS$MANAGER:KRB$SYMBOLS


      Press RETURN to continue:
Again more information:
    VSI AXPVMS SSL V1.4-502A: SSL V1.4 for OpenVMS Alpha (Based on OpenSSL 0.9.8ze)

      There are post installation tasks that you must complete

      after upgrading from previous SSL versions

      including verifying startup command procedures and logical names.

      Refer to SYS$HELP:SSL014.RELEASE_NOTES for more information.

    VSI AXPVMS SSL1 V1.0-2JA: SSL1 for OpenVMS AXP V1.0-2J (Based on OpenSSL 1.0.2J)

      There are post-installation tasks that you must complete.

      After upgrading from previous SSL1 versions

      Refer to SYS$HELP:SSL100-2J.RELEASE_NOTES for more information.

    VSI AXPVMS TDC_RT V2.3-1220: The Performance Data Collector (base) for OpenVMS

      Users of this product require the following privileges:
          (CMKRNL,LOG_IO,WORLD,PHY_IO,SYSPRV,SYSLCK)

      Users of this product require the following process resource limits:
          WSQUO minimum 6000

      A read-me file is available in SYS$COMMON:[TDC]TDC_README.TXT

      Release notes are available in SYS$COMMON:[TDC]TDC_RELEASE_NOTES.TXT

    VSI AXPVMS HPBINARYCHECKER V1.1-A: HP Binary Checker

      Release notes for HP Binary Checker available

    VSI AXPVMS DECNET_OSI V8.4-D: DECnet-Plus V8.4-D for OpenVMS AXP

      Release notes are available in SYS$HELP:DECNET-Plus-V8_4.RELEASE_NOTES

      It is necessary to reboot your system for the software to take effect.

      You may install OSI Applications after rebooting and configuring.

    VSI AXPVMS TCPIP V5.7-13ECO5F: VSI TCP/IP Services for OpenVMS.

      VSI AXPVMS SSL1 V1.0-2JA: SSL1 for OpenVMS AXP V1.0-2J (Based on OpenSSL 1.0.2J)

        There are post-installation tasks that you must complete.

        After upgrading from previous SSL1 versions

        Refer to SYS$HELP:SSL100-2J.RELEASE_NOTES for more information.

      Check the release notes for current status of the product.
%PCSIUI-I-COMPWERR, operation completed after explicit continuation from errors

        **************************************************************
        *                                                            *
        *                        W A R N I N G                       *
        *                                                            *
        *  One or more errors were encountered during installation/  *
        *  upgrade.  The target system may not operate correctly.    *
        *                                                            *
        *  You should correct the condition that caused the error(s) *
        *  and repeat the installation/upgrade.                      *
        *                                                            *
        **************************************************************
Finally, output that states that our install is complete:
    The installation is now complete.

    When the newly installed system is first booted, a special
    startup procedure will be run.  This procedure will:

        o  Configure the system for standalone or OpenVMS Cluster operation.
        o  Run AUTOGEN to set system parameters.
        o  Reboot the system with the newly set parameters.


    You may shut down now or continue with other operations.


  Process AXPVMS_INSTALL logged out at 18-OCT-2018 08:44:06.52

Press Return to continue...
Enter 9 to shutdown the system:
    ****************************************************************

    You can install or upgrade the OpenVMS ALPHA operating system
    or you can install or upgrade layered products that are included
    on the OpenVMS ALPHA distribution media (CD/DVD).

    You can also execute DCL commands and procedures to perform
    "standalone" tasks, such as backing up the system disk.

    Please choose one of the following:

        1)  Upgrade, install or reconfigure OpenVMS ALPHA Version V8.4-2L1
        2)  Display layered products that this procedure can install
        3)  Install or upgrade layered products
        4)  Show installed products
        5)  Reconfigure installed products
        6)  Remove installed products
        7)  Find, Install or Undo patches; Show or Delete Recovery Data
        8)  Execute DCL commands and procedures
        9)  Shut down this system

Enter CHOICE or ? for help: (1/2/3/4/5/6/7/8/9/?) 9

    Shutting down the system
You can close AXPbox by pressing CTRL+C if you're not automatically
redirected to the SRM prompt (P0 >>>)
I do recommend you to make a copy of the disk image, as the installation takes a long time.
If you want to play around with multiple installations, as we want to do, copy
the disk0.img file somewhere safe, that saves you a few hours of
installation later on.
If you want to speed up the boot process, you can (re)enable
skip_memtest_hack = true; in the es40.cfg file now.
OpenVMS Configuration, autoboot
Now that we've installed OpenVMS, it's time for the first boot. Edit the
es40.cfg file and replace the ALPHA0842L1.ISO installation disk with your
license ISO you created earlier. Fire up the emulator, we're going to setup
auto_boot, so we skip the SRM prompt. Saves us a bit of time.
At the SRM prompt, enter the following two commands:
P00>>>set auto_action boot
P00>>>set bootdef_dev dqa0
Then boot up:
P00>>>boot dqa0
Since this is the first boot, we are not setting boot_osflags, we want the
conversational startup to happen this time. If you're wondering, the first
half of osflags is the directory to boot from (0 = [SYS0], 1 = [SYS1]) and
the second part can enable specific functions on boot:
0,1: Enable SYSBOOT to change system parameters; enable conversational booting for debugging purposes.0,2: Load XDELTA0,4: Stops at the initial system breakpoint. (EXEC_INIT)0.8: Performs a diagnostic bootstrap0,10: Stops at the bootstrap breakpoints0,20: Omits header from secondary boot image0,80: Prompts for the name of the secondary bootfile0,100: Halts the system before secondary bootstrap0,2000: Marks corrected read data error pages as bad.0,10000: Print debug messages on boot.0,20000: Print selected user messages at boot.0,30000: Print even more debug messages on boot.
The next time you fire up the emulator, it will automatically boot the harddisk:
AlphaServer ES40 Console V7.3-1, built on Feb 27 2007 at 12:57:47

CPU 0 booting

(boot dqa0.0.0.15.0 -flags 0)
block 0 of dqa0.0.0.15.0 is a valid boot block
Now that we've set up autoboot and OpenVMS is starting up, continue on to the next paragraph.
First boot
First boot takes a while, things are setup, uncompressed and you have to wait some more time. If you thought the installation took a long time, this process will take about half that time in my experience.
Here's the boatload of output:
 OpenVMS (TM) Alpha Operating System, Version V8.4-2L1
                    Copyright 2016 VMS Software, Inc.

%DECnet-I-LOADED, network base image loaded, version = 05.17.02

%DECnet-W-NOOPEN, could not open SYS$SYSROOT:[SYSEXE]NET$CONFIG.DAT


    Installing required known files...

    Configuring devices...

%%%%%%%%%%%  OPCOM   2-NOV-2020 06:20:09.58  %%%%%%%%%%%
Operator _U1$OPA0: has been enabled, username SYSTEM

%%%%%%%%%%%  OPCOM   2-NOV-2020 06:20:09.59  %%%%%%%%%%%
Operator status for operator _U1$OPA0:
CENTRAL, PRINTER, TAPES, DISKS, DEVICES, CARDS, NETWORK, CLUSTER, SECURITY,
LICENSE, OPER1, OPER2, OPER3, OPER4, OPER5, OPER6, OPER7, OPER8, OPER9, OPER10,
OPER11, OPER12

%%%%%%%%%%%  OPCOM   2-NOV-2020 06:20:09.62  %%%%%%%%%%%
Logfile has been initialized by operator _U1$OPA0:
Logfile is U1::SYS$SYSROOT:[SYSMGR]OPERATOR.LOG;1

%%%%%%%%%%%  OPCOM   2-NOV-2020 06:20:09.62  %%%%%%%%%%%
Operator status for operator U1::SYS$SYSROOT:[SYSMGR]OPERATOR.LOG;1
CENTRAL, PRINTER, TAPES, DISKS, DEVICES, CARDS, NETWORK, CLUSTER, SECURITY,
LICENSE, OPER1, OPER2, OPER3, OPER4, OPER5, OPER6, OPER7, OPER8, OPER9, OPER10,
OPER11, OPER12

%SYSTEM-I-BOOTUPGRADE, security auditing disabled
%%%%%%%%%%%  OPCOM   2-NOV-2020 06:20:10.09  %%%%%%%%%%%
Message from user SYSTEM on U1
%JBC-E-OPENERR, error opening SYS$COMMON:[SYSEXE]QMAN$MASTER.DAT;

%%%%%%%%%%%  OPCOM   2-NOV-2020 06:20:10.09  %%%%%%%%%%%
Message from user SYSTEM on U1
-RMS-E-FNF, file not found

%LICENSE-F-EMTLDB, license database contains no license records
%RUN-S-PROC_ID, identification of created process is 0000002A
%SYSTEM-I-BOOTUPGRADE, security server not started
%SYSTEM-I-BOOTUPGRADE, ACME server not started
%%%%%%%%%%%  OPCOM   2-NOV-2020 06:20:12.51  %%%%%%%%%%%
Message from user SYSTEM on U1
TDF-I-SETTDF TDF set new timezone differential

NET$STARTUP, Network not started due to UPGRADE boot
%SYSTEM-W-NOSUCHDEV, no such device available
%%%%%%%%%%%  OPCOM   2-NOV-2020 06:20:15.20  %%%%%%%%%%%
Message from user SYSTEM on U1
%LICENSE-E-NOAUTH, VSI OPENVMS-ALPHA use is not authorized on this node
-LICENSE-F-NOLICENSE, no license is active for this software product
-LICENSE-I-SYSMGR, please see your system manager


%LICENSE-E-NOAUTH, VSI OPENVMS-ALPHA use is not authorized on this node
-LICENSE-F-NOLICENSE, no license is active for this software product
-LICENSE-I-SYSMGR, please see your system manager
Startup processing continuing...

%SYSTEM-I-BOOTUPGRADE, Coordinated Startup not performed
%EWA0, Auto-negotiation mode set by console
%EWA0, Link state: UP
%EWA0, Auto-negotiation (internal) starting
%EWA0, Full Duplex 100baseTX connection selected


CDSA-I-InitCDSA, Initializing CDSA...
MDS installed successfully.
Module installed successfully.
Module installed successfully.
Module installed successfully.
Module installed successfully.
Module installed successfully.
Module installed successfully.
Module installed successfully.
Module installed successfully.
Module installed successfully.
Module installed successfully.
Module installed successfully.
CDSA-I-InitCDSA, CDSA Initialization complete

CDSA-I-InitSecDel, Initializing Secure Delivery...
Install completed successfully.
Install completed successfully.
Module installed successfully.
Module installed successfully.
CDSA-I-InitSecDel, Secure Delivery Initialization complete

    AUTOGEN will now be run to compute the new system parameters.  The system
    will then shut down and reboot, and the installation or upgrade will be
    complete.

    After rebooting you can continue with such system management tasks as:

            Configuring networking software (TCP/IP Services, DECnet, other)
            Using SYS$MANAGER:CLUSTER_CONFIG.COM to create an OpenVMS Cluster
            Creating FIELD, SYSTEST and SYSTEST_CLIG accounts if needed

%AUTOGEN-I-BEGIN, GETDATA phase is beginning.
%AUTOGEN-I-NEWFILE,  Previous contents of SYS$SYSTEM:CLU$PARAMS.DAT have
  been copied to SYS$SYSTEM:CLU$PARAMS.OLD.  You may wish to purge
  SYS$SYSTEM:CLU$PARAMS.OLD.
%AUTOGEN-I-NEWFILE,  Previous contents of SYS$SYSTEM:CLU$PARAMS.DAT have
  been copied to SYS$SYSTEM:CLU$PARAMS.OLD.  You may wish to purge
  SYS$SYSTEM:CLU$PARAMS.OLD.
%AUTOGEN-I-NEWFILE,  Previous contents of SYS$SYSTEM:CLU$PARAMS.DAT have
  been copied to SYS$SYSTEM:CLU$PARAMS.OLD.  You may wish to purge
  SYS$SYSTEM:CLU$PARAMS.OLD.
%AUTOGEN-I-NEWFILE, A new version of SYS$SYSTEM:PARAMS.DAT has been created.
        You may wish to purge this file.
%AUTOGEN-I-END, GETDATA phase has successfully completed.
%AUTOGEN-I-BEGIN, GENPARAMS phase is beginning.
%AUTOGEN-I-NEWFILE, A new version of SYS$MANAGER:VMSIMAGES.DAT has been created.
        You may wish to purge this file.
%SYSTEM-W-NOSUCHDEV, no such device available
%AUTOGEN-I-NEWFILE, A new version of SYS$SYSTEM:SETPARAMS.DAT has been created.
        You may wish to purge this file.
%AUTOGEN-I-END, GENPARAMS phase has successfully completed.
%AUTOGEN-I-BEGIN, GENFILES phase is beginning.
Computed size: 42;  current size: 8202
%SYSGEN-I-CREATED, SYS$SYSROOT:[SYSEXE]SYS$ERRLOG.DMP;2 created
Computed size: 2105300;  current size: 4604
%SYSGEN-I-EXTENDED, SYS$SYSROOT:[SYSEXE]PAGEFILE.SYS;1 extended

        Extending SYS$SYSROOT:[SYSEXE]PAGEFILE.SYS to 2105300 blocks will take
        approximately 180 seconds.  Please wait ...
180 seconds, I wish. It took ten minutes on my system, but your mileage may vary. Next few lines of output, including an automatic reboot:
%SYSGEN-I-EXTENDED, SYS$SYSROOT:[SYSEXE]PAGEFILE.SYS;1 extended
                                        ... done.
Computed size: 315554;  current size: 0
%SYSGEN-I-CREATED, DQA0:[SYS0.SYSEXE]SYSDUMP.DMP;1 created
%SYSGEN-I-EXTENDED, DQA0:[SYS0.SYSEXE]SYSDUMP.DMP;1 extended
Computed size: 66200;  current size: 1000
%SYSGEN-I-EXTENDED, SYS$SYSROOT:[SYSEXE]SWAPFILE.SYS;1 extended

%AUTOGEN-I-REPORT, AUTOGEN has produced some informational messages which
        have been stored in the file SYS$SYSTEM:AGEN$PARAMS.REPORT.  You may
        wish to review the information in that file.

%AUTOGEN-I-END, GENFILES phase has successfully completed.
%AUTOGEN-I-BEGIN, SETPARAMS phase is beginning.
%%%%%%%%%%%  OPCOM   2-NOV-2020 06:26:35.77  %%%%%%%%%%%
Message from user SYSTEM on U1
%SYSGEN-I-WRITECUR, CURRENT system parameters modified by process ID 00000023 in
to file SYS$SYSROOT:[SYSEXE]ALPHAVMSSYS.PAR;2

%AUTOGEN-I-SYSGEN, parameters modified
%AUTOGEN-I-END, SETPARAMS phase has successfully completed.
%AUTOGEN-I-BEGIN, REBOOT phase is beginning.

The system is shutting down to allow the system to boot with the
generated site-specific parameters and installed images.

The system will automatically reboot after the shutdown and the
upgrade will be complete.


        SHUTDOWN -- Perform an Orderly System Shutdown
                    on node U1
As you might have noticed, this console terminal is very verbose. When the first boot is finished, make sure to configure networking and work via SSH as a regular user, that terminal will be way less chatty.
%SHUTDOWN-I-BOOTCHECK, performing reboot consistency check...
%SHUTDOWN-I-CHECKOK, basic reboot consistency check completed

%SHUTDOWN-I-OPERATOR, this terminal is now an operator's console
%SHUTDOWN-I-DISLOGINS, interactive logins will now be disabled
%SET-I-INTSET, login interactive limit = 0, current interactive value = 0
%SHUTDOWN-I-STOPQUEUES, the queues on this node will now be stopped
%%%%%%%%%%%  OPCOM   2-NOV-2020 06:26:38.49  %%%%%%%%%%%
Message from user SYSTEM on U1
%JBC-E-OPENERR, error opening SYS$COMMON:[SYSEXE]QMAN$MASTER.DAT;

%%%%%%%%%%%  OPCOM   2-NOV-2020 06:26:38.50  %%%%%%%%%%%
Message from user SYSTEM on U1
-RMS-E-FNF, file not found


SHUTDOWN message on U1 from user SYSTEM at U1 Batch   06:26:38
U1 will shut down in 0 minutes; back up soon.  Please log off node U1.
Reboot system with AUTOGENerated parameters


%SHUTDOWN-I-STOPUSER, all user processes will now be stopped
%SHUTDOWN-I-REMOVE, all installed images will now be removed
%SHUTDOWN-I-DISMOUNT, all volumes will now be dismounted
%%%%%%%%%%%  OPCOM   2-NOV-2020 06:26:39.86  %%%%%%%%%%%
Message from user SYSTEM on U1
STARTUP, U1 shutdown was requested by the operator.

halted CPU 0

halt code = 5
HALT instruction executed
PC = ffffffff80093a84
Since we've setup autoboot, the emulator automatically boots again:
CPU 0 booting

resetting all I/O buses
(boot dqa0.0.0.15.0 -flags 0)
block 0 of dqa0.0.0.15.0 is a valid boot block
reading 1230 blocks from dqa0.0.0.15.0
bootstrap code read in
base = 200000, image_start = 0, image_bytes = 99c00(629760)
initializing HWRPB at 2000
initializing page table at 3ff54000
initializing machine state
setting affinity to the primary CPU
jumping to bootstrap code


    OpenVMS (TM) Alpha Operating System, Version V8.4-2L1
                    Copyright 2016 VMS Software, Inc.

%DECnet-I-LOADED, network base image loaded, version = 05.17.02

%DECnet-W-NOOPEN, could not open SYS$SYSROOT:[SYSEXE]NET$CONFIG.DAT

%STDRV-I-STARTUP, OpenVMS startup begun at  2-NOV-2020 06:27:11.79
I'm going to skip over the output now, since that would be a big wall of text
again. Once your prompt hangs at the following, you can press Return to
login:
%RUN-S-PROC_ID, identification of created process is 00000418
  SYSTEM       job terminated at  2-NOV-2020 06:28:47.35

  Accounting information:
  Buffered I/O count:               4004      Peak working set size:       7792
  Direct I/O count:                 1753      Peak virtual size:         186624
  Page faults:                      4820      Mounted volumes:                0
  Charged CPU time:        0 00:00:26.35      Elapsed time:       0 00:01:35.85
It will ask you to choose a new password, do so:
 Welcome to OpenVMS (TM) Alpha Operating System, Version V8.4-2L1

Username: SYSTEM
Password:
%LICENSE-I-NOLICENSE, no license is active for this software product
%LOGIN-S-LOGOPRCON, login allowed from OPA0:
   Welcome to OpenVMS (TM) Alpha Operating System, Version V8.4-2L1

Your password has expired; you must set a new password to log in


New password:
Verification:
Your output will be full of AUDITSERVER messages, you get my point on the chattiness:
%%%%%%%%%%%  OPCOM   2-NOV-2020 06:32:12.55  %%%%%%%%%%%
Message from user AUDIT$SERVER on U1
Security alarm (SECURITY) and security audit (SECURITY) on U1, system id: 1156
Auditable event:          System UAF record modification
Event time:                2-NOV-2020 06:32:12.54
PID:                      0000041A
Process name:             SYSTEM
Username:                 SYSTEM
Process owner:            [SYSTEM]
Terminal name:            OPA0:
Image name:               U1$DQA0:[SYS0.SYSCOMMON.][SYSEXE]LOGINOUT.EXE
Object class name:        FILE
Object name:              SYS$COMMON:[SYSEXE]SYSUAF.DAT;1
User record:              SYSTEM
Password Date:            New:       2-NOV-2020 06:32
                          Original: 18-OCT-2018 06:10
Posix UID:                -2
Posix GID:                -2 (%XFFFFFFFE)

$
The dollar sign means you're now at a shell prompt. Finally! You can view some
system information with the show status or show cpu command:
$ show status
  Status on   2-NOV-2020 06:34:04.03     Elapsed CPU :   0 00:00:10.09
  Buff. I/O :      277    Cur. ws. :    4096    Open files :         0
  Dir. I/O :       105    Phys. Mem. :  1312    Page Faults :      529
$ show cpu

System: U1, AlphaServer ES40

CPU ownership sets:
   Active               0
   Configure            0

CPU state sets:
   Potential            0
   Autostart            0-3
   Powered Down         None
   Not Present          1-3
   Hard Excluded        None
   Failover             None
$
The help system is very comprehensive on OpenVMS, try the command help show,
and play around. To exit a command if you're stuck, don't use CTRL+C, but
CTRL+Z.
Once you finished playing around and admiring your hard work, continue on to activating the license.
Activate the license
If you haven't prepared the license ISO, check the top of this page for that
topic. I assume you have it configured in the es40.cfg file. This short
paragraph is a summary of this page, read that for more information on whats
happening.
Figure out which disk is the license ISO:
$ show dev

Device                  Device           Error   Volume          Free  Trans Mnt
 Name                   Status           Count    Label         Blocks Count Cnt
U1$DQA0:                Mounted              0 ALPHASYS        7998480   313   1
U1$DQA1:                Offline              1
U1$DVA0:                Offline              0
U1$DQB0:                Online               0
U1$DQB1:                Offline              1
The only other online disk is DQB0. Check that for more information:
$ show dev dqb0 /full
Output:
Disk U1$DQB0:, device type pak.iso, is online, file-oriented device, shareable,
    available to cluster, error logging is enabled.

    Error count                    0    Operations completed                  1
    Owner process                 ""    Owner UIC                      [SYSTEM]
    Owner process ID        00000000    Dev Prot            S:RWPL,O:RWPL,G:R,W
    Reference count                0    Default buffer size                 512
    Total blocks            16515072    Sectors per track                    63
    Total cylinders            16384    Tracks per cylinder                  16
This is our pak.iso file we created earlier. Mount the license disk:
$ MOUNT /OVERRIDE=IDENT DQB0
Output:
%MOUNT-I-WRITELOCK, volume is write locked
%MOUNT-I-CDROM_ISO, license: (1 of 1) , mounted on  _U1$DQB0:
Navigate to the mounted volume folder:
SET DEF _U1$DQB0:[000000]
_U1is our hostname, on clusters all disks are available on all nodes, you address them via their hostname.DQB0is the device name[000000]has to do with the Master File Directory. Check this page for more info.
This folder has our license file:
$ dir
Output:
Directory U1$DQB0:[000000]

ALPHA_CO.COM;1

Total of 1 file.
If you have a HP hobbyist license, replace the filename in the following commands.
Copy the license script from the disk to the system. This is required because we need to change the document format, line endings are messed up. Check here for more info on that as well.
COPY ALPHA_CO.COM;1 SYS$LOGIN
Navigate back to the folder we just copied the license to:
SET DEF SYS$LOGIN
Update the file to "fix" the line ending:
SET FILE/ATTRIBUTE=(RFM=STM) ALPHA_CO.COM;1
Finally, execute the license script:
@ALPHA_CO.COM;1
On my first try, nothing happened, no output. Checking the license status confirmed that no licenses were added:
$ SHOW LICENSE

Active licenses on node U1:
%SHOW-I-NOLICENSE, no licenses exist
The script does contain license command:
$ TYPE ALPHA_CO.COM;1
Output:
$! Software Product Authorization Key Replica
$! Issued by LICENSESVR
$! Issued on 21-SEP-2020 08:13
$!-----------------------------------
$ LICENSE REGISTER ALPHA-LP -
/ISSUER=VSI -
/AUTHORIZATION=...
/PRODUCER=VSI -
/UNITS=0 -
/TERMINATION_DATE=20-SEP-2021  -
/AVAILABILITY=H -
/OPTIONS=(ALPHA) -
/CHECKSUM=...
$! Software Product Authorization Key Replica
$! Issued by LICENSESVR
$! Issued on 21-SEP-2020 08:13
$!-----------------------------------
$ LICENSE REGISTER ALPHA-SYSTEM -
/ISSUER=VSI -
/AUTHORIZATION=...
/PRODUCER=VSI -
/UNITS=0 -
/TERMINATION_DATE=20-SEP-2021  -
/AVAILABILITY=A -
/OPTIONS=(ALPHA) -
/CHECKSUM=...
$! Software Product Authorization Key Replica
$! Issued by LICENSESVR
$! Issued on 21-SEP-2020 08:14
$!-----------------------------------
$
Manually trying to register the license told me that it was already registered:
$ LICENSE REGISTER
_PRODUCT: ALPHA-LP
%LICENSE-F-DUPREC, license is already registered
So whats going on there? On the HP build of OpenVMS, registering the license spams the console with loads of output, If we try to run the script again, it says that the license is already registered:
$ @ALPHA_CO.COM;1
%LICENSE-F-DUPREC, license is already registered
The HELP LICENSE page tells me that there is also a LICENSE LIST command.
If we issue that, we see that there are two active licenses:
$ LICENSE LIST /FULL

 License Management Facility  V2.0

 License Database File:       SYS$COMMON:[SYSEXE]LMF$LICENSE.LDB;1
 Created on:              18-OCT-2018
 Created by user:         SYSTEM
 Created by LMF Version:      V2.0

 -----------------------------------
 Issuer:              VSI
 Authorization:           ...
 Product Name:            ALPHA-LP
 Producer:            VSI
 Units:               0
 Version:             0.0
 Release Date:            (none)
 PAK Termination Date:        20-SEP-2021
 Availability:            H (Alpha & IA64 Layered Products)
 Activity:            0
 Options:             ALPHA
 Hardware ID:

 Revision Level:          1
 Status:              Active

 -----------------------------------
 Issuer:                      VSI
 Authorization:               ...
 Product Name:                ALPHA-SYSTEM
 Producer:                    VSI
 Units:                       0
 Version:                     0.0
 Release Date:                (none)
 PAK Termination Date:        20-SEP-2021
 Availability:                A (VAX/VMS Capacity or OpenVMS Unlimited or Base)
 Activity:                    0
 Options:                     ALPHA
 Hardware ID:

 Revision Level:              1
 Status:                      Active
 Command:                     REGISTER
 Modified by user:            SYSTEM
 Modified on:                  2-NOV-2020 06:47:37.10
 [End Of List]
Why all this extra text and troubleshooting? On HP OpenVMS you got a load of
output telling all the licenses are activated, on VSI OpenVMS, nothing, and
the SHOW LICENSE command tells me that there is nothing active. But, it
seems this is different between HP and VSI, and it seems our hobbyist license
is activated.
I'm not sure if everything is correct now, but lets continue on. On the HP OpenVMS build, this does work so let's assume this works as well. Continue on with creating a user.
Update after a few days of writing this guide, after a reboot
(@SYS$SYSTEM:SHUTDOWN.COM), the licenses became visible:
Active licenses on node U1:

------- Product ID --------    ---- Rating ----- -- Version --
Product            Producer    Units Avail Activ Version Release    Termination
ALPHA-LP           VSI             0  H     0      0.0  (none)      20-SEP-2021
ALPHA-SYSTEM       VSI             0  A     0      0.0  (none)      20-SEP-2021
Add a user
It's a bad idea to always work with the administrative user, just as on linux or windows. Therefore, we will create a user that you can use for your daily activities.
First create a folder for home folders of users:
CREATE/DIR SYS$SYSDEVICE:[USERS]
Check if there is not already a symlink:
show log sys$users
Output should be:
%SHOW-S-NOTRAN, no translation for logical name SYS$USERS
If so, continue on to create a logical name (sort of symlink):
ASSIGN SYS$SYSDEVICE:[USERS] SYS$USERS
It's not required to create such a folder, but as I'm used to Linux having /home/, it feels
more comfortable and tidy to have a specific user folder here as well.
Create home folder for our new user:
CREATE /DIRECTORY SYS$SYSDEVICE:[USERS.REMY]
Remember, on OpenVMS, folders are separated by a dot (.), not a / or \, so
USERS.REMY is the comparable to C:\Users\Remy or /home/remy.
Add a new administrative user with a temp password (TEMP). Same privileges as the SYSTEM account.
# change to the folder where the user management program is located
$ SET DEFAULT SYS$SYSTEM
$ RUN AUTHORIZE
UAF> ADD REMY/PASSWORD=TEMP/OWNER="Remy van Elst"/DEV=SYS$SYSDEVICE/DIR=[USERS.REMY]/UIC=[200,201]/FLAG=NODISUSER/PRIV=ALL
Output:
%UAF-I-PWDLESSMIN, new password is shorter than minimum password length
%UAF-I-ADDMSG, user record successfully added
%UAF-I-RDBADDMSGU, identifier REMY value [000200,000201] added to rights database
On the main audit console:
%%%%%%%%%%%  OPCOM   2-NOV-2020 07:17:26.10  %%%%%%%%%%%
Message from user AUDIT$SERVER on U1
Security alarm (SECURITY) and security audit (SECURITY) on U1, system id: 1156
Auditable event:          System UAF record addition
Event time:                2-NOV-2020 07:17:26.09
PID:                      0000041A
Process name:             SYSTEM
Username:                 SYSTEM
Process owner:            [SYSTEM]
Terminal name:            OPA0:
Image name:               U1$DQA0:[SYS0.SYSCOMMON.][SYSEXE]AUTHORIZE.EXE
Object class name:        FILE
Object name:              SYS$COMMON:[SYSEXE]SYSUAF.DAT;1
User record:              REMY
Default Device:           New:      SYS$SYSDEVICE:
                          Original: <none>
Default Directory:        New:      [USERS.REMY]
                          Original: [USER]
Flags:                    New:      (none)
                          Original: DISUSER
Owner:                    New:      Remy van Elst
                          Original: <none>
Privileges:               New:      CMKRNL,CMEXEC,SYSNAM,GRPNAM,ALLSPOOL,IMPERSO
NATE,DIAGNOSE,LOG_IO,GROUP,NOACNT,PRMCEB,PRMMBX,PSWAPM,SETPRI,SETPRV,TMPMBX,WORL
D,MOUNT,OPER,EXQUOTA,NETMBX,VOLPRO,PHY_IO,BUGCHK,PRMGBL,SYSGBL,PFNMAP,SHMEM,SYSP
RV,BYPASS,SYSLCK,SHARE,UPGRADE,DOWNGRADE,GRPPRV,READALL,IMPORT,AUDIT,SECURITY
                          Original: TMPMBX,NETMBX
UIC:                      New:      [200,201]
                          Original: [200,200]
Password Date:            New:      (pre-expired)
                          Original: (pre-expired)
Posix UID:                -2
Pos
*TRUNCATED* -- If audits are enabled for this class, the full message
               can be examined with ANALYZE/AUD

%%%%%%%%%%%  OPCOM   2-NOV-2020 07:17:26.17  %%%%%%%%%%%
Message from user AUDIT$SERVER on U1
Security alarm (SECURITY) and security audit (SECURITY) on U1, system id: 1156
Auditable event:          Identifier added
Event time:                2-NOV-2020 07:17:26.16
PID:                      0000041A
Process name:             SYSTEM
Username:                 SYSTEM
Process owner:            [SYSTEM]
Terminal name:            OPA0:
Image name:               U1$DQA0:[SYS0.SYSCOMMON.][SYSEXE]AUTHORIZE.EXE
Identifier name:          REMY
Identifier value:         %X00800081
Attributes:               none
Posix UID:                -2
Posix GID:                -2 (%XFFFFFFFE)
Press CTRL+Zto exit UAF, you should be back in a regular shell prompt ($).
Assign the home folder to the new user:
SET DIRECTORY/OWNER=REMY SYS$SYSDEVICE:[USERS.REMY]
Logout as the system user:
LOG
Reconnect and login as your new user, the password is TEMP. You'll be prompted to set a new password.
 Welcome to OpenVMS (TM) Alpha Operating System, Version V8.4

Username: remy
Password: TEMP
   Welcome to OpenVMS (TM) Alpha Operating System, Version V8.4

Your password has expired; you must set a new password to log in

New password:
Verification:
Check your home folder:
$ show def
  SYS$SYSDEVICE:[USERS.REMY]
You can now try to run a privileged command, which should fail:
set def sys$system
run authorize
Output:
%UAF-E-NAOFIL, unable to open system authorization file (SYSUAF.DAT)
-RMS-E-PRV, insufficient privilege or file protection violation
You can give yourself permissions (sort of sudo) with the following command:
$ SET PROCESS/PRIVILEGE=SYSPRV
After which run authorize will work:
$ run authorize
UAF>
With this separate account, you can still do privileged work, but you will have to elevate your rights, making you aware of whats happening and what you're doing.
Networking
Now the fun part you've all been waiting for, networking. As you could have read in the introduction,
this was quite an adventure for me to figure out and due to the way network is emulated in AXPbox,
there are some limitations. If you build and run AXPbox on Windows, you shouldn't have these problems,
libpcap there supports host communication. But since this is a linux guide, we have to do a few
workarounds.
If you have the luck of having two separate NIC's and bridging works, then lucky you. It saves you a
bunch of configuration. Plug in both cables (or wireless), configure one NIC (secondary) in es40.cfg
and you're good to go.
In the introduction we already discussed the setup, a virtual machine with 2 NIC's, one Virtualbox NAT and one bridged. Why one NAT and not two bridged adapters? Well, if the bridged adapter inside the VM would work, then we wouldn't need the VM because our host would be able to be bridged as well. Due to the host OS not being able to receive libpcap network packages, we eliminate the host OS nic by using a virtualbox NAT NIC.
You need to give the emulator special permissions for networking:
sudo setcap cap_net_raw,cap_net_bind_service=+eip ./axpbox
If you still get a permission error afterwards, start the emulator as root (sudo ./axpbox run).
Inside es40.cfg you need to configure your interface:
pci0.4 = dec21143
{
  adapter = "enp0s3"
  mac = "08-00-DE-AD-BE-EF";
}
The MAC parameter is optional, but if you are running multiple AXPbox instances to play with clustering,
I recommend you change it to something other than the default. Change en0ps3 to your network adapter,
you can find it with the ifconfig or ip addr command.
The next topic is for the Virtualbox setup. You can skip that if you don't use this setup with virtualbox.
Virtualbox Port Forward
If you've got the same setup as I have, Virtualbox Debian 10 VM with 2 NIC's, you need to setup a port forward to be able to reach OpenVMS. OpenVMS can connect to the outside world via NAT, but you cannot get in. Just like your home router allows all your devices to access the internet, but blocks the internet from accessing your devices unless you open a port.
Open up the preferences pane in Virtualbox for the Debian VM, go to the networking page and select the NAT adapter tab. Click Advanced, then Port Forwarding and enter the following, as the image below shows:
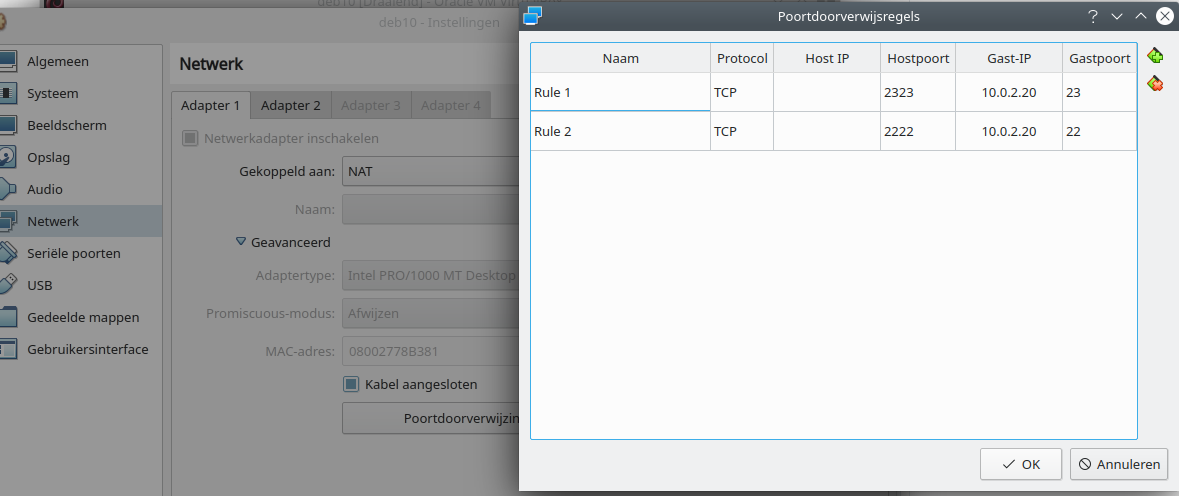
- Enter port 2323 as Host port, and 23 as guest port for telnet.
- Enter port 2222 as Host port, and 22 as guest port for SSH.
For both lines, enter the NAT OpenVMS IP, in my case, 10.0.2.20.
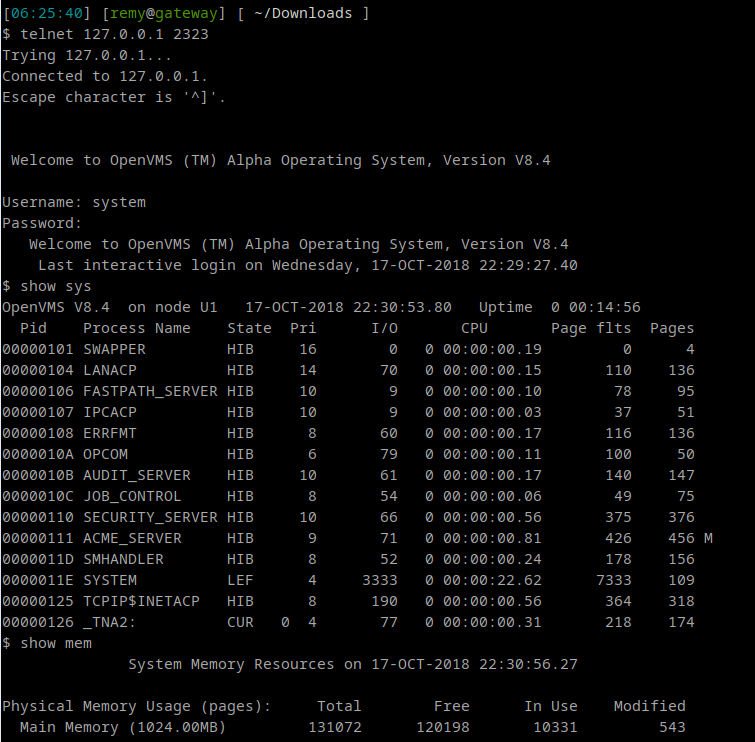
You can now connect to localhost (or the Debian VM IP) with those ports to reach OpenVMS:
telnet 10.0.0.8 2323 # 10.0.0.8 is my Debian VM IP
Do note that you have to setup the services, which we'll do in the next section. Here's a picture of my HP OpenVMS telnet login:
If you decide to setup WASD (web server) you need to open up port 80/443 as well. Inside the NAT network all communication is allowed, so clustering doesn't require any additional ports open.
OpenVMS TCP/IP setup
Login as the SYSTEM user (or elevate your permissions, SET PROCESS/PRIVILEGE=SYSPRV) and issue the following
command to open the interactive menu driven configuration for TCP/IP:
@SYS$STARTUP:TCPIP$CONFIG.COM
In the virtualbox setup, the IP and subnet for OpenVMS will be 10.0.2.25/24, the gateway will be
10.0.2.2 and DNS is 8.8.8.8. In the below commands, replace those for your network.
On VSI OpenVMS the output is a bit different than on HP OpenVMS the first time, you should be able to follow along with both. First is a warning that not everything is setup yet:
        TCP/IP Network Configuration Procedure

    This procedure helps you define the parameters required
    to run HP TCP/IP Services for OpenVMS on this system.


    Checking TCP/IP Services for OpenVMS configuration database files.

    Creating SYS$COMMON:[SYSEXE]TCPIP$SERVICE.DAT
    Creating SYS$COMMON:[SYSEXE]TCPIP$HOST.DAT
    Creating SYS$COMMON:[SYSEXE]TCPIP$NETWORK.DAT
    Creating SYS$COMMON:[SYSEXE]TCPIP$ROUTE.DAT
    Creating SYS$COMMON:[SYSEXE]TCPIP$PROXY.DAT
    Creating SYS$COMMON:[SYSEXE]TCPIP$CONFIGURATION.DAT


    Node: U1

    HP TCP/IP Services for OpenVMS requires either DHCP to be
    configured or alternately, you must manually configure an
    address, and a hostname. HP TCP/IP Services for OpenVMS
    will not start until these are configured.

    DHCP      - NOT configured.
    Hostname  - NOT configured.

    Please configure these from the Core Environment Menu on node U1.
Press Return to continue.
The next menu lists the possible choices. We'll start with 1, the Core Environment:
    HP TCP/IP Services for OpenVMS Configuration Menu

    Configuration options:

         1  -  Core environment
         2  -  Client components
         3  -  Server components
         4  -  Optional components

         5  -  Shutdown HP TCP/IP Services for OpenVMS
         6  -  Startup HP TCP/IP Services for OpenVMS
         7  -  Run tests

         A  -  Configure options 1 - 4
        [E] -  Exit configuration procedure

Enter configuration option:
If you see license errors, like below:
     2  -  Client components  No Client License
     3  -  Server components  No Client License
     [...]
     1  -  Domain               No Client License
     3  -  Routing              No Client License
     4  -  BIND Resolver        No Client License
Those mean your hobbyist license wasn't installed correctly. Reboot and retry.
Start with option 2, Interfaces:
    HP TCP/IP Services for OpenVMS Core Environment Configuration Menu

    Configuration options:

         1  -  Domain
         2  -  Interfaces
         3  -  Routing
         4  -  BIND Resolver
         5  -  Time Zone

         A  -  Configure options 1 - 5
        [E] -  Exit menu

Enter configuration option: 2
Next pick the only interface, WE0:
      HP TCP/IP Services for OpenVMS Interface WE0 Configuration Menu (Node: U1)

 Configuration options:

         1  - Add a primary address on WE0
         2  - Add an alias address on WE0
         3  - Enable DHCP client to manage address on WE0

        [E] - Exit menu

Enter configuration option: 1
Pick 1 to configure an IP address:
* Is this address used by Clusters over IP (IPCI) [NO]:

    IPv4 Address may be entered with CIDR bits suffix.
    E.g. For a 16-bit netmask enter 10.0.1.1/16

Enter IPv4 Address []: 10.0.2.25/24
Enter hostname []: u1.home

Requested configuration:

      Node     : U1
      Interface: WE0
      IPCI     : No
      Address  : 10.0.2.25/24
      Netmask  : 255.255.255.0 (CIDR bits: 24)
      Hostname : u1.home

* Is this correct [YES]:
Exit the next menu with E:
      HP TCP/IP Services for OpenVMS Interface & Address Configuration Menu

 Hostname Details: Configured=u1.home, Active=u1

 Configuration options:

   0  -  Set The Target Node (Current Node: U1)

   1  -  WE0 Menu (EWA0: TwistedPair 100mbps)
   2  -  10.0.2.25/24        u1.home               Configured


  [E] -  Exit menu

Enter configuration option: E
Select option 3 - Routing and answer NO to the first question:
DYNAMIC ROUTING Configuration

 [...]

* Do you want to configure dynamic ROUTED or GATED routing [NO]:
Enter the hostname of your gateway, or it's IP address:
A default route has not been configured.
* Do you want to configure a default route [YES]:

Enter your Default Gateway host name or address: 10.0.0.1
You'll be back in the previous menu. Select 4 for the DNS resolver configuration:
BIND RESOLVER Configuration

    A BIND resolver has not been configured.

    HP TCP/IP Services for OpenVMS supports the Berkeley Internet Name
    Domain (BIND) resolver.  BIND is a network service that enables clients
    to name resources or objects and share information with other objects
    on the network.

    Before configuring your system as a BIND resolver, you should
    first be sure that there is at least one system on the network
    configured as either a BIND primary or secondary server for
    this domain.

    You can specify a BIND server by its address or name;
    however, if specified by name, an entry for it must
    exist in the TCPIP$HOST database.

    You will be asked one question for each server.
    Press Return at the prompt to terminate the list.
Enter the address of your DNS server, in our case it's Google DNS:
Enter your BIND server name: 8.8.8.8

    8.8.8.8 is not in the local host database.
    If you want to enter the server in the local host
    database, enter the server name. Otherwise, enter <CR>.
Give it a name:
Enter remote BIND server name []: googledns
Enter nothing here, just return:
Enter next BIND server name:

  Creating file TCPIP$ETC:IPNODES.DAT
  Creating file TCPIP$ETC:SERVICES.DAT

  Creating file TCPIP$ETC:RESOLV_CONF.TEMPLATE

    You must provide the domain name in order to run
    the BIND resolver. This information should be available
    from your Internet network administrator.

    You will now be asked to configure the domain name.
Enter a domain name of choice here, I choose local.home.
You'll be back in the main menu, exit that with E to go to the topmost menu.
Select 6 to start the TCP/IP stack:
Enter configuration option: 6
Begin Startup...

%TCPIP-I-INFO, TCP/IP Services startup beginning at  3-NOV-2020 14:26:22.10
%TCPIP-I-INFO, creating UCX compatibility file SYS$COMMON:[SYSEXE]UCX$SERVICE.DAT
[...]
%%%%%%%%%%%  OPCOM   3-NOV-2020 14:26:32.85  %%%%%%%%%%%
Message from user INTERnet on U1
%TCPIP-I-FSIPADDRUP, WE0 10.0.2.25 primary active on node U1, interface WE0
[...]
%TCPIP-S-STARTDONE, TCP/IP Services startup completed at  3-NOV-2020 14:26:41.06
IP Configuration is finished, lets test if we can connect to the outside world:
$ tcpip ping 8.8.8.8
Output:
PING 8.8.8.8 (8.8.8.8): 56 data bytes
64 bytes from 8.8.8.8: icmp_seq=0 ttl=63 time=169 ms
64 bytes from 8.8.8.8: icmp_seq=1 ttl=63 time=90 ms
64 bytes from 8.8.8.8: icmp_seq=2 ttl=63 time=46 ms
64 bytes from 8.8.8.8: icmp_seq=3 ttl=63 time=79 ms


----8.8.8.8 PING Statistics----
4 packets transmitted, 4 packets received, 0% packet loss
round-trip (ms)  min/avg/max = 46/96/169 ms
Yay! You can view the current information with tcpip show, a few examples:
$ tcpip show int
                                                           Packets
Interface   IP_Addr         Network mask          Receive          Send     MTU

 LO0        127.0.0.1       255.0.0.0                   0             0    4096
 WE0        10.0.2.25       255.255.255.0               5             6    1500


$ tcpip show route

                             DYNAMIC

Type           Destination                           Gateway

AN    0.0.0.0                               10.0.2.2
AN    10.0.2.0/24                           10.0.2.25
AH    10.0.2.25                             10.0.2.25
AH    127.0.0.1                             127.0.0.1
Later on in this guide we will configure telnet and SSH.
Automatic TCP/IP Startup
Once you reboot, you might notice TCP/IP is not started. You must do this manually each time with the following command:
@SYS$STARTUP:TCPIP$STARTUP.COM
Or you can edit the startup procedure to make it auto start on boot. Edit the following file: SYS$COMMON:[SYSMGR]SYSTARTUP_VMS.COM and
remove the exclamation point (!) from the beginning of the following line:
$!$ @SYS$STARTUP:TCPIP$STARTUP.COM
You can edit this file with the following command:
EDIT /EDT SYS$COMMON:[SYSMGR]SYSTARTUP_VMS.COM
You'll enter a line editor. To switch to visual mode, type change followed by Return. You can use the arrow keys to scroll down.
Exit visual mode with CTRL+Z, then type exit to save the file:
*exit
SYS$COMMON:[SYSMGR]SYSTARTUP_VMS.COM;2 413 lines
With all network configuration done, lets continue on with enabling some network services, so we can make use of our network.
Telnet, FTP & SSH
To enable telnet or SSH, which will allow you to connect remotely to your OpenVMS installation. Open up the TCP/IP configuration menu:
@SYS$STARTUP:TCPIP$CONFIG.COM
Contrary to what you might expect, enabling TELNET is done from the Client
Menu, not services menu, so enter 2 as choice. The following menu is displayed:
HP TCP/IP Services for OpenVMS Client Components Configuration Menu

    Configuration options:

         1  -  DHCP Client      Disabled Stopped
         2  -  FTP Client       Disabled Stopped
         3  -  NFS Client       Disabled Stopped
         4  -  REXEC and RSH    Disabled Stopped
         5  -  RLOGIN           Disabled Stopped
         6  -  SMTP             Disabled Stopped
         7  -  SSH Client       Disabled Stopped
         8  -  TELNET           Disabled Stopped
         9  -  TELNETSYM        Disabled Stopped

         A  -  Configure options 1 - 9
        [E] -  Exit menu

Enter configuration option: 8
Choose Enable and Start, option 2:
TELNET Configuration

Service is not defined in the SYSUAF.
Service is not defined in the TCPIP$SERVICE database.
Service is not enabled.
Service is stopped.

    TELNET configuration options:

         1 - Enable service on this node

         2 - Enable & Start service on this node

        [E] - Exit TELNET configuration

Enter configuration option: 2
Lots of logging output later, the system tells you telnet is enabled:
%TCPIP-I-INFO, service enabled
%TCPIP-S-STARTDONE, TCPIP$TELNET startup completed
Press <ENTER> key to continue ...
In the services menu, telnet should now be enabled:
8 - TELNET Enabled Started
Repeat the same process for service 7 - SSH Client and if you want, 2 - FTP Client. For SSH, you'll see the
location of all configuration files as well:
    Creating TCPIP$SSH_DEVICE:[TCPIP$SSH.SSH2]SSH2_CONFIG.
%TCPIP-I-INFO, image SYS$SYSTEM:TCPIP$SSH_SCP2.EXE installed
%TCPIP-I-INFO, image SYS$SYSTEM:TCPIP$SSH_SFTP2.EXE installed
%TCPIP-I-INFO, image SYS$SYSTEM:TCPIP$SSH_SSH-ADD2.EXE installed
%TCPIP-I-INFO, image SYS$SYSTEM:TCPIP$SSH_SSH-AGENT2.EXE installed
%TCPIP-I-INFO, image SYS$SYSTEM:TCPIP$SSH_SSH-KEYGEN2.EXE installed
%TCPIP-I-INFO, image SYS$SYSTEM:TCPIP$SSH_SSH-SIGNER2.EXE installed
%TCPIP-I-INFO, image SYS$SYSTEM:TCPIP$SSH_SSH2.EXE installed
%TCPIP-I-INFO, logical names created
%TCPIP-S-STARTDONE, TCPIP$SSH_CLIENT startup completed
Press <ENTER> key to continue ..
After which you will be told that the SSH Server is not active on this system, with a question to activate it:
The SSH SERVER is not enabled.
* Do you want to configure SSH SERVER [NO]:
Enter YES and you'll be taken to the SSH Server menu. Choose option 2 to enable and start the SSH server.
OpenVMS will now generate SSH keys, which takes a few minutes. 10 on my system to be exact:
    Creating SSH Service Entry
    Creating TCPIP$SSH_DEVICE:[TCPIP$SSH.SSH2]SSHD2_CONFIG.
* Create a new default server host key? [YES]:
* Please enter host key type DSA or RSA [RSA]:
    Creating private RSA key file: TCPIP$SSH_DEVICE:[TCPIP$SSH.SSH2]HOSTKEY
    Creating public RSA key file: TCPIP$SSH_DEVICE:[TCPIP$SSH.SSH2]HOSTKEY.PUB
After a few minutes, key generation is complete and more output is shown:
%TCPIP-I-INFO, image SYS$SYSTEM:TCPIP$SSH_SSHD2.EXE installed
%TCPIP-I-INFO, image SYS$SYSTEM:TCPIP$SSH_SFTP-SERVER2.EXE installed
%TCPIP-I-INFO, logical names created
%%%%%%%%%%%  OPCOM   3-NOV-2020 14:47:51.19  %%%%%%%%%%%
Message from user INTERnet on U1
INTERnet ACP Activate SSH Server

%TCPIP-I-INFO, service enabled
%TCPIP-S-STARTDONE, TCPIP$SSH startup completed
Press <ENTER> key to continue ...
You can edit the SSH configuration, e.g. to change the port, in the following file:
TCPIP$SSH_DEVICE:[TCPIP$SSH.SSH2]SSH2_CONFIG.
If you want to configure SSH public key authentication, which I recommend you do (instead of passwords), read my guide to do that here.
If you by accident choose just to enable the SSH server, you can start it manually with the following command:
@SYS$STARTUP:TCPIP$SSH_STARTUP.COM
FTP client and server do not prompt for any options, so you can just enable those via the respective menu's.
The SSH server version is not the latest, so you'll have to specify some older configuration options to connect to OpenVMS:
ssh -o HostKeyAlgorithms=ssh-rsa,ssh-dss \
-o KexAlgorithms=diffie-hellman-group1-sha1 \
-o Ciphers=aes128-cbc,3des-cbc \
-o MACs=hmac-md5,hmac-sha1 \
-l SYSTEM \
-p 2222 \
127.0.0.1
Replace -p 2222 by the Virtualbox Port forward you defined, or leave it out
all together if you have two NIC's in your host PC, then you can just connect
to the IP configured in OpenVMS.
You can also put a few lines in your ~/.ssh/config file:
Host openvms
  Hostname 127.0.0.1
  Port 2222
  HostKeyAlgorithms ssh-rsa,ssh-dss
  KexAlgorithms diffie-hellman-group1-sha1
  Ciphers aes128-cbc,3des-cbc
  MACs hmac-md5,hmac-sha1
  User SYSTEM
You will then be able to just type ssh openvms to connect.
Installing unzip on OpenVMS
Now that we have networking, you might want to be able to download files over http,
which by default is a bit hard, since OpenVMS does not come with any command line
download utilities, except for FTP and NFS. No HTTP. But we are lucky, since both
curl and wget are available, prepackaged, for OpenVMS. They do require you to
install zip first.
There are a few ways to install zip, the fastest way is to download unzip.alpha_exe and use an FTP client to upload it to OpenVMS. Here's a picture of Filezilla connected to my OpenVMS installation:
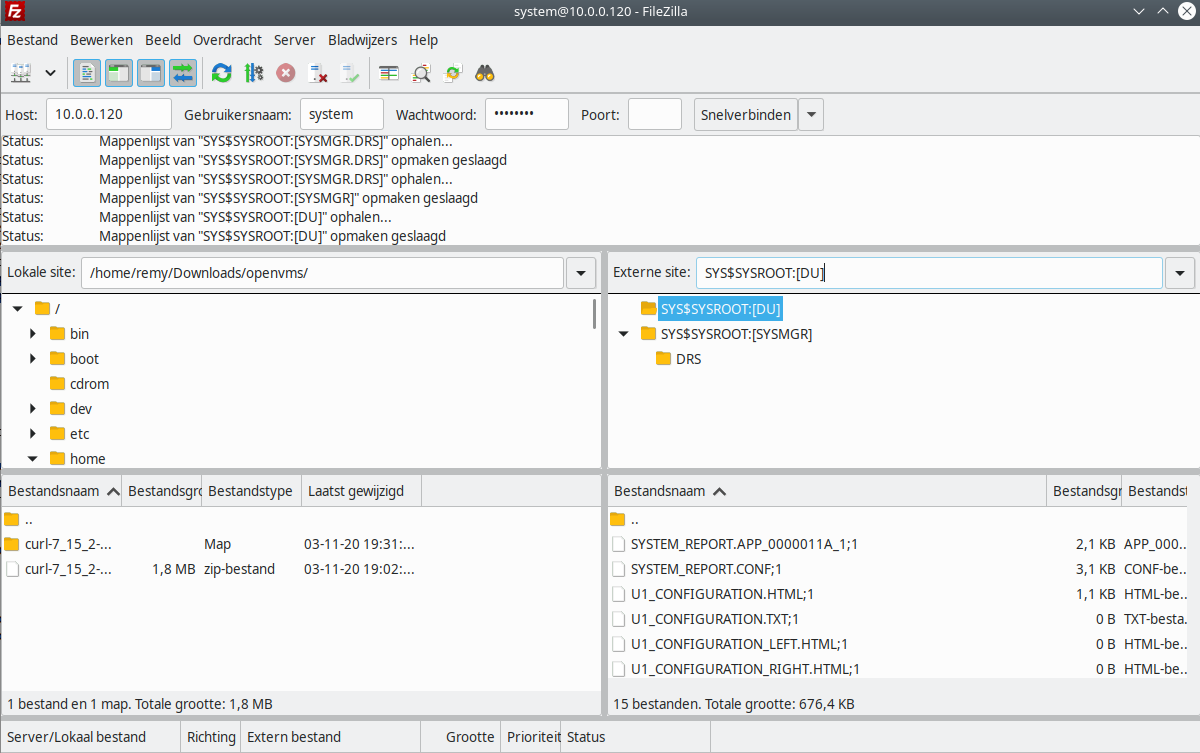
Alternatively, you can download it via FTP on OpenVMS. Process software has an up to date version on their FTP server. Start the FTP client
ftp
A new prompt opens, connect to ftp.process.com and login as user anonymous:
FTP> connect ftp.process.com
Output:
220 triton.process.com MultiNet FTP Server Process V5.6(17) at Tue 3-Nov-2020 10
:59PM-EST
Connected to ftp.process.com.
Name (ftp.process.com:system): anonymous
331 anonymous user ok. Send real ident as password.
Password:
230-Welcome to Process's TCPware Anonymous FTP directory
230-Thanks for stopping by.
230-
230-Note: If you're looking for MultiNet related files, please try
230-ftp.multinet.process.com.
230-
230-Here's a roadmap for what's available:
230-
230-Subdirectory    Contents
230-------------    --------
230-DECUS           The session notes for talks given by Process
230-                  Software Corporation personnel at recent
230-                  DECUS National Events.
230-SUPPORT         Update kits for TCPware for OpenVMS - check
230-                  out the 00SUMMARY.TXT file in this subdirectory
230-                  for more details.
230-TCPWARE         Contains various TCPware related subdirectories.
230-
230-VMS-FREEWARE    Hunter Goatley's VMS Freeware archive, plus mirrors
230-                  of the WASD web server and other freeware packages
230-
230-Other files and directories exist.
230-
230-Guest User TEST logged into /delta_anonymous at Tue 3-Nov-2020 10:59PM-EST,
job 2c000547.
230 Directory and access restrictions apply
Make sure to set FTP to binary mode, otherwise you'll get corrupt files:
FTP> binary
200 TYPE is now 8-bit binary
You can browse around, but first get the unzip binary:
FTP> get vms-freeware/unzip.alpha_exe
Output:
200 Type I ok.
227 Entering passive mode; use PORT (192,42,95,32,79,81)
150 IMAGE retrieve of /delta_anonymous/vms-freeware/unzip.alpha_exe (204800 byte
s) started.
226 Transfer completed.  203776 (8) bytes transferred.
local: SYS$SYSROOT:[SYSMGR]unzip.alpha_exe;1  remote: vms-freeware/unzip.alpha_exe
203776 bytes received in 00:00:00.00 seconds (1897.81 Gbytes/s)
If you get the following error:
500 I won't open a connection to 10.0.2.25 (only to .....)
You must first enable passive mode:
FTP> passive on
Passive is ON.
Exit FTP (CTRL+Z) and test if the binary is correctly transfered:
run unzip.alpha_exe
UnZip 6.00 of 20 April 2009, by Info-ZIP.  For more details see: unzip -v.
There however is one more thing to do, because by using run you can't pass any more
parameters to a program:
$ run unzip.alpha_exe -v
%DCL-W-MAXPARM, too many parameters - reenter command with fewer parameters
The RUN program only accepts one parameter, the program to run. You must declare a special symbol (a foreign command),
otherwise DCL's command line parsing will be in the way. Use the following command to declare such a symbol:
unzip :== $SYS$SYSROOT:[SYSMGR]unzip.alpha_exe
There is a leading dollar sign ($), the format of the above line is unzip :== $device:[path]unzip.exe.
Test to see if you can now call unzip:
$ unzip -v
Output:
UnZip 6.00 of 20 April 2009, by Info-ZIP.  Maintained by C. Spieler.  Send
bug reports using http://www.info-zip.org/zip-bug.html; see README for details.

Latest sources and executables are at ftp://ftp.info-zip.org/pub/infozip/ ;
see ftp://ftp.info-zip.org/pub/infozip/UnZip.html for other sites.

Compiled with DEC C for OpenVMS (V6.2 Alpha) on Apr 29 2009.
This symbol is gone however if you reboot the system, so it's best if you add it to your login file:
EDIT /EDT SYS$LOGIN:LOGIN.COM
Type change to get into visual mode, then read the file and place the command where it states
interactive things should go:
$! Put commands that you want executed only on an interactive login
$! between this comment and the "ENDINTER:" label.
$!
$! For example, you may wish to add a shortcut to an editor:
$!  E*DIT == "EDIT/EDT/COMMAND=SYS$LOGIN:EDTINI.EDT"
$!
$ unzip :== $SYS$SYSROOT:[SYSMGR]unzip.alpha_exe
$
$!
Exit visual mode with CTRL+z and save by typing exit
Installing wget or curl on OpenVMS
You can find many packages, including curl and wget on the OpenVMS Freeware CD,
which is hosted by Digiater. Not the most recent versions, but they will
get you started. Fire up FTP again and connect:
FTP> connect ftp.digiater.nl
220---------- Welcome to Pure-FTPd [privsep] [TLS] ----------
220-You are user number 2 of 12 allowed.
220-Local time is now 17:01. Server port: 21.
220-Only anonymous FTP is allowed here
220 You will be disconnected after 15 minutes of inactivity.
Connected to www.digiater.nl.
Name (www.digiater.nl:system):
230 Anonymous user logged in
FTP>
Turn on passive mode (passive on) and binary (binary):
FTP> binary
200 TYPE is now 8-bit binary

FTP> passive on
Passive is ON.
Get the curl archive:
FTP> get openvms/freeware/v80/curl/alpha/curl-7_15_2-vms-axp.zip
227 Entering Passive Mode (185,92,71,114,199,82)
150-Accepted data connection
150 1740.5 kbytes to download
226-File successfully transferred
226 6.987 seconds (measured here), 249.86 Kbytes per second
local: SYS$SYSROOT:[SYSMGR]curl-7_15_2-vms-axp.zip;1  remote: openvms/freeware/v
80/curl/alpha/curl-7_15_2-vms-axp.zip
1782272 bytes received in 00:00:00.00 seconds (16598.70 Gbytes/s)
Exit FTP and unzip the file:
$ unzip curl-7_15_2-vms-axp.zip
Output:
Archive:  SYS$SYSROOT:[SYSMGR]CURL-7_15_2-VMS-AXP.ZIP;1
  inflating: CURL.EXE_HPSSL
  inflating: CURL.EXE_NOSSL
  inflating: CURL.EXE_OPENSSL
  inflating: CURLLIB.OLB_HPSSL
  inflating: CURLLIB.OLB_NOSSL
  inflating: CURLLIB.OLB_OPENSSL
  inflating: README.VMS
If you get the following error:
     Error:  zipfile is in variable-length record format.  Please
     run "bilf l SYS$SYSROOT:[SYSMGR]curl-7_15_2-vms-axp.zip;1" to convert the zipfile to stream-LF
     record format.  (BILF is available at various VMS archives.)
You probably forgot to turn on binary mode in FTP, or your file is corrupt. Try again with binary mode on in
FTP.
As with unzip, we must create a symbol to allow command line flags to be passed to curl:
curl_openssl :== $SYS$SYSROOT:[SYSMGR]curl.exe_openssl
curl_nossl :== $SYS$SYSROOT:[SYSMGR]curl.exe_nossl
Test it:
$ curl_openssl --version
curl 7.15.2 (ALPHA-HP-VMS) libcurl/7.15.2 OpenSSL/0.9.7e
Protocols: tftp ftp telnet dict http file https ftps
Features: NTLM SSL
You should now be able to get stuff over HTTP/HTTPS:
$ curl_nossl http://raymii.org/s/index.html

<!DOCTYPE html>
<html lang="en">
    <head>
    <title>Homepage - Raymii.org</title>
Follow the same procedure for any other interesting software you see in the freeware archive.
I found crs to be quite nice, it's a visual midnight commander style file manager.
Create a new folder to download it into:
$ create /directory [.crs]
Go into the folder:
$ set def [.crs]
Download the zipfile via FTP:
$ ftp ftp.digiater.nl
220---------- Welcome to Pure-FTPd [privsep] [TLS] ----------
220-You are user number 2 of 12 allowed.
220-Local time is now 06:59. Server port: 21.
220-Only anonymous FTP is allowed here
220 You will be disconnected after 15 minutes of inactivity.
Connected to www.digiater.nl.
Name (www.digiater.nl:system):
230 Anonymous user logged in
Don't forget binary and passive:
FTP> binary
200 TYPE is now 8-bit binary
FTP> passive on
Passive is ON.
Get the archive:
FTP> get openvms/freeware/v80/crs/crs.zip
200 PORT command successful
150-Connecting to port 49191
150 240.0 kbytes to download
226-File successfully transferred
226 0.858 seconds (measured here), 280.83 Kbytes per second
local: SYS$SYSROOT:[SYSMGR.CRS]crs.zip;1  remote: openvms/freeware/v80/crs/crs.zip
245780 bytes received in 00:00:00.00 seconds (2289.00 Gbytes/s)
FTP>
Disconnect and unzip:
$ unzip crs.zip
Archive:  SYS$SYSROOT:[SYSMGR.CRS]crs.zip;1


CRS V1.1  --  A Norton Commander-style directory browser for VMS
Written by Alexey Gadzhiev <alexey@ace.elektra.ru>

Runs on both OpenVMS VAX and OpenVMS Alpha.  To produce a .EXE, just
execute @LINK.COM.

(VMS file attributes saved---use UnZip v5.x+ on VMS to restore)
  inflating: AAAREADME.TXT
Do as it says to create the exe:
$ @LINK.COM
Run it:
$ run CRS
Initializing, please wait ...
............................
Here's what crs looks on my system:
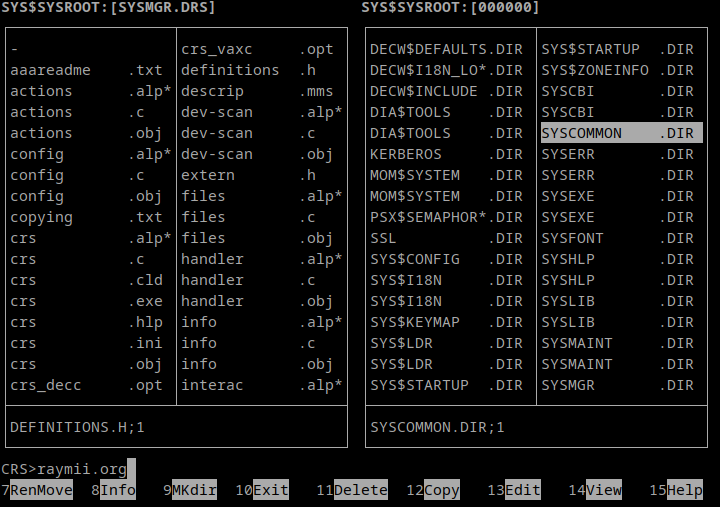
The VSI OpenVMS Wiki has a page on the freeware CD with a description of what most things are.
Tags: alpha , axpbox , dec , decus , es40 , itanium , openvms , pdp , simh , tutorials , vax , vms