Raymii.org

אֶשָּׂא עֵינַי אֶל־הֶהָרִים מֵאַיִן יָבֹא עֶזְרִֽי׃Home | About | All pages | Cluster Status | RSS Feed
Create a PDP-8 OS8 RK05 system disk from RX01 floppies with SIMH (and get text files in and out of the PDP-8)
Published: 07-12-2016 | Last update: 07-05-2019 | Author: Remy van Elst | Text only version of this article
❗ This post is over six years old. It may no longer be up to date. Opinions may have changed.
Table of Contents

PDP-8/L with papertape reader (src)
This guide shows you how to build an RK05 bootable system disk with OS/8 on it for the PDP-8, in the SIMH emulator. We will use two RX01 floppies as the build source, copy over all the files and set up the LPT printer and the PTR/PIP paper tape punch/readers. As an added bonus the article also shows you how to get text files in and out of the PDP-8 sytem using the printer and papertape reader / puncher.
Oscar Vermeulen created an amazing replica of the PDP-8/I. It's a front panel with working switches and LED's, plus a simple Raspberry Pi running the SIMH emulator. I've written multiple articles on the PDP and PiDP-8 and I like the device a lot in general.
Setup
You need simh installed. On Ubuntu this can be done with apt:
apt-get install simh
On Arch linux with pacman:
pacman -Sy simh
You also need two RX01 floppy disks with the OS/8 system on them. We will use
those floppies to create and format an RK05 disk and copy over all the files. As
a bonus we will also copy over a lot of games from the famous advent.rk05
disk.
Create a new folder for this project:
mkdir pdp8-buildsys
cd pdp8-buildsys
Download the two floppies:
wget http://www.pdp8online.com/ftp/images/os8/os8_rx.rx01
wget http://www.pdp8online.com/ftp/images/os8/os8f4_rx.rx01
The files are mirrored here as well:
wget https://raymii.org/s/inc/downloads/pdp/os8_rx.rx01
wget https://raymii.org/s/inc/downloads/pdp/os8f4_rx.rx01
The first disk is OS/8 with Basic, the second disk with Fortran 4.
Download the advent disk as well:
wget https://raymii.org/s/inc/downloads/pdp/advent.rk05
Preparing SIMH
OS/8 was delivered via a lot of different ways. You could get it on paper tape,
DECtape, RK05 disks or RX01/2 floppies. All 'distributions' came with a utility
named BUILD, which allowed you to create new systems or modify the existing
running system. In our case we use the RX01 floppies as our 'source', booting of
one of them. We then use the BUILD program to format a new RK05 disk and then
copy over all the programs.
Fun fact, the RX01 capacity was 256kb and the RX02 disk is 512kb large. On the image below another type of diskette made by DEC is shown, the rx50. That was 1.2 MB large as far as I can find.
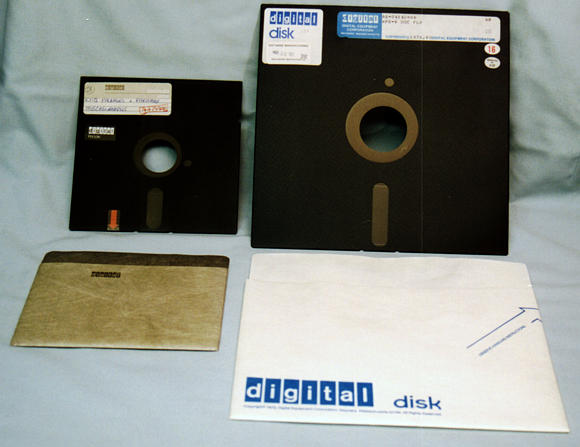
On the left an RX01 or RX02 diskette and on the right an RX50 diskette. (source)
Update 2019-05-07, thanks to Doug. Doug wrote in, quoting verbatim:
  The RX01 and RX02 are both 8 inch diameter floppy disks.  They are single
  sided media.  The RX50 is a 5.25 inch single sided diskette with 10 sectors
  per track and 80 tracks.  There were 512 bytes per sector making this about
  a 400kb diskette.  The diskette on the left is the RX50 and the diskette on
  the right is either an RX01 or RX02.  The RX01 was formatted in an industry
  standard with 26 sectors and 77 tracks.  Each sector was 128 bytes.  The
  RX02 has 256 bytes per sector.  The RX01 could hold 256kb and the RX02 could
  hold 512kb.  I never saw an RX50 on a PDP-8.  There was no support for it in
  OS/8 V3.
We will not create a simh ini file just yet. Fire off the emulator in this folder:
simh-pdp8
First we will tell the emulator that it is emulating a PDP8 with 32k of core memory (instead of 4):
PDP-8 simulator V4.0-0 Beta git commit id: ff95fb8e sim> set cpu 32k sim> set cpu noidle
Attach the (nonexistent) new system disk, simh will create it:
sim> attach rk0 systemdisk.rk05
RK: creating new file
Attach the two existing floppy images:
sim> attach rx0 os8_rx.rx01
RX: buffering file in memory
sim> attach rx1 os8f4_rx.rx01
RX: buffering file in memory
Last but not least, the advent.rk05 disk:
sim> attach rk1 advent.rk05
sim>
All is set up, we're ready to boot into OS/8 from the floppy.
RUN SYS BUILD
It is time to boot up the system from the floppy disk:
sim> boot rx0

.
If you see the . (dot), then it works and you're in OS/8. Test it out:
.RESORC /L

1 FREE BLOCKS

 NAME TYPE USER
 SYS  RX8E
 DSK  RX8E
 PTR  PTR
 RXA0 RX8E
 RXA1 RX8E
 RKA0 RK8E
 RKB0 RK8E
 RKA1 RK8E
 RKB1 RK8E
 TTY  TTY
 LPT  LPTR

OS/8 V3Q


.
The RESORC command shows the system resources. In this case we can see that
the SYS (system partition?) is of type RX8E. This type is the subsystem
controller (hardware board) which, via the OMNIBUS, drives the RX01 floppy
drive. RK8E is the (OMNIBUS) controller for the RK05 disks. The PT8E
is the paper tape/punch used with PIP as the PTP: or PTR: device.
We start with formatting the disk with the ZERO command:
.ZERO RKA0:

.ZERO RKB0:

.
RKA0 and RKB0 represent the inner and outer cylinders of the disk. The split is necessary because OS/8 cannot address the entire 2.5 MB disk with a 12-bit machine word. 1.6 megawords is 6250 sectors (256 words per sector) so that overflows the 4096 word limit. So, it just assigns half the disk to one device, and half to the other.
On the RK05F, the double-capacity fixed-disk version, OS/8 sees two logical drives, drive 0 and drive 1. So, RKA0, RKB0, RKA1, and RKB1.
The above disk explanation comes via Warren Young and Rick Murphy on the PiDP-8 mailinglist.
The actual system build is done with the BUILD program:
.RUN SYS BUILD

$
From the OS/8 System reference manual (AA-H607A-TA OS8 V3D_sysMan), Chapter 9,
the description of BUILD:
BUILD is the system generation program for OS/8 that allows you to:
- Create an OS/8 monitor system from cassettes or paper tapes.
- Maintain and update device handlers in an existing OS/8 system.
- Add device handlers supplied by DIGITAL to a new or existing system.
- Add your own device handlers to a new or existing system.
With BUILD, you use simple keyboard commands to manipulate the device handlers
that make up the OS/8 peripheral configuration. BUILD allows you to quickly
and easily insert devices not standard on the system.
Device handlers are comparable to our current day device drivers. They for example know how a specific disk, paper tape or other device works and let the OS/8 system use it.
I'll go over a few commands in more detail below. After that we create the actual disk with the commands.
Type PRINT to see the current configuration:
$PRINT

PT8E:  PTP  *PTR
RX8E: *SYS
RX01: *RXA0 *RXA1
RK8E:  SYS   RKA0  RKB0
RK05: *RKA0 *RKB0 *RKA1 *RKB1  RKA2  RKB2  RKA3  RKB3
KL8E: *TTY
LS8E: *LPT

DSK=RX8E:SYS
If there is an asterisk (*) in front of the devices then that device is active
and will be included in the new OS/8 system.
The BUILD commands INSERT, REPLACE and SYSTEM are used to activate
device handlers. A maximum of 15 handlers, including the system device (SYS) and
the default mass storage device can be made active.
LOAD
If you have a tape with a specific device handler, which will be unlikely in the
case of simh emulation, you can use the LOAD command to load this handler
from the tape device. For example to load a handler from a binary paper tape:
$LOAD PTR:
^
$
The caret (^) is shown to indicate that the system is waiting for the tape to
be loaded. If you've loaded the device then you can press any key (the ESC is a
good one). The prompt will change back to $ to indicate that the handler has
been loader. If you have a specific filename on a structured device you can
specify it after the colon. A paper tape is a non-structured device so we can
omit it there.
To load the handler with the filename HANDLR.03 from the DECtape device DTA3
use the below syntax:
$LOAD DTA3:HANDLR.03

$
INSERT and DELETE
After a LOAD command has made a handler or group of handlers available for
insertion into the OS/8 system, use the INSERT command to make particular
entry points active. The INSERT command uses two arguments; gname and
pname. Gname is the group name of the handler, for example, the gname for
TC08 DECtape is TC. Pname is the permanent name by which the device is
currently known to BUILD. TC08 DECtape thus has the group name TC and the
permanent names DTA0-DTA7.
Other examples are to include a handler for the paper tape reader and punch
device PT8E:
$INSERT PT8E:PTR
$INSERT PT8E:PTP
If you want to export files or import files (with PIP) then having the papertape reader is quite handy.
DSK
DSK allows you to specify the name of the device that will become the default
storage device of OS/8. Since we want to use the RK05 disk, we should tell the
system that:
$DSK RK8E:SYS
SYSTEM and BOOTSTRAP
The SYSTEM command specifies devices that are system handlers. The BOOTSTRAP
command is the command that finally implements all the changes that you made
with BUILD. BOOT rewrites all relevant Monitor tables and device handlers to
reflect the updated system status. The devices BUILD had marked active now
become device handlers in the system.
To mark the RK05 drive as the system device:
$SYSTEM RK8E

$BOOT
WRITE ZERO DIRECT?YES
SYS BUILT
If the system device specified is different from the current system device,
BUILD copies the system from the current system device to the new system
device. After the copy is complete, BUILD asks:
WRITE ZERO DIRECT?
to determine whether a new (zero) directory is to be writtenon the new system device. If the reply is YES, the system will place a zero directory on the device. Any other reply causes the system to retain the old directory.
We must save the built system in the case we ever want to make changes to it
again without starting over. This is after you've exited the BUILD program
(with CTRL+C), in the OS/8 prompt:
. SAVE SYS BUILD
BUILD the new device
If you've read all the above information you can probably guess the commands
we're going to execute. We start from the OS/8 monitor (. prompt) by running:
. RUN SYS BUILD
The prompt changes to the $. Delete the current system device (we don't want
the floppy-based system, but the disk based one):
$DELETE SYS
Make the RK8E device the active system handler:
$INSERT RK8E:SYS
Also make the RK8E device the active handler for the RK[A|B]0 disk:
$INSERT RK8E:RKA0

$INSERT RK8E:RKB0
The papertape reader and punch and the LPT printer always come in handy, so insert the required system handlers:
$INSERT LS8E:LPT

$INSERT PT8E:PTP

$INSERT PT8E:PTR
Mark the RK8E handler the primary disk:
$DSK RK8E:SYS

$SYSTEM RK8E
If you get the error:
?SYS
Then you need to check if the RX8E (floppy) handler is not active. Issue the
PRINT command and check for:
RX8E: *SYS
RK8E: *SYS  *RKA0 *RKB0
If the * (star) is there, it is active. Run DELETE SYS again and check with
PRINT afterwards. It should look like:
RX8E: SYS
RK8E: *SYS  *RKA0 *RKB0
Run BOOT again and it should work.
Save the BUILD data:
.SAVE SYS BUILD
Copy all the things
The systemdrive is set up on the RK05 disk, we can now boot from it. Press
CTRL+E to pause and return to the SIMH prompt and boot from the new system
disk:
Simulation stopped, PC: 01210 (JMP 1207)
sim> boot rk0
.
Any command will fail, since there is nothing on the device except the bare base system:
.DIR
NO CCL!
.RES /L
NO CCL!
.
We should copy over all the system files and software from the floppy drive.
Press CTRL+E again and boot from the floppy disk again:
Simulation stopped, PC: 01210 (JMP 1207)
sim> boot rx0

.
With the DIR command you can see what is on the disk. I made a typo earlier
when doing SAVE SYS BUILD as you can see:
.DIR RKA0:

BUILT .SV  33           BUILD .SV  33

   2 FILES IN   66 BLOCKS - 3126 FREE BLOCKS
The other side of the disk is empty as well:
.DIR RKB0:

   0 FILES IN    0 BLOCKS - 3241 FREE BLOCKS
Copy over all the files from disk A:
.COPY RKA0:<RXA0:*.*
The syntax is COPY DEST:<SRC:name.ext. To just copy the binaries you can do
COPY RKA0:<RXA0:*.SV.
The output is a list of files copied:
FILES COPIED:
ABSLDR.SV
BITMAP.SV
[...]
BATCH.SV
FUTIL.SV
IDS.SV

.
The second floppy has the FORTRAN compiler. Copy that over as well:
.COPY RKA0:<RXA1:*.*
The same output is given, the list of files and such:
FILES COPIED:
BUILD.SV
CCL.SV
DIRECT.SV
EDIT.SV
FOTP.SV
F4.SV
FORLIB.RL
[...]
We also have the ADVENT disk coupled. It houses a few programs I want, like
WPFLOP.SV (to manage WPS-8 diskettes) and the editor TECO.SV. Copy that as
well:
.COPY RKA0:<RKA1:*.SV
Here I copy just the programs, nothing else. The B side of that disk has the
ADVENT.SV game and a boatload of other games, if you like you can copy it as
well:
.COPY RKA0:<RKB1:*.*
You might hit a full disk and get errors like these:
NO ROOM, SKIPPING- RX01SY.BN
With the DIR RKA0: command you can see large files (blocks used). With the
DEL command you can remove them:
.DEL RKA0:ADVENT.TX
FILES DELETED:
ADVENT.TX
I also don't want the MUSIC files:
.DEL RKA0:*.MU
Output:
FILES DELETED:
MUSIC5.MU
USA.MU
JCOOK2.MU
SCALE.MU
JCOOK1.MU
BABYEL.MU
MUSIC2.MU
MUSIC3.MU
MUSIC4.MU
MUSIC1.MU
MUSIC6.MU
FIFTH3.MU
FIFTH1.MU
MINUET.MU
YANKEE.MU
FUGUE.MU
CASCAD.MU
MAPLE.MU
ENTER.MU
GMINOR.MU
Do more file management as you like. To see the contents of a file, use the
TYPE command:
.TYPE RKA0:SNOOPY.BA
Output:
1 PRINT "DIRECT YOUR DOG TO ANY OF THE FOLLOWING FILES:"
2 PRINT "1=KEYBOARD,2=LINE PRINTER,3=HIGH SPEED PUNCH"
3 PRINT "WHICH ONE";\INPUT A
[...]
When you're done we can finish off by booting from the filled up rx0 disk.
Press CTRL+E to return to the simh prompt and boot off the disk:
Simulation stopped, PC: 01207 (KSF)
sim> boot rk0

.
Check that the new system runs from the disk with the RESORC command:
.RESOURC /L

614 FREE BLOCKS

 NAME TYPE USER
 SYS  RK8E
 DSK  RK8E
 PTP  PTP
 PTR  PTR
 RXA0 RX8E
 RXA1 RX8E
 RKA0 RK8E
 RKB0 RK8E
 RKA0 RK8E
 RKB0 RK8E
 RKA1 RK8E
 RKB1 RK8E
 TTY  TTY
 LPT  LPTR

OS/8 V3Q
The version command:
.VERSION
OS/8 - KBM V3Q - CCL V1F
Run the SNOOPY script to get a nice ASCII suprise:
.R BASIC
NEW OR OLD--OLD
FILE NAME--SNOOPY.BA

READY
RUN

SNOOPY  BA    5B

DIRECT YOUR DOG TO ANY OF THE FOLLOWING FILES:
1=KEYBOARD,2=LINE PRINTER,3=HIGH SPEED PUNCH
WHICH ONE?1


[...]

COMPLIMENTS OF  DIGITAL'S  PDP-8/E  COMPUTER

READY
Punching and reading PAPERTAPE with PIP aka getting files in and out of the
system
Now that we have a working systemdisk we can set up a simh.ini file and play
with the papertape reader and puncher. This is the contents of my simh ini file:
set cpu 32k
set cpu noidle
attach ptr ptr.txt
attach ptp ptp.txt
set lpt enable
attach lpt lpt.txt
attach rk0 systemdisk.rk05
boot rk0
If you start the sim it will create the text files:
$ simh-pdp8 pdp8.ini

PDP-8 simulator V4.0-0 Beta        git commit id: ff95fb8e
PTR: creating new file
PTP: creating new file
LPT: creating new file

.
To get files off the PDP-8 system, use the PTP device (paper tape punch).
Create a test file with the CREATE command:
.CREATE REMY.TX
Type I to Insert text in the current like:
#I
HELLO RAYMII.ORG
HOW ARE YOU?
Press CTRL+L to exit EDIT mode:
^L
Type L to list the contents:
#L
HELLO RAYMII.ORG
HOW ARE YOU?
.
Save the file with E:
#E
.
With the TYPE command you can also check the contents:
.TYPE REMY.TX
HELLO RAYMII.ORG
HOW ARE YOU?
.
Fire up the PIP program, it stands for peripheral interchange program. I
didn't make it up, but the name is quite a mouthfull. Just as with the copy
command, we can send data from place A to place B:
.R PIP
The prompt changes to a *. Send the text file to the LPT printer:
*LPT:<REMY.TX
Or to the papertape punch:
*PTP:<REMY.TX
Syntax is like COPY, DEST:<SRC. Press ESC afterwards to return to the OS/8
Monitor:
*$
.
Exit SIMH (BOOT /DT) or just CTRL+E and check the printer text file:
$ cat lpt.txt

HELLO RAYMII.ORG
HOW ARE YOU?
.
To get files into the system, like your assembler or basic programs, use the
PTR (reader). On the host system, edit the ptr.txt file with your desired
text:
$ cat ptr.txt
Raymii.org

The quick brown fox jumps over the lazy dog.

The quick brown fox jumps over the lazy dog.

The quick brown fox jumps over the lazy dog.
The file does require DOS line endings, so convert it:
$ unix2dos ptr.txt
unix2dos: converting file ptr.txt to DOS format...
Start up simh again and fire up PIP. The syntax here is the opposite of when getting data out of the system, since we now have our local file as the DEST:
.R PIP
*REMY2.TX<PTR:
The prompt now changes to an ^. This is to allow you to load the paper tape.
Since we're emulating that is not needed. Press ESC to continue, the prompt
will go back to the *. Exit PIP with CTRL+C afterwards;
^*
*^C
.
Since the encoding is different the file is in ALL CAPS, but that's not an issue for compiling:
.TYPE REMY2.TX
RAYMII.ORG

THE QUICK BROWN FOX JUMPS OVER THE LAZY DOG.

THE QUICK BROWN FOX JUMPS OVER THE LAZY DOG.

THE QUICK BROWN FOX JUMPS OVER THE LAZY DOG.

.
There is one more way to get text in the system, directly via the terminal.
PIP TTY
Since the TTY device on emulated PDP-8's is just a window on your host
computer, you can use the TTY device in PIP and paste text in from the host.
Start up pip in OS/8:
. R PIP
then use the "FILE.EX<TTY:" as input to PIP:
*REMY3.TX<TTY:
Paste the text and ype CTRL+Z when the input is done. There is a 140 character
line limit in ASCII mode. If you have binary data or longer lines, start up
PIP with the /I flag in Image Mode.
The above TTY trick comes via Warren Young and Rick Murphy on the PiDP-8 mailinglist.
When your entirely finished with your newly built system drive you can shut down
the system with the BOOT command, then quit SIMH with a CTRL+C:
.BOOT /DT
Output:
HALT instruction, PC: 00002 (JMP I 177)
sim> ^C