Raymii.org

אֶשָּׂא עֵינַי אֶל־הֶהָרִים מֵאַיִן יָבֹא עֶזְרִֽי׃Home | About | All pages | Cluster Status | RSS Feed
FST-01 gnuk firmware update via USB
Published: 09-09-2016 | Author: Remy van Elst | Text only version of this article
❗ This post is over nine years old. It may no longer be up to date. Opinions may have changed.
Table of Contents
The FST-01 (Flying Stone 1) (wiki link), niibe link is a small
STM32F103TB based USB device designed to run gnuk and neug (gpg usb token or
true random number generator). (order here, no affiliate link). This guide
shows you how to upgrade the firmware on the FST-01 so that you can enjoy newer
gnuk features like 4096 bit RSA keys.
I'm a huge fan of the Nitrokey line of devices. The Nitrokey Start is a software-only USB token for gnupg. The other Nitrokey devices all use a smartcard (SmartCard-HSM for the Nitrokey HSM and OpenGPG Card for the Nitrokey Pro) for their key storage, but the Nitrokey Start does that all in the microcontroller. The Nitrokey Start is based on the FST-01 device, as are the other Nitrokeys, since the Nitrokey Start runs the same firmware, gnuk 1.0.4.
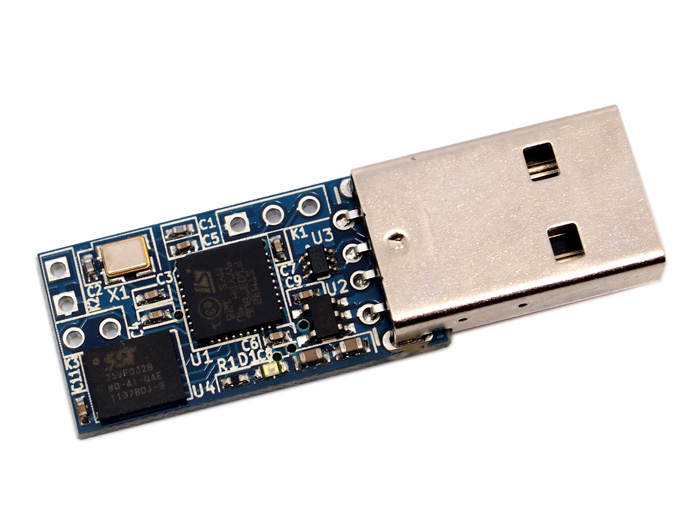
The FST-01 device
This guide will show you how to compile and upgrade the latest firmware onto the device via USB. The recommended way is to upgrade via the ST-Link protocol, but that requires opening the device, soldering wires and a special adapter. The USB upgrade works most of the time.
Why upgrade?
If your device is working as intended, then don't upgrade. But, a lot has changes since the 1.0.1 firmware that came on my FST-01. A small list from the git commit log and the website:
- Support for 4096 bit RSA keys
- ECDSA, ECDH, Curve25519, secp256k1 and Ed25519 support (experimental)
- More boards supported (STM32 Nucleo, Maple Mini and ST Dongle)
- Replaced thread library from ChibiOS/RT to ChopSTX
- OpenPGPcard specification v3.0 compatibility
- Upgrade of the NeuG routine to the one of NeuG 1.0 (TRNG)
- an incompatible change to support overriding key
- Improvements in the RSA code (Prime number generation is done by Fouque-Tibouchi method, changes from upstream PolarSSL 1.2.10
You could also flash the NeuG firmware onto the device so that you get a True random number generator instead of a crypto token.
A word of caution

Do not try to upgrade the Nitrokey. It fails at the moment.
If you want to upgrade the Nitrokey Start, you need to use DFU, see my guide here
Also, do not try to upgrade if you don't have a backup of the key material. The upgrade will WIPE the entire device.
Last, you will probably brick the device. Make sure you have another way to access and recover the device, like an ST-Link V2 adapter link.
So to wrap up, if you're not comfortable with a few bricked devices and all key material wiped, then don't try to upgrade.
Build dependencies
You need to install the entire arm cross compilation toolchain. On Arch Linux
this requires installing the entire base-dev group and the following packages:
pacman -Sy arm-none-eabi-gcc arm-none-eabi-newlib arm-none-eabi-binutils python2-pyusb
You also need git installed. On Ubuntu the package names are the same, so you
can install those as well:
apt-get install git build-essential arm-none-eabi-gcc arm-none-eabi-newlib arm-none-eabi-binutils python-usb
To make sure we can update the token as a regular user, we need to add some
udev rules:
vim /etc/udev/rules.d/69-gnuk.rules
Contents:
# Gnuk Token by FSIJ

SUBSYSTEMS=="usb", ACTION=="add", \
  ATTRS{idVendor}=="234b", ATTRS{idProduct}=="0000", \
  ENV{ID_SMARTCARD_READER}="1", ENV{ID_SMARTCARD_READER_DRIVER}="gnupg"
Reboot the machine, or on Arch do a systemctl restart systemd-udevd.service.
Compile gnuk
The first thing we need to do is get the source code. Clone the repositories:
git clone https://anonscm.debian.org/cgit/gnuk/gnuk/gnuk.git gnuk
cd gnuk
rm -rf chopstx
git clone https://anonscm.debian.org/cgit/gnuk/chopstx/chopstx.git chopstx
They use git submodules upstream but that fails for me, therefore the chopstx folder is removed and the repository is cloned over.
This guide uses commit 452c15c908b1d10fe14d71c3314c6550c3e3a471, (* 452c15c -
(HEAD -> master, tag: release/1.2.1, origin/master, origin/HEAD) Version 1.2.1
(8 weeks ago) <NIIBE Yutaka>).
Go in the src folder and start the compile:
cd src
./configure --target=FST_01 --vidpid="234b:0000"
Output:
Header file is: board-fst-01.h
Debug option disabled
Configured for bare system (no-DFU)
PIN pad option disabled
CERT.3 Data Object is NOT supported
Card insert/removal by HID device is NOT supported
If you want to see the other target options you can do a ./configure -h:
$ ./configure -h
Usage: ./configure [OPTION]...

Defaults for the options are specified in brackets.

Configuration:
  -h, --help    display this help and exit  [no]
  --vidpid=VID:PID  specify vendor/product ID [<NONE>]
  --target=TARGET specify target      [FST_01]
      supported targets are:
         FST_01
         OLIMEX_STM32_H103
         STM32_PRIMER2
         STBEE
         STBEE_MINI
         MAPLE_MINI
         ST_DONGLE
         ST_NUCLEO_F103
         NITROKEY_START
         CQ_STARM
         FST_01_00 (unreleased version with 8MHz XTAL)
Start the make, this might take some time. It will end with output like below:
arm-none-eabi-objcopy -O binary build/gnuk.elf build/gnuk.bin
ReGNUal is the firmware update tool, we need to compile that as well:
cd ../regnual/
make
The make ends with:
arm-none-eabi-objcopy -Obinary regnual.elf regnual.bin
arm-none-eabi-objcopy -Oihex regnual.elf regnual.hex
All the required compilations are done now. The next step is testing the token before we use it.
Test the token
It is important to test if the scripts and GPG recognize the token before we upgrade, so that we know that it worked.
In the gnuk/tools folder is a script called usb_strings.py:
$ python2 usb_strings.py
Device:
    Vendor: Free Software Initiative of Japan
   Product: FSIJ USB Token
    Serial: FSIJ-1.0.1-87022326
  Revision: release/1.0.1
    Config: FST_01:dfu=no:debug=no:pinpad=no:certdo=yes:keygen=yes
       Sys: 1.0
And you can use GnuPG:
$ gpg --card-status
Reader ...........: 234B:0000:FSIJ-1.0.1-87022326:0
Application ID ...: D276000124010200FFFE870223260000
Version ..........: 2.0
Manufacturer .....: unmanaged S/N range
Serial number ....: 87022326
Name of cardholder: [not set]
Language prefs ...: [not set]
Sex ..............: unspecified
URL of public key : [not set]
Login data .......: [not set]
Signature PIN ....: forced
Key attributes ...: rsa2048 rsa2048 rsa2048
Max. PIN lengths .: 127 127 127
PIN retry counter : 3 3 3
Signature counter : 0
Signature key ....: [none]
Encryption key....: [none]
Authentication key: [none]
General key info..: [none]
The upgrade
Go in the gnuk/tools folder. Execute the actual upgrade:
$ python2 ./upgrade_by_passwd.py ../regnual/regnual.bin ../src/build/gnuk.bin
It will ask you for the admin password. The output afterwars is like below, if the upgrade goes correct:
../regnual/regnual.bin: 4412
../src/build/gnuk.bin: 110592
CRC32: 303d2f62

Device:
Configuration: 1
Interface: 0
20001400:20004a00
Downloading flash upgrade program...
start 20001400
end   20002500
Run flash upgrade program...
Wait 1 seconds...
Device:
08001000:08020000
Downloading the program
start 08001000
end   0801b000
After the upgrade you can check if it succeeded:
$ python2 usb_strings.py
Device:
    Vendor: Free Software Initiative of Japan
   Product: Gnuk Token
    Serial: FSIJ-1.2.1-87022326
  Revision: release/1.2.1-1-g2b784cb-modified
    Config: FST_01:dfu=no:debug=no:pinpad=no:certdo=no
       Sys: 1.0
The version went from 1.0.1 to 1.2.1. For reference, here is my dmesg:
  [  294.977933] thinkpad_acpi: EC reports that Thermal Table has changed
  [  726.481249] usb 1-1.1: new full-speed USB device number 3 using ehci-pci
  [ 1408.628722] usb 1-1.1: USB disconnect, device number 3
  [ 1412.817498] usb 2-1.2: new full-speed USB device number 4 using ehci-pci
  [ 1461.011520] usb 2-1.2: USB disconnect, device number 4
  [ 1464.014677] usb 2-1.2: new full-speed USB device number 5 using ehci-pci
  [ 1469.705384] usb 2-1.2: USB disconnect, device number 5
  [ 1469.893972] usb 2-1.2: new full-speed USB device number 6 using ehci-pci
You can also use GPG to check the new firmware:
[20:20:18] [remy@gateway] [ ~ ]
$ gpg --card-status
Reader ...........: 234B:0000:FSIJ-1.2.1-87022326:0
Application ID ...: D276000124010200FFFE870223260000
Version ..........: 2.0
Manufacturer .....: unmanaged S/N range
Serial number ....: 87022326
Name of cardholder: [not set]
Language prefs ...: [not set]
Sex ..............: unspecified
URL of public key : [not set]
Login data .......: [not set]
Signature PIN ....: forced
Key attributes ...: rsa2048 rsa2048 rsa2048
Max. PIN lengths .: 127 127 127
PIN retry counter : 3 3 3
Signature counter : 0
Signature key ....: [none]
Encryption key....: [none]
Authentication key: [none]
General key info..: [none]
If it goes wrong?
You need to use the ST Link v2 adapter to reflash the firmware. See this tutorial for a guide.
Now what?
You can put 4096 bit keys on the card, or use any of the new algorithms. See my Nitrokey Start Getting Started guide for how to put keys on the card.
You can also reflash the device to NeuG firmware, then it will become a True Random Number Generator. But that is for another tutorial.
Tags: fst-01 , gnuk , gnupg , gpg , neug , nitrokey , nitrokey-start , start , stm32f103tb , tutorials