Raymii.org

אֶשָּׂא עֵינַי אֶל־הֶהָרִים מֵאַיִן יָבֹא עֶזְרִֽי׃Home | About | All pages | Cluster Status | RSS Feed
Yocto boot2qt for the Seeed reTerminal (Qt 6)
Published: 18-03-2022 | Last update: 04-04-2022 | Author: Remy van Elst | Text only version of this article
❗ This post is over four years old. It may no longer be up to date. Opinions may have changed.
Table of Contents
In this guide we'll build a linux distribution for Seeed reTerminal, using the Yocto project and the boot2qt stack provided by Qt. This boot2qt image can be written to the internal eMMC and when booted up, the Seeed reTerminal runs a software stack that integrates nicely with Qt Creator (the Qt IDE), for example, one click deployment to the device. You can run your own Qt application on the reTerminal, full screen, it will boot right into it.
This guide covers Qt 6.2. The guide also covers changing the default startup app to your own app, Qt Creator integration and rotating your Qt app, both Widgets and QML, the latter via Wayland and Weston.
The main difference between the guide that Seeed provides and this guide is that this guide uses Qt's own boot2qt Yocto stack and runs Qt 6. The Seeed guide covers their own image and Qt 5. This guide also shows you how to make your own Qt app the default and helps you with rotation.
Running your own Yocto distribution over the default Debian image provided by Seeed
has the advantage that it's reproducible and you are fully in control. Using the
boot2qt Yocto stack makes the Yocto setup process way easier and faster. By using
your own image, no other application run on the device, so all resources are available
for your app. (No desktop environment or other software, unless you built it in the
image.) This also assures you that in the future, lets say as an example, 5 years later,
you can still build your image and software, since your Yocto build server has all
the sources locally.
Full disclosure: I was contacted by Seeed, they sent me this reTerminal in exchange for a few articles, this one being the first. No monetary payment is involved and Seeed has not reviewed this article before publishing. For official support, please visit the Seeed wiki.
Seeed actually sent me 2 reTerminal units. The first one had a stuck boot-mode switch. It wouldn't move, and later broke off. The boot mode switch is required to flash an image, which is quite essential for this Yocto guide. I contacted them and a replacement unit was sent quickly. So, be careful with your boot mode switch. I now use a pair of tweezers to switch it, just to be extra cautious.
Article changelog:
- 04-04-2022: Fixed paths in shell commands
- 04-04-2022: Fixed syntax in some recipe files including missing slashes
- 04-04-2022: Added note regarding the
seeed-linux-dtoverlayson commit7c846e23de9346d318fbdc8ac92dcc72b90fb6ce - Thanks to Ryan Bryngelson for the above issues and fixes!
What is the reTerminal
The reTerminal
The reTerminal is marketed as a future-ready Human-Machine Interface (HMI). The reTerminal is powered by a Raspberry Pi Compute Module 4 (cm4) which is a Quad-Core ARM Cortex-A72 CPU running at 1.5GHz and a 5-inch IPS capacitive multi-touch screen with a resolution of 1280x720. 4GB of RAM and 32 GB of eMMC storage are built in (non-expandable). It has wireless connectivity with dual-band 2.4GHz/5GHz Wi-Fi and Bluetooth 5.0 BLE.
The reTerminal has a high-speed expansion interface and exposes many I/O ports and connectors. The device has security features such as a cryptographic co-processor with secure hardware-based key storage. It also has built-in modules such as an accelerometer, light sensor and a Real-Time Clock. reTerminal has a Gigabit Ethernet Port for faster network connections and also has dual USB 2.0 Type-A ports. The 40-pin Raspberry Pi compatible GPIO header allows most or all of your hat's and existing projects to work with the reTerminal.
You can buy the reTerminal here, current price is USD 195. That includes a Compute Module 4.
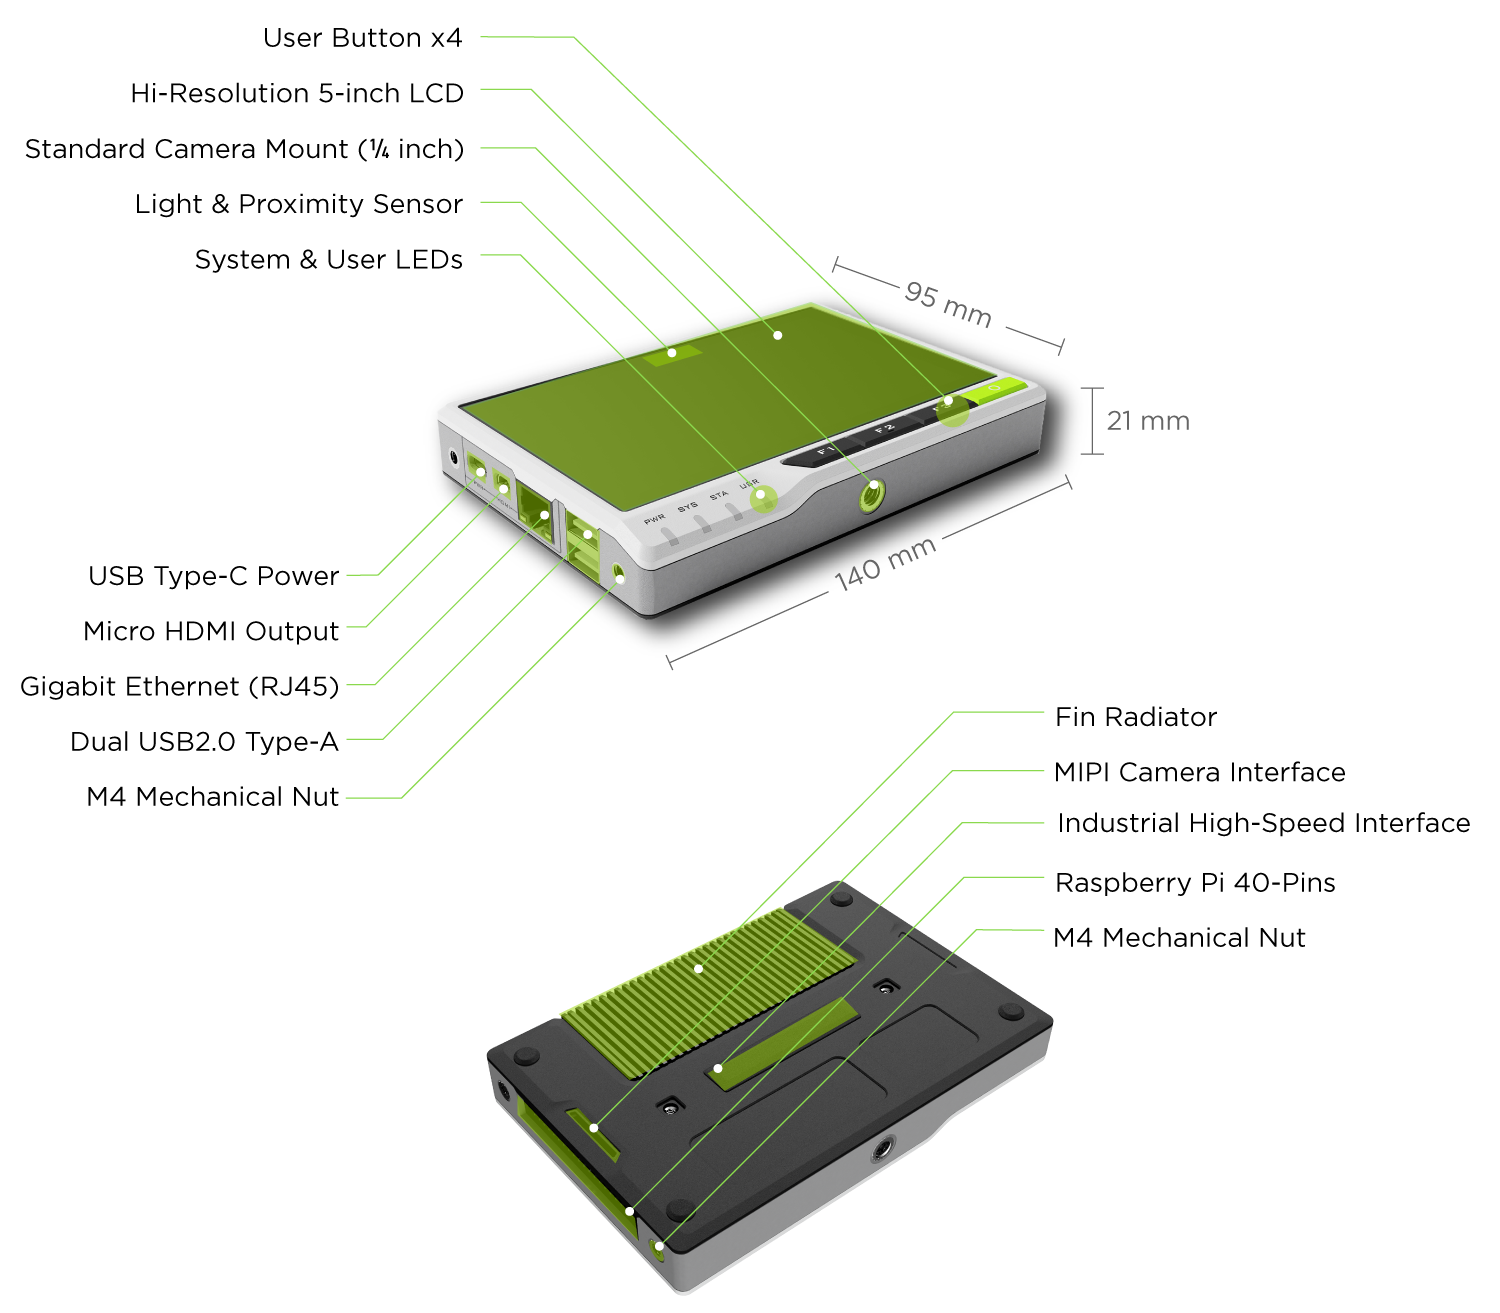
External hardware overview of the reTerminal. Notice the many mounting holes and nuts
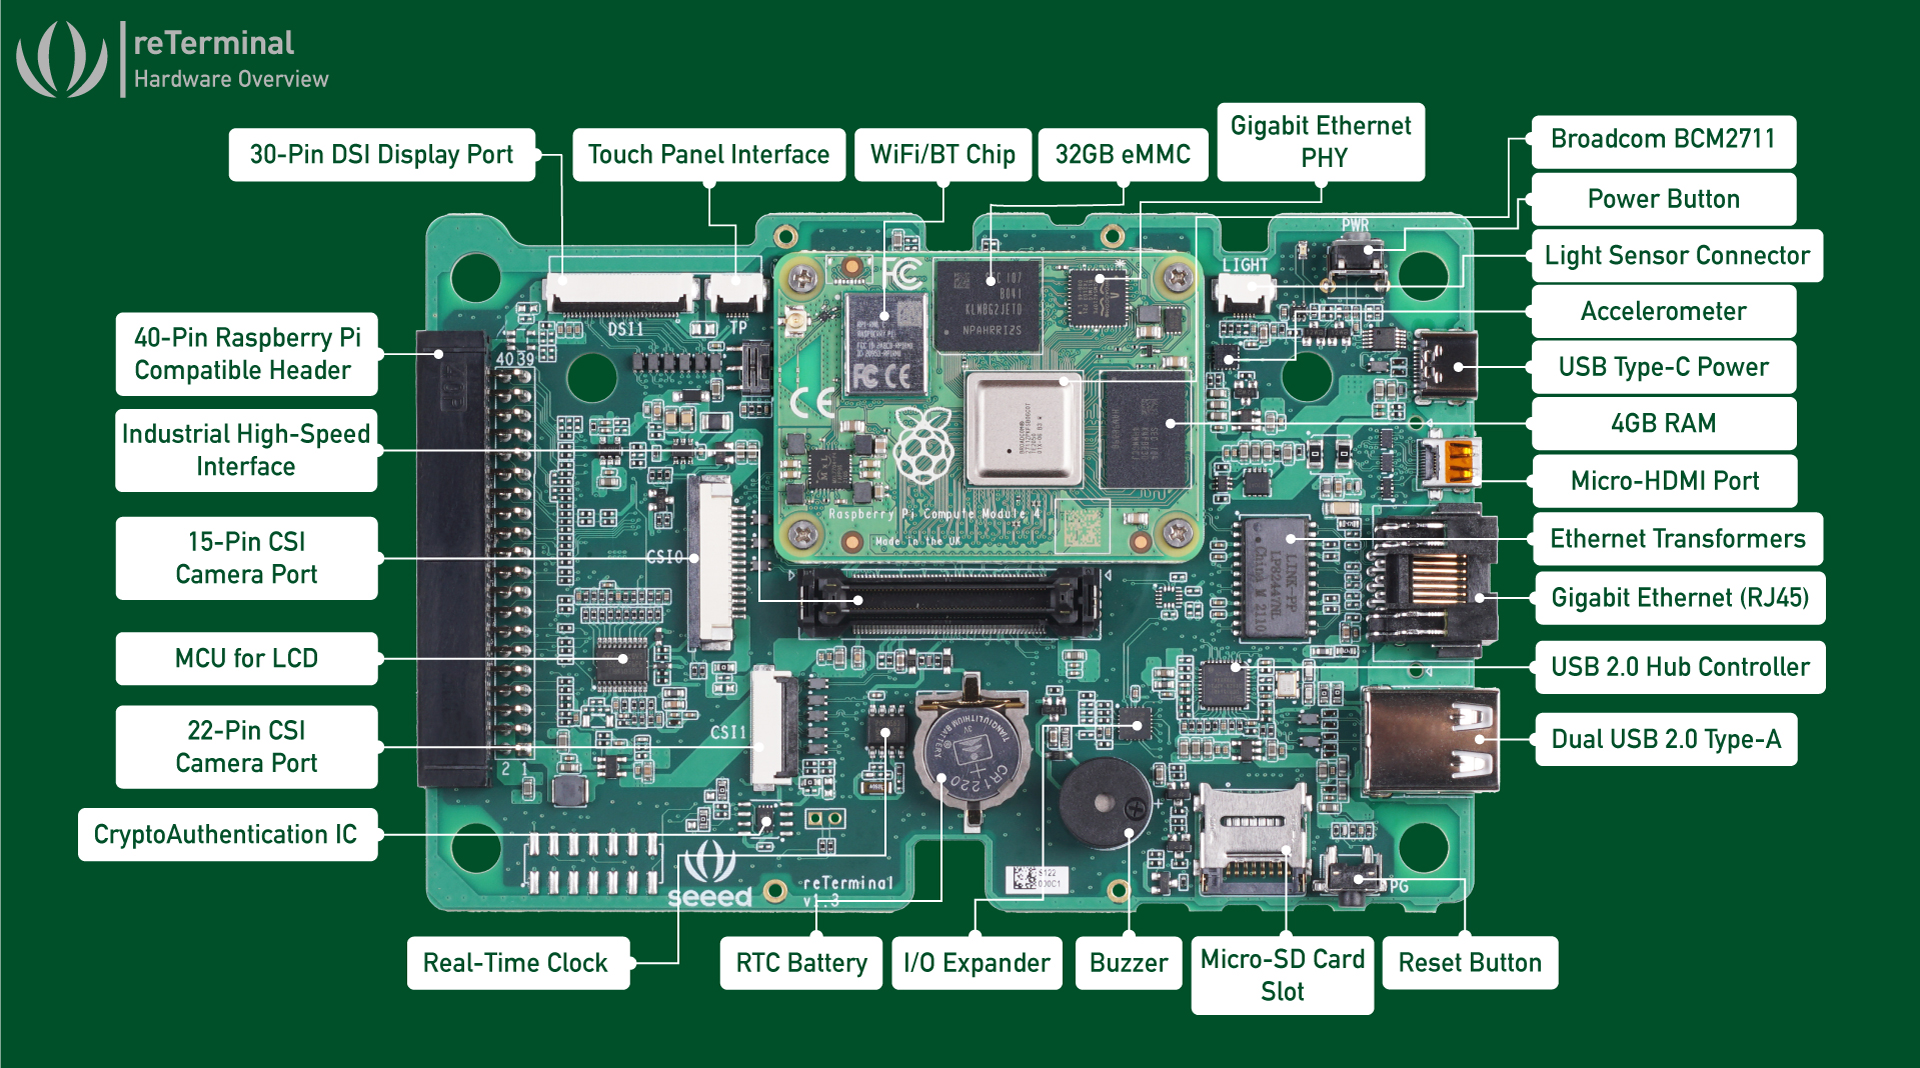
Carrier board including the Compute Module 4
You could bluntly say that the reTerminal is a carrier board for the Compute Module 4 with a multi-touch screen and a convenient case. In my opinion, it's much more than that.
It does lack a built-in battery at the time of writing this article. You power it via a USB-C cable or by supplying 5V and ground to the correct GPIO pins.
Behind a little cover pad is a high-speed interface, on the picture above it's labeled
Industrial High Speed Interface. In the FAQ they write the following:
The High-Speed Interface for Expansion Modules consists of 1 PCIe 1-lane Host Gen 2 (supporting speeds up to 5Gbps), 1 USB 2.0, 1 PoE and 26 GPIOs. The 26 GPIO pins can be further used as 2 I2C, 2 SPI and 1 UART. We plan to build expansion modules in the future for reTerminal and we have reserved this interface to connect these modules to the reTerminal. We will release a wide range of modules such as a Mic Array & Speaker Module, Camera Module, Industrial I/O, LoraWAN Module, 5G/4G Module, PoE Module and an Ethernet Switch. There are 2xM4 mechanical screw holes on the side of the reTerminal to help keep the expansion modules in place.
So, hardware wise, the reTerminal is solid and future proof. If you buy one, it comes pre-loaded with a Compute Module and Raspbian including drivers plus a demo application, so you can get started right away. No messy supply chain issues here, only a bit of waiting on shipping a package from China.
What is Yocto
There is a lot of ground to cover, if you are not familiar with the Yocto project, here is a quick, simplified, overview of all the terms.
Seeed have their own FAQ on Yocto for the reTerminal here. That FAQ covers the basics and has tips and tricks for using Yocto. I recommend you read that guide as well, since it explains different parts. My guide is tailored to (boot 2) Qt on the reTerminal.
Yocto is an open-source project which provides a build framework and metadata
to help to create a custom image for your target board. Yocto uses so-called
(meta) layers and recipes. Recipes are .bb (for bitbake) files that contain
build instructions and layers are a collection of specific recipes, classes
and configuration files. You could have a layer named meta-raspberry
(all layers, by convention, start with meta-) that has recipes applicable
only for the Raspberry Pi.
Yocto helps you to build a linux distro, their reference distro is named
poky. The primary build tool is a python command line tool named bitbake.
It parses all the recipes and then, one by one, gathers the source code
and compiles all the software, then packages that up into an image for your
board.
Yocto is aimed at embedded linux devices, at work we use it to create our own
Linux distribution (not boot2qt) to run on the coffee machines. Many
different boards are supported, most vendors provide a so called board
support package (bsp). Often this contains a kernel and drivers for your
board. There is a board support package for the Raspberry Pi, which we will
use.
boot2qt is an set of layers for Yocto which builds a simple linux system
that starts up without a desktop, right into a Qt application. It also builds
a cross-compile SDK for your desktop, which you can use in Qt Creator to
cross-compile your application for the target device. Often the device you
develop for does not have the same CPU architecture as your desktop
workstation. To top this all up, it also integrates into Qt Creator, allowing
you to one-click deploy and run your application, via the network, on your
device.
boot2qt also provides a set of scripts to make the yocto setup very easy, so
the process you see in this guide is not the same as a default yocto setup. It's
specifically for boot2qt and for the reTerminal.
So to summarize, boot2qt provides a layer on top of yocto that adds
integration between your embedded linux device and the Qt suite of tools,
saving a boatload of time doing manual busywork.
Development host Yocto setup
The machine that is going to build your boot2qt image (the host that runs
bitbake) needs a few packages before we can get started building. You need
at least 50 GB's of free space, but my host has 300 GB. Cross-compiling all
the packages takes a huge amount of time, so the more cores and RAM you have,
the better. My test build machine has 4 cores and 8 GB of RAM, the entire
image build took more than 2 days. At work we have a few beefy servers, there
the build takes about 2 hours. Yocto does support incremental builds, so if
you change one recipe, only that part has to be rebuilt, not all the other
parts.
My build machine runs Debian 11, but Ubuntu 20.04 is also known to work. Install the required packages first:
apt-get install gawk wget git diffstat unzip texinfo gcc build-essential
chrpath socat cpio python3 python3-pip python3-pexpect xz-utils
debianutils iputils-ping python3-git python3-jinja2 libegl1-mesa
libsdl1.2-dev pylint3 xterm python3-subunit mesa-common-dev python
git-lfs g++-multilib gcc-multilib libxkbcommon-dev
libxkbcommon-x11-dev libwayland-cursor++0 libwayland-cursor0
These are a bit more packages than the Qt site recommends, I had build issues
when building the qbsp layer, which is where most of the extra packages
come from.
Google Repo
Next you need repo, a git management tool by Google. It hides most of
the complexity of submodules and different repo's by putting all of that
extra information in a manifest file. You can install it using apt:
apt install repo
If it's not in the repository, check the instructions, installation process is just a simple copy of one executable.
Initial boot2qt setup
Create a folder where all of yocto will reside:
mkdir b2qt
cd b2qt
Use the repo tool to clone all the git repositories of the Yocto project
and boot2qt at once. First initialize for the correct Qt version:
# for Qt 6.2:
repo init -u git://code.qt.io/yocto/boot2qt-manifest -m v6.2.3.xml
Then sync the repositories:
repo sync
You must tell which board you want to build for, then source a script:
export MACHINE=raspberrypi4-64 && source ./setup-environment.sh
This step must be repeated on every login.
Notice that we specify raspberrypi-64. This is because the reTerminal uses a
Raspberry Pi Compute Module 4. The meta-raspberry layer uses that name for
both the regular Pi 4 and the Compute module. The Yocto layer from Seeed has
a specific board for the reTerminal since 3 days (at the time of writing),
but boot2qt has no support for that, so in this guide we'll port the specific
requirements over to our build image.
Output:
### Shell environment set up for builds. ###

You can now run 'bitbake <target>'

Common targets are:
b2qt-embedded-qt6-image
meta-toolchain-b2qt-embedded-qt6-sdk

QBSP target is:
meta-b2qt-embedded-qbsp

For creating toolchain or QBSP for Windows, set environment variable before running bitbake:
SDKMACHINE=x86_64-mingw32

For more information about Boot to Qt, see https://doc.qt.io/QtForDeviceCreation/
You should now be in a folder named build-raspberrypi4-64. Using the repo tool and
sourcing this script has made a nifty folder structure for yocto:
build-raspberrypi4-64: build directory for the board, you are in this folder after sourcing thesetup-environment.shfile.sources: has all thebitbakelayers and recipesdownload: folder where all the source code is downloaded (git repo's, tar.gz archives)
In the build-* directory there is a conf folder, that has two important
files. bblayers.conf and local.conf. The first defines the layers that
your build uses and the second has specific configuration options for
this specific build. We'll start by adding the reTerminal layer, the
config file is covered later.
Adding the Seeed reTerminal layer
We need the reTerminal layer for the device tree and a few drivers.
cd ../sources
git clone -b main https://github.com/Seeed-Studio/meta-seeed-reterminal.git
I've tested this guide with commit 7c846e23de9346d318fbdc8ac92dcc72b90fb6ce
and with commit 57d1b68d73e625fe6a4cb14372a0cb7c42bae9c5. If the
seeed-linux-dtoverlays package gives a linker error like below:
| aarch64-poky-linux-ld: internal error in set_address, at ../../gold/output.h:322
Then, remove the ld-is-gold option that the boot2qt distro.conf file enabled,
as we do in our local config later on:
DISTRO_FEATURES_remove = "ld-is-gold"
I've made an upstream bug report for it. If you use commit 7c846e23de9346d318fbdc8ac92dcc72b90fb6ce, the error will not appear.
You must add the Yocto version that boot2qt uses to the layer configuration. Edit
the following file:
vi meta-seeed-reterminal/conf/layer.conf
Add hardknott to the LAYERSERIES_COMPAT line:
LAYERSERIES_COMPAT_meta-reterminal = "honister hardknott"
Save and close. Change to our build folder:
cd ../build-raspberrypi4-64
Add the layer to our config:
bitbake-layers add-layer ../sources/meta-seeed-reterminal
Making our own layer for b2qt image overrides
To override a few parts of the default b2qt-embedded-qt6-image, we must
make our own layer. This layer will include more customization later on,
but for the initial build, we'll only override parts of the image. Why do
we not just overwrite the contents of the original file? By using a .bbappend
file, we can keep our changes separated, so we know later on what our specific
changes are. It also makes it easier to apply upstream changes.
Start by making a few folders for your layer, in the b2qt folder:
mkdir -p sources/meta-raymii/conf/
mkdir -p sources/meta-raymii/recipes-qt/images/
Edit the following file:
sources/meta-raymii/conf/layer.conf
Place the below contents:
BBPATH .= ":${LAYERDIR}"

BBFILES += "${LAYERDIR}/recipes*/*/*.bb \
            ${LAYERDIR}/recipes*/*/*.bbappend \
            "
BBFILE_COLLECTIONS += "raymii"
BBFILE_PATTERN_raymii := "^${LAYERDIR}/"
BBFILE_PRIORITY_raymii = "1"

LAYERSERIES_COMPAT_raymii = "thud zeus dunfell gatesgarth hardknott"
Add our layer to the Yocto build for the reTerminal:
cd build-raspberrypi4-64
bitbake-layers add-layer ../sources/meta-raymii
Now on to the changes to the default boot2qt image. The following
file is a .bbappend file, which, if it has the same name, path and version,
will, as you might expect, append stuff to the original. In this case, we
will extend the default b2qt-embedded-qt6-image image to include our
myapp recipe in the installation. Edit this file:
vi sources/meta-raymii/recipes-qt/images/b2qt-embedded-qt6-image.bbappend
Add the following:
SUMMARY = "reTerminal changes for Qt image"

SPLASH = "psplash-raspberrypi"

IMAGE_FEATURES_append = " \
        splash \
        "

IMAGE_INSTALL_append = " \
        kernel-modules \
        evtest \
        iperf3 \
        i2c-tools \
        util-linux \
        "
The changes, as you can see, are related to the reTerminal image. Later on we'll add our application here, but for now this is just the essentials to make a bootable image.
Tweaking our local.conf for the reTerminal
We need to add a few variables to the local config file (conf/local.conf). All of these
have to do with the reTerminal hardware, except for one, the removal of webengine. If your
Qt app uses webengine, leave it in, otherwise, remove it. Not including it saves you a bunch
of time compiling and the image is smaller.
The reTerminal related features are pulled from the official layer, but
tweaked for boot2qt. You can see the backport here, quite a recent
addition to the reTerminal Yocto layer, 3 days ago when writing this
article.
The difference between local.conf and the b2qt-embedded-qt6-image.bbappend is that
local.conf is for this device only. In my case I also have a raspberrypi4 machine
build folder for the compute module 4. You could also create your own distro.conf
or define a new device with machine specific overrides, but for this article, local.conf
is simple enough.
Edit the following file:
# in the folder: build-raspberrypi4-64
vi conf/local.conf
Add the following:
RPI_KERNEL_DEVICETREE_OVERLAYS_append = " overlays/reTerminal.dtbo overlays/i2c3.dtbo overlays/vc4-kms-v3d-pi4.dtbo"
ENABLE_UART = "1"
ENABLE_I2C = "1"

KERNEL_MODULE_AUTOLOAD_rpi += "i2c-dev"

MACHINE_EXTRA_RRECOMMENDS += "\
    seeed-linux-dtoverlays \
"

VC4DTBO ?= "vc4-kms-v3d"

PACKAGECONFIG_append_pn-qtbase = " eglfs "

DISTRO_FEATURES_remove = "webengine ld-is-gold"

PREFERRED_VERSION_linux-raspberrypi ?= "5.10.%"
You're all set up for the initial build of boot2qt. I recommend you start a
screen or tmux session as the build will take a long time. My initial build
on the hardware described earlier took more than 2 days.
If you use commit 7c846e23de9346d318fbdc8ac92dcc72b90fb6ce, you do not need
to add the MACHINE_EXTRA_RRECOMMENDS += "seeed-linux-dtoverlays". The
device tree overlays are a patch in that commit, later on they
became a git submodule.
Bitbaking the image
With boot2qt and the reTerminal hardware layer setup, we can do our initial build.
Make sure you have source-ed the script and are in the correct folder:
cd ~/b2qt
export MACHINE=raspberrypi4-64 && source ./setup-environment.sh
Start the image build:
bitbake b2qt-embedded-qt6-image
The output will vary. First it lists all your layers and config, at the bottom it shows the current task. Example output:
WARNING: Host distribution "debian-11" has not been validated with this version of the build system; you may possibly experience unexpected failures. It is recommended that you use a tested distribution.
Loading cache: 100% |################################################################################################| Time: 0:00:00
Loaded 4374 entries from dependency cache.
Parsing recipes: 100% |##############################################################################################| Time: 0:00:00
Parsing of 2813 .bb files complete (2809 cached, 4 parsed). 4377 targets, 611 skipped, 0 masked, 0 errors.
NOTE: Resolving any missing task queue dependencies

Build Configuration:
BB_VERSION           = "1.50.0"
BUILD_SYS            = "x86_64-linux"
NATIVELSBSTRING      = "universal"
TARGET_SYS           = "aarch64-poky-linux"
MACHINE              = "raspberrypi4-64"
DISTRO               = "b2qt"
DISTRO_VERSION       = "3.3.4"
TUNE_FEATURES        = "aarch64 armv8a crc crypto cortexa72"
TARGET_FPU           = ""
SDKMACHINE           = "x86_64"
meta
meta-poky            = "HEAD:c40ac16d79026169639f47be76a3f7b9d8b5178e"
meta-raspberrypi     = "HEAD:b4ec97e4eb8e36efd1f7e2f8ae020a9e55cfc239"
meta-oe
meta-python
meta-networking
meta-initramfs
meta-multimedia      = "HEAD:f72a73b42fa740130b388ba8555cdbefdee8d37d"
meta-python2         = "HEAD:810d6d842f103eb59f18b06426106462b15de7e2"
meta-boot2qt
meta-boot2qt-distro  = "HEAD:e59a2e20697e0afc2a0b068835cd90e102dec589"
meta-mingw           = "HEAD:422b96cb2b6116442be1f40dfb5bd77447d1219e"
meta-qt6             = "HEAD:eb3719266fc03b96d5056980b135b371f31811f4"
meta-seeed-reterminal = "main:57d1b68d73e625fe6a4cb14372a0cb7c42bae9c5"
meta-raymii          = "master:84123f093be34a9a4d73de545132cffc3e210c19"

Initialising tasks: 100% |###########################################################################################| Time: 0:00:10
Sstate summary: Wanted 1706 Local 49 Network 0 Missed 1657 Current 1441 (2% match, 47% complete)
Removing 375 stale sstate objects for arch raspberrypi4_64: 100% |#################################################| Time: 0:00:02
Removing 6 stale sstate objects for arch allarch: 100% |###########################################################| Time: 0:00:00
Removing 956 stale sstate objects for arch cortexa72: 100% |#######################################################| Time: 0:00:02
NOTE: Executing Tasks
Currently  8 running tasks (2488 of 9043)  27% |######################                                                           |
0: libunistring-0.9.10-r0 do_configure - 27s (pid 1946515)
1: libpciaccess-0.16-r0 do_configure - 22s (pid 1949317)
2: icu-68.2-r0 do_compile - 15s (pid 1959678)
3: libpam-1.5.1-r0 do_compile - 15s (pid 1959794)
4: tslib-1.22-r0 do_configure - 13s (pid 1961800)
5: nettle-3.7.3-r0 do_configure - 10s (pid 1963210)
6: libpcre2-10.36-r0 do_configure - 8s (pid 1963889)
7: libogg-1.3.4-r0 do_configure - 5s (pid 1964770)
Now is a great time to go do something else and return in a few days. If you have a beefy machine, the build will be faster, but it will still take a while.
Once the build is done, the image is located in the folder:
build-raspberrypi4-64/tmp/deploy/images/raspberrypi4-64/
The image is a bmap file. bmap is a special format which should be faster to flash
and verifies data during flash, initially created by Intel for their Tizen
project. If you run Ubuntu, you must install the bmap-tools package.
Flashing the image
Because the reTerminal has a Compute Module 4 with eMMC, the SD card slot
won't work. You must flash the image to the eMMC, using a tool provided by
the Raspberry Pi. This tool is named rpiboot, which you must build
yourself. Start by installing a dependency:
sudo apt install git libusb-1.0-0-dev
Next, clone the repo
git clone --depth=1 https://github.com/raspberrypi/usbboot
cd usbboot
Start the build process:
make
The above steps are one time only. You now have the rpiboot tool in this
folder. Every time you flash an image, you must repeat the below process.
Flip the boot mode switch. Be very careful, my first unit had a stuck boot mode switch. I use a pair of tweezers to carefully flip the tiny switch.
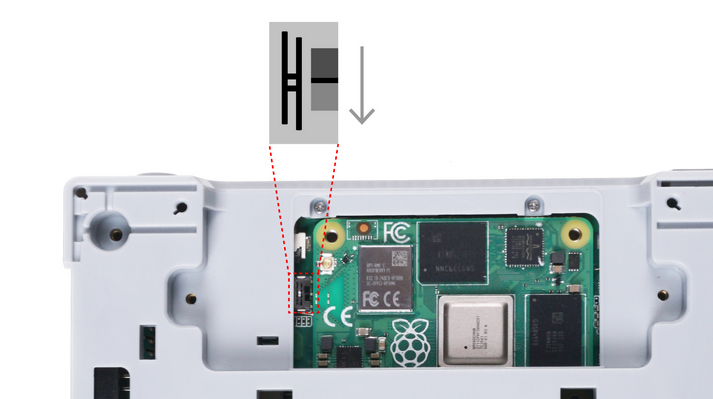
While you're playing around with the reTerminal and constantly flashing images, I recommend to leave the device open, not screw back the cooling or the plastic cover. This way the boot switch is easily accessible. My device did get a bit hot, but not extremely.
Plug in the USB C cable and run the rpiboot utility as root:
$ sudo ./rpiboot
RPIBOOT: build-date Feb 22 2022 version 20220208~181027 042cd145
Waiting for BCM2835/6/7/2711...
Loading embedded: bootcode4.bin
Sending bootcode.bin
Successful read 4 bytes
Waiting for BCM2835/6/7/2711...
Loading embedded: bootcode4.bin
Second stage boot server
Loading embedded: start4.elf
File read: start4.elf
Second stage boot server done
Unmount the folders, otherwise the image flashing will fail:
sudo umount /dev/sda1; sudo umount /dev/sda2
Flash the image, using bmaptool:
cd TO_THE_YOCTO_IMAGE_FOLDER
# cd b2qt/build-raspberrypi4-64/tmp/deploy/images/raspberrypi4-64/


sudo bmaptool copy b2qt-embedded-qt6-image-raspberrypi4-64-20220316191856.rootfs.wic.bz2 --bmap b2qt-embedded-qt6-image-raspberrypi4-64-20220316191856.rootfs.wic.bmap /dev/sda
Output:
bmaptool: info: block map format version 2.0
bmaptool: info: 698368 blocks of size 4096 (2.7 GiB), mapped 367758 blocks (1.4 GiB or 52.7%)
bmaptool: info: copying image 'rootfs.wic.bz2' to block device '/dev/sda' using bmap file 'rootfs.wic.bmap'
bmaptool: info: 100% copied
bmaptool: info: synchronizing '/dev/sda'
bmaptool: info: copying time: 5m 6.5s, copying speed 4.7 MiB/sec
Flashing takes a while, for me with the default image it takes about 5 minutes. The image filename varies, the date and time is in there. Switch the boot mode switch back (be careful), remove the USB C power cable and plug it back in.
First boot and a quick recap
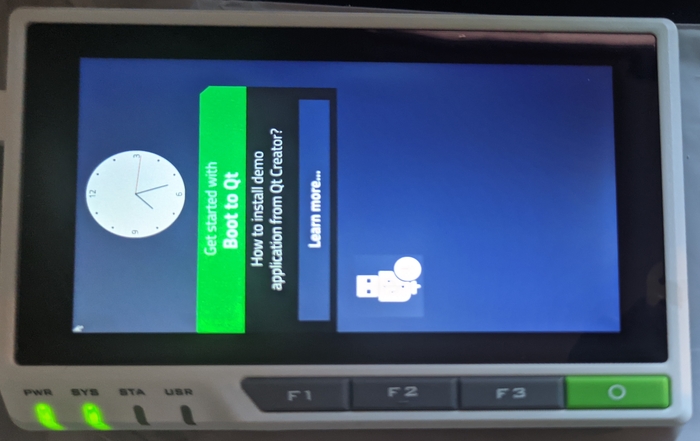
First bootup of your own
boot2qtimage!
Sit back, relax and enjoy your own home-grown image booting. Well done!
Play around with the example app, you can click "Learn More" and scroll around a bit.
You might notice the application is rotated. Actually the screen's default orientation is portrait, but the terminal is landscape. The FAQ addresses this for Ubuntu and Debian, we will fix this later on when we deploy our own Qt app. The fix depends on what kind of Qt app you want to run and if you have access to the source code of said app.
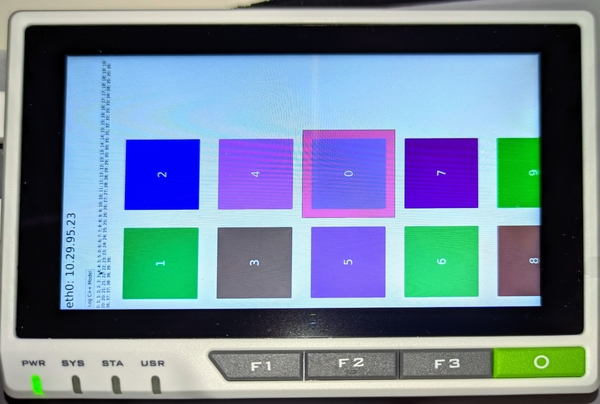
You can also plugin a network cable and ssh in to the machine, the IP address
will be displayed on screen.
To recap what you already have achieved:
- Installed Yocto
- Installed the
boot2qtstack - Customized Yocto by creating your own layer
- Added the reTerminal hardware layer
- Built your own image
- Flashed it onto the reTerminal.
If you make changes to Yocto, subsequent builds will be faster since it only has to re-do stuff that changed. The steps you always have to do on the Yocto side are:
cd b2qt/export MACHINE=raspberrypi4-64 && source ./setup-environment.sh- (do your changes)
bitbake b2qt-embedded-qt6-image
On the reTerminal side for flashing:
- Flip the
boot mode switchand plugin a USB C cable ./rpibootto be able to flash the imagebmaptool copy b2qt-embedded-qt6-image-raspberrypi4-64-2022*.rootfs.wic.bz2 --bmap b2qt-embedded-qt6-image-raspberrypi4-64-2022*.rootfs.wic.bmap /dev/sda- Flip back the boot mode switch
- Remove the power cable and plug it back in
Now that you have your device set up, it's time to make use of all the handy features
boot2qt offers us, most important, the integration with the Qt IDE, Qt Creator. It
allows for rapid development and testing, right from inside the IDE you can deploy to
the device and test your changes. That workflow is really nice and quick, including
debugging, breakpoints, etc.
Qt SDK and Qt Creator integration
In my other article on Yocto on the regular Pi Compute Module 4, I've written out all the steps required to build the Qt SDK and integrate it with Qt Creator. Because the process is quite long, I've decided not to duplicate it here but rather refer you to my other guide, which is full of screenshots and explains the whole process.
Please check out that article for the full guide. The only thing that changes is
the first command to source the setup file, we're exporting the MACHINE variable
for the 64 bit version, like so:
export MACHINE=raspberrypi4-64 && source ./setup-environment.sh
Next, you build the SDK, which takes a while:
bitbake meta-toolchain-b2qt-embedded-qt6-sdk
When you've completed all the steps in my other guide, you should have a new Qt kit configured in Qt Creator and a new device to deploy to.
Making your own app the default
Now that you've got the image working and you have your Qt integration set up, you should be able to run and deploy your app to the reTerminal via Qt Creator.
If, and only if that's the case, continue on with the guide. We're going to
replace the default b2qt startupscreen app with our own compiled program.
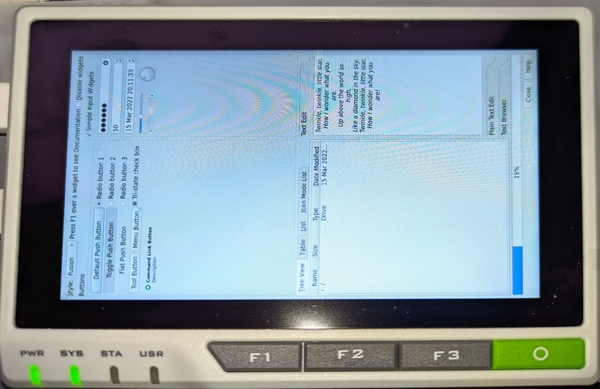
In my case it's a drag and drop demo app. It's modified a little bit to also show the current IP address, which is useful when debugging on the device.
This demo app is cool because it allows me to check the touch screen as well. Later on in the guide, in case of a Qt Widgets app, the rotation of the screen and the touch-screen rotation must match, otherwise the app will be rotated, but not the touch. Very weird stuff happens then.
Start by making a new recipe for your app. We'll name it myapp for this example:
mkdir -p sources/meta-raymii/recipes-myapp/myapp/files/
In the folder files/ we've just created, place the compiled binary for your app,
name it myapp for this guides example. Make sure the architecture matches the
Pi 64 bit build:
$ file myapp
myapp: ELF 64-bit LSB pie executable, ARM aarch64, version 1 (GNU/Linux), dynamically linked, interpreter /lib/ld-linux-aarch64.so.1, for GNU/Linux 3.14.0, BuildID[sha1]=f2d876e1fe62e2eec1d5c0ead27a99c74a1f77ca, with debug_info, not stripped
Next, create the actual recipe file with filename myapp_1.0.bb (not in the
files folder, but one folder above). The underscore and version number are
important, if you raise that number, a new package will be built by Yocto.
Paste in the following contents:
DESCRIPTION = "My Custom Qt App"
AUTHOR = "author@example.org"
LICENSE = "CLOSED"
PR = "r0"

SRC_URI =+ "file://myapp \
           "

DEPENDS += "qtbase qtdeclarative qtdeclarative-native"

do_install() {
    install -d ${D}/${bindir}
    install -m 0755 ${WORKDIR}/myapp ${D}/${bindir}/myapp

    lnr ${D}/${bindir}/myapp ${D}/${bindir}/b2qt

}

FILES_${PN} = "${bindir}/myapp \
               ${bindir}/b2qt \
              "
The line starting with lnr replaces the build in b2qt startupscreen app
(which is a symlink) to your own application. boot2qt ships with a simple
launcher that, on boot, launches whatever is the current symlink at
/usr/bin/b2qt and it has a few more utilities (like start/stop or replacing
the symlink)
Add the new myapp recipe to our custom image .bbappend file:
vi sources/meta-raymii/recipes-qt/images/b2qt-embedded-qt6-image.bbappend
Edit the IMAGE_INSTALL_append section and add myapp right above the
kernel-modules line:
myapp \
The entire section looks like this now:
IMAGE_INSTALL_append = " \
        myapp \
        kernel-modules \
        evtest \
        iperf3 \
        i2c-tools \
        util-linux \
        "
After the changes, build a new image:
bitbake b2qt-embedded-qt6-image
Flash that using bmaptool as described above.
Because we're appending to the default b2qt image, and because we're
symlinking our own binary where the b2qt launcher expects it, the next
time you boot up after building and flashing an image, your own app should start.
Here's a picture of my custom app after startup, still incorrectly rotated:
If you want to upload a new version of your app, replace the myapp binary
in the files folder and increment the PR = "r0" line to r1. Then bitbake
a new image and flash it. Rinse and repeat for every release.
If you just want to test out a new version, you can also bitbake myapp, then
you'll just build the app without a new image. There will be a new IPK package
in the tmp/deploy/ipk folder:
$ file tmp/deploy/ipk/cortexa72/myapp_1.0-r2_cortexa72.ipk
tmp/deploy/ipk/cortexa72/myapp_1.0-r2_cortexa72.ipk: Debian binary package (format 2.0), with control.tar.gz, data compression xz
scp this file over to the device and install it using the package manager opkg:
opkg install myapp_1.0-r2_cortexa72.ipk
Then either reboot or restart the startupscreen service to load the new app.
However, if you just want to test new builds of your app, use the built in Qt creator integration you set up earlier. Works way faster and right from Qt Creator, including remote debugging.
Rotating your app in b2qt
The next sections will cover the rotation aspect. It differs for Qt Widgets and Qt QML apps,
and, in my opinion, is a big mess. The FAQ covers rotation and I've found a Japanese
Seeed blog covering rotation, but that is all for the X11 display server.
boot2qt uses eglfs to directly run your app. EGLFS is a platform plugin
for running Qt applications on top of EGL and OpenGL ES 2.0, without an
actual windowing system like X11 or Wayland.
Using eglfs, you can set an environment variable to rotate your application,
but that will only work if you have a Qt Widgets app. For a QML app, you must
either add a transform: Rotation {} to your program or run a display server
like weston on wayland and let that handle rotation. We'll cover all the options
in the next sections, starting with Qt Widgets.
Qt Widgets rotation
The simplest option is for a Qt Widget application, you can define 2 environment variables, one for rotation and one for touchscreen rotation, that's all:
QT_QPA_EGLFS_ROTATION=-90
QT_QPA_GENERIC_PLUGINS=evdevtouch:/dev/input/event0:rotate=270
Why does one use -90 and one use 270? Because when I tried to use 270
instead of -90, on startup the app gave an error: Invalid rotation 270
specified in QT_QPA_EGLFS_ROTATION. I did try
QT_QPA_EVDEV_TOUCHSCREEN_PARAMETERS, but that failed to work for touchscreen rotation.
Now, how do we apply this to Yocto? There is a default qt environment file in /etc/default/qt,
which we need to override in our Yocto build. Start by making a folder where our override .bbappend
will reside:
mkdir -p sources/meta-raymii/recipes-qt/boot2qt-addons/default-qt-envs/
Copy over the default environment file from the boot2qt layer to that folder:
cp sources/meta-boot2qt/meta-boot2qt/recipes-qt/boot2qt-addons/default-qt-envs/defaults sources/meta-raymii/recipes-qt/boot2qt-addons/default-qt-envs/
Edit the defaults file:
vim sources/meta-raymii/recipes-qt/boot2qt-addons/default-qt-envs/defaults
Append the two lines below the existing ones:
QT_QPA_EGLFS_ROTATION=-90
QT_QPA_GENERIC_PLUGINS=evdevtouch:/dev/input/event0:rotate=270
In my case, the user programmable keys don't show up, so the touchscreen
is /dev/input/event0. It might be event1, but you can check using the
evtest command:
root@b2qt-raspberrypi4-64:~# evtest
No device specified, trying to scan all of /dev/input/event*
Available devices:
/dev/input/event0:      seeed-tp
/dev/input/event1:      vc4
/dev/input/event2:      vc4
Select the device event number [0-2]:
seeed-tp is the touchscreen (tp stands for touch-panel).
Create a .bbappend file, which will override the default recipe:
vim sources/meta-raymii/recipes-qt/boot2qt-addons/default-qt-envs.bbappend
Add the following:
FILESEXTRAPATHS_prepend := "${THISDIR}/${PN}:"
This line adds the folder in our own layer to the package, so it will look for
the files in that folder as well as the original folder. Your new folder is checked
first. The Yocto manual explains this variable and why using := is important.
You can check that your .bbappend is used using the following command:
bitbake-layers show-appends default-qt-envs
Output:
=== Matched appended recipes ===
default-qt-envs.bb:
  /home/remy/b2qt/sources/meta-raymii/recipes-qt/boot2qt-addons/default-qt-envs.bbappend
  /home/remy/b2qt/sources/meta-boot2qt/meta-boot2qt-distro/dynamic-layers/raspberrypi/recipes-qt/boot2qt-addons/default-qt-envs.bbappend
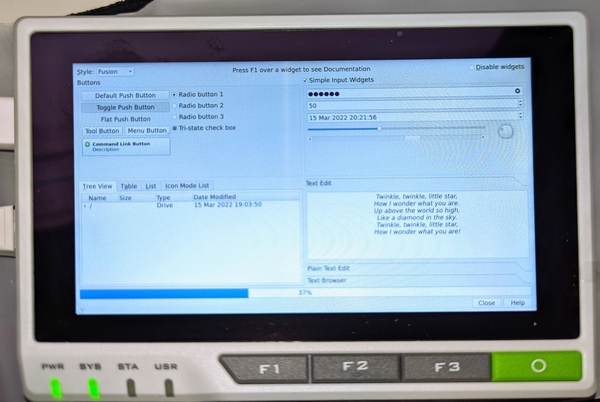
bitbake the image and flash it, now your Qt Widgets app should be rotated correctly. Here
is a picture of the incorrectly rotated example Qt widgets controls demo app:
And here is the app with the environment variables set, rotated as you'd expect:
Qt QML rotation
For a QML application, rotation is a bit harder. You either need to make changes
to the source code, or use wayland and weston, a display manager and server
which handle the rotation. The latter solution is only if you cannot change
the source code of your application.
If you can change your QML source code, add a Rotation transformation:
transform: Rotation {
    angle: 270
    origin.x: parent.width / 2
    origin.y: parent.width / 2
}
In this case I assume the rotation is on your root element. Not the Window, but the
Loader or StackLayout, or Rectangle in the window, whatever is your root element.
No changes to the environment are required, just upload a new version of your application as described above.
Weston and Wayland
If you cannot change your source code, you must install a display manager. We're using
Wayland and Weston, not X11. The Qt documentation has an article explaining why not X11.
Here is a quote summarizing the important bits:
X11 is quite large and complex, and it lacks customizability. In fact, it is difficult to run a client fluidly with X11, and reach 60 fps without tearing. Wayland, in contrast, is easier to implement, has better performance, and contains all the necessary parts to run efficiently on modern graphics hardware. For embedded, multi-process systems on Linux, Wayland is the standard.
Qt also has a Wayland Compositor, but we're not going to use that. We're going
to run our myapp program as a client application in Weston. Weston is the
reference compositor, sort of like the window manager in X11. Why Weston? It ships
with the boot2qt Yocto stack and can run one program fullscreen without decorations
and panels (using the kiosk plugin).
We're currently at Weston version 9. In version 10 there will be support for
autostarting programs, but for now we must do that ourselves using a
systemd service.
As we've done a few times in this guide, we'll make a .bbappend file
to override the default recipes with our changes. Start by creating a
folder structure:
mkdir -p sources/meta-raymii/recipes-graphics/wayland/weston-init/
In that folder, create a file named weston.ini and put the following in:
# configuration file for Weston

[core]
shell=kiosk-shell.so
require-input=false

[output]
name=DSI-1
mode=720x1280@60
transform=rotate-270

[screen-share]
command=/usr/bin/weston --backend=rdp-backend.so --shell=fullscreen-shell.so --no-clients-resize

[shell]
panel-position=none
The default shipped config starts a desktop, but we're changing that. The
kiosk-shell.so plugin runs one app fullscreen without any window
decorations. The output section, including the transform=rotate-270 is
the magic section you need to rotate your QML application.
Create a .bbappend recipe:
FILESEXTRAPATHS_prepend := "${THISDIR}/${PN}:"

SRC_URI += " file://weston.ini "

do_install_append() {
    # Remove upstream weston.ini to avoid conflict with weston-ini-conf package
    rm -f ${D}${sysconfdir}/xdg/weston/weston.ini

    install -D -p -m0644 ${WORKDIR}/weston.ini ${D}${sysconfdir}/xdg/weston/weston.ini
}

SYSTEMD_AUTO_ENABLE_${PN} = "enable"
This looks like what we did earlier to override the default Qt environment.
FILESEXTRAPATHS_prepend := "${THISDIR}/${PN}:" adds the current folder in our
own layer, where we just placed the config file. I had some vague issues where
the default weston.ini file was not replaced, which is why there is such an
explicit do_install_append section. Normally that is not required, but in
my case, the file would not be replaced unless I did it this way.
SYSTEMD_AUTO_ENABLE_${PN} = "enable" enables the weston systemd service.
Now, to make sure weston starts and not b2qt or the startupscreen, we must
make a few more .bbappend recipes to disable those systemd services. There can
only be one display service running, if b2qt runs, then weston will fail to
start.
Same as earlier, create the following file:
sources/meta-raymii/recipes-qt/boot2qt-addons/boot2qt-startupscreen_%.bbappend
Put in the below line:
SYSTEMD_AUTO_ENABLE_${PN} = "disable"
This disables the startupscreen service.
Repeat the above for the b2qt service, which, confusingly, is in
the default-qt-envs recipe file:
sources/meta-raymii/recipes-qt/boot2qt-addons/default-qt-envs.bbappend
The same line goes in to disable the systemd service:
SYSTEMD_AUTO_ENABLE_${PN} = "disable"
The next part involves our custom image .bbappend file, where we need to add
weston to the distro features, to make sure systemd boots up to the graphical
target and not the multiuser target:
sources/meta-raymii/recipes-qt/images/b2qt-embedded-qt6-image.bbappend
Append weston \ to the IMAGE_FEATURES_append section:
IMAGE_FEATURES_append = " \
        splash \
        weston \
        "
Include the weston-init package in the IMAGE_INSTALL_append section:
IMAGE_INSTALL_append = " \
        myapp \
        kernel-modules \
        evtest \
        iperf3 \
        i2c-tools \
        util-linux \
        weston-init \
        "
The last part involves updating our myapp recipe to include a systemd service,
which will start up our application after weston is started. Create a new file:
vim sources/meta-raymii/recipes-myapp/myapp/files/myapp.service
Place the following contents:
[Unit]
Description=MyApp on Weston
After=weston.service

[Service]
User=weston
Restart=always
Type=simple
Environment=QT_QPA_PLATFORM=wayland
ExecStartPre=/bin/sh -c 'echo XDG_RUNTIME_DIR="$(loginctl show-user --property=RuntimePath --value \"$USER\")" > /tmp/qtenv'
EnvironmentFile=-/tmp/qtenv
ExecStopPost=/bin/rm /tmp/qtenv
ExecStart=/usr/bin/myapp
WorkingDirectory=/home/weston

[Install]
WantedBy=multi-user.target
If you run a Qt app on Wayland, it required the XDG_RUNTIME_DIR environment variable. We
could hardcode this to /run/user/1000, which would work for this specific setup, but we
can also use the loginctl command to query the actual path, which works for all future
devices and setups.
systemd has no option to evaluate a shell command as an Environment option, so we use
a hack to do that. First, it executes the ExecStartPre command, which start a subshell to
execute the command and writes the output to a file in /tmp. Then we specify the line
EnvironmentFile, but, important, start it with a dash (-). This ensures the correct
order, first the command, then the file. Not documented well, I found a stackoverflow post
explaining it, but I cannot find that anymore to quote as source. Once the app stops,
the environment file is removed.
Change our myapp_1.0.bb recipe to include this systemd recipe:
DESCRIPTION = "My Custom Qt App"
AUTHOR = "author@example.org"
LICENSE = "CLOSED"
PR = "r1"

SRC_URI =+ "file://myapp \
            file://myapp.service \
           "

inherit systemd

DEPENDS += "qtbase qtdeclarative qtdeclarative-native"

do_install() {
    install -d ${D}/${bindir}
    install -m 0755 ${WORKDIR}/myapp ${D}/${bindir}/myapp

    lnr ${D}/${bindir}/myapp ${D}/${bindir}/b2qt

    install -m 0755 -d ${D}${systemd_unitdir}/system
    install -m 0644 ${WORKDIR}/myapp.service ${D}${systemd_unitdir}/system/
}

FILES_${PN} = "${bindir}/myapp \
               ${bindir}/b2qt \
              "
SYSTEMD_SERVICE:${PN} = "myapp.service"
By specifying SYSTEMD_SERVICE, it will be enabled by default on boot.
Build a new image and after all that effort, a correctly rotated QML application should be the result:
In my personal opinion this rotation for QML is an area the Qt Company could improve, rather, make just as easy as Qt Widgets.
You can run any Qt app this way manually, compile and copy it via Qt Creator, or if you
can't compile it, just copy it. Set the correct environment variables and run it. For
example, the Qt built in Bear Whack example (fun game, under quick/touchinteraction):
XDG_RUNTIME_DIR=/run/user/1000 QT_QPA_PLATFORM=wayland /usr/share/examples/quick/touchinteraction/touchinteraction
Here's a picture of Bear Whack:

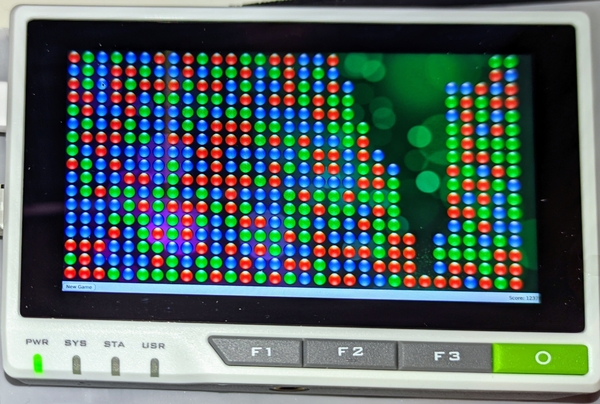
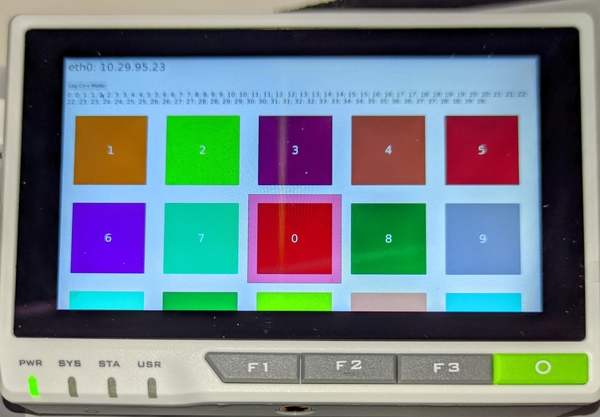
And here's a picture of the SameGame demo running. Particles and effects are very smooth on the reTerminal: