Raymii.org

אֶשָּׂא עֵינַי אֶל־הֶהָרִים מֵאַיִן יָבֹא עֶזְרִֽי׃Home | About | All pages | Cluster Status | RSS Feed
Windows 7 installer on a KVM Linux VPS (Windows on Digital Ocean)
Published: 01-07-2018 | Author: Remy van Elst | Text only version of this article
❗ This post is over eight years old. It may no longer be up to date. Opinions may have changed.
Table of Contents
For fun I wanted to install Windows 7 on a KVM Linux VPS (on Digital Ocean) but it should work for any KVM or XEN-HVM VPS with console access). I was experimenting with Grub2 and ISO booting, since grub2 can natively boot a linux ISO. For Windows this is not possible, the installer needs to be extracted on a FAT32 partition from which you boot. On a normal system I would repartition the disk using a live CD, but on a VPS where an ISO cannot be booted this is troublesome. If I could boot from an ISO I would use that to install Windows, but where's the fun in that? I had to figure out how to shrink an EXT4 filesystem from a running Ubuntu VPS, which is possible, however very risky, with pivot_root. Next the partiton table can be converted to MBR, the partition can be resized, a FAT32 partiton and filesystem can be created, the Windows Installer files copied onto that, some Grub config and a reboot later, you're in the Windows 7 Installer. TL;DR, the installer cannot complete due to missing VirtIO drivers, which is a project for another time.
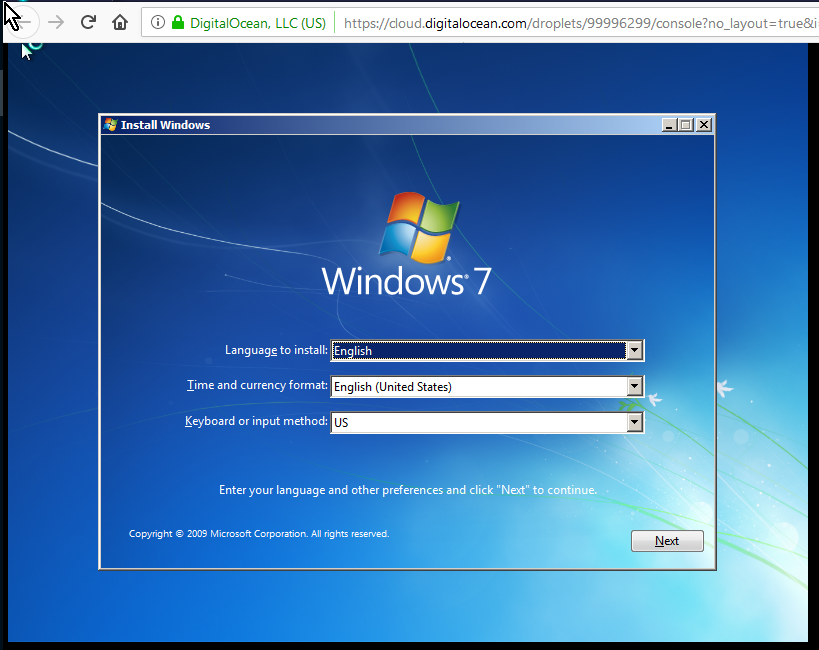
The finished result, Windows 7 on Digital Ocean
Summary and requirements
Why Windows on a Linux VPS and why Windows 7? Because it's fun. I learned new stuff about partitioning schemes and how to do harddisk maintenance on a running Linux system. I won't be using the Windows VPS, in fact I removed it already, but the journey to get there was quite the ride.
Requirements:
- Windows 7 installer ISO
- KVM VPS with console access, at least 2 GB RAM (I used Digital Ocean).
The VPS needs 2 GB of ram to create the temporary root filesystem in it. 1 GB is too small for my Ubuntu test system. Windows itself will also not run very well with such a small amount of RAM.
I'll be using a trial version of Windows 7. I have not tested this with Server 2016 or Windows 10, but the steps should be fairly similar. Remember this is just a fun experiment.
The steps involved are the following:
- Create a VPS with Ubuntu 16.04 and 2 GB of RAM (I used Digital Ocean).
- Resize the root filesystem while the VPS is running (since we cannot boot a live CD)
- Resize the root partition while the VPS is running
- Convert the partition table from GPT to MBR
- Create a fat32 partition
- Copy the Windows 7 ISO installer files on the new partition
- Edit Grub2, add the Windows 7 partition
- Reboot
- ???
- Profit!
Depending on the VPS provider the partition layout might be different. The Digital Ocean VPS has one large root partition as the first partition, no LVM or extended partitions:
root@w:~# lsblk
NAME    MAJ:MIN RM  SIZE RO TYPE MOUNTPOINT
vda     253:0    0   50G  0 disk
|-vda1  253:1    0 49.9G  0 part /
|-vda14 253:14   0    4M  0 part
`-vda15 253:15   0  106M  0 part /boot/efi
Chainloading Windows 7 ISO
Grub2 can load Linux ISO files directly. None of the pages mentioned
anything about Windows, so I tried a few GRUB2 entries to load the Windows 7 ISO
from /win7.iso:
menuentry "Win7 1" {
  set isofile="/win7.iso"
  loopback loop $isofile
  chainloader (loop)
}

  menuentry "Win7 2" {
    insmod ntfs
    insmod ntldr
    set isofile="/win7.iso"
    loopback loop $isofile
    ntldr (loop)/bootmgr
    boot
}
None worked, both resulted in a Windows boot which directly errored with
Windows BCD boot error 0xc0000225:
 Windows failed to start. A recent hardware or software change might be the cause. To fix the problem:

1. Insert your Windows installation disc and restart your computer.
2. Choose your language settings, and then click "Next."
3. Click "Repair your computer."

If you do not have this disc, contact your system administrator or computer manufacturer for assistance.

Status: 0xc0000225
Info: An unexpected error has occurred.
I found one article that suggested Windows needed to be booted from a FAT32 partition where all the files were extracted.
Online shrink root partition with pivot_root
An EXT4 partition can be grown without reboots or downtime (using resize2fs).
Shrinking is not possible while the partition is mounted. Using pivot_root we
create a bare root filesystem in RAM, pivot the linux system in there, unmount
the actual disk (since we're running from RAM) and shrink the partition.
Via this stackoverflow post, a brief summary of steps to do an online resize. This is dangerous and might destroy your system, don't try it on a production system. It works 99% of the time, but make sure you have working out of band access.
Set a root password first so you can access the console:
passwd
Output:
Enter new UNIX password:
Retype new UNIX password:
passwd: password updated successfully
Make it a strong password, you never know who will brute force it.
Install software we need:
apt-get install gdisk cfdisk dosfstools grub-pc
Unmount all filesystems not in use. Ignore any warnings:
umount -a
Create the temporary root filesystem in RAM and copy over essential files:
mkdir /tmp/tmproot
mount -t tmpfs none /tmp/tmproot
mkdir /tmp/tmproot/{proc,sys,dev,run,usr,var,tmp,oldroot,root}
cp -ax /{bin,etc,mnt,sbin,lib,lib64} /tmp/tmproot/
cp -ax /usr/{bin,sbin,lib,lib64} /tmp/tmproot/usr/
cp -ax /var/{account,empty,lib,local,lock,nis,opt,preserve,run,spool,tmp,yp} /tmp/tmproot/var/
# don't forget your SSH key:
cp -axr /root/.ssh /tmp/tmproot/root/
Pivot into the new RAM root:
mount --make-rprivate /
pivot_root /tmp/tmproot /tmp/tmproot/oldroot
for i in dev proc sys run; do mount --move /oldroot/$i /$i; done
Quoting from the article, it explains what were doing:
systemd causes mounts to allow subtree sharing by default (as with mount --make-shared), and this causes pivot_root to fail. Hence, we turn this off globally with mount --make-rprivate /. System and temporary filesystems are moved wholesale into the new root. This is necessary to make it work at all; the sockets for communication with systemd, among other things, live in /run, and so there's no way to make running processes close it.
The next step is to close all running processes in the old root. First, restart OpenSSH:
systemctl restart sshd
systemctl status sshd
Now, don't close this terminal. First, open a new one and SSH into the VPS. If that works, close the old tab. I forgot to copy over my SSH key in the new root so I had to reboot and start again, since I did close the tab before checking.
Whe'n you're setup in the new shell, use lsof or fuser on /oldroot/ to see
which files are open and used:
fuser -vm /oldroot/
Output:
                     USER        PID ACCESS COMMAND
/oldroot:            root     kernel mount /oldroot
                     root          1 ....m systemd
                     root        624 ....m systemd-journal
                     root        672 ....m lvmetad
                     root        703 f...m systemd-udevd
                     systemd-timesync    881 ....m systemd-timesyn
                     root       1367 ....m iscsid
                     root       1368 ....m iscsid
                     root       1375 ....m systemd-logind
                     root       1379 ....m cron
                     root       1382 ....m accounts-daemon
                     messagebus   1383 ....m dbus-daemon
                     daemon     1393 ....m atd
                     root       1401 ....m acpid
                     root       1407 ....m lxcfs
                     syslog     1415 F...m rsyslogd
                     root       1425 ....m snapd
                     root       1463 ....m polkitd
                     root       1496 ....m mdadm
                     root       1524 ....m agetty
                     root       1529 ....m agetty
                     root       1613 ....m sshd
                     root       1822 ....m systemd
                     root       1824 ....m (sd-pam
                     root       1859 ....m sshd
                     root       1891 ....m bash
Either kill $PID or systemctl stop $service all the items in that list. Here
are the items I had to stop:
systemctl stop rsyslog
systemctl stop snapd
systemctl stop systemd-journald
systemctl stop systemd-logind
systemctl stop systemd-timesyncd
systemctl stop cron
systemctl stop atd
systemctl stop dbus
systemctl stop lxcfs
systemctl stop accounts-daemon
systemctl stop mdadm
systemctl stop iscsid
The rest of the list was killed via kill $PID:
root@w:~# fuser -vm /oldroot
                     USER        PID ACCESS COMMAND
/oldroot:            root     kernel mount /oldroot
                     root        676 ....m lvmetad
                     root        702 f...m systemd-udevd
                     messagebus   1362 ....m dbus-daemon
                     root       1388 ....m acpid
                     root       1428 ....m mdadm
                     root       1433 ....m polkitd
                     root       1481 ....m agetty
                     root       1483 ....m agetty
                     root       1529 ....m systemd
                     root       1531 ....m (sd-pam

root@w:~# kill 676 702 1362 1388 1428 1433 1481 1483 1529 1531

root@w:~# fuser -vm /oldroot
                     USER        PID ACCESS COMMAND
/oldroot:            root     kernel mount /oldroot
root@w:~#
Don't kill PID 1, systemd. Use this systemd command:
systemctl daemon-reexec
The list should now be empty. No other filesystems should be mounted as well:
root@w:~# mount
sysfs on /sys type sysfs (rw,nosuid,nodev,noexec,relatime)
proc on /proc type proc (rw,nosuid,nodev,noexec,relatime)
udev on /dev type devtmpfs (rw,nosuid,relatime,size=1017012k,nr_inodes=254253,mode=755)
devpts on /dev/pts type devpts (rw,nosuid,noexec,relatime,gid=5,mode=620,ptmxmode=000)
tmpfs on /run type tmpfs (rw,nosuid,noexec,relatime,size=204824k,mode=755)
tmpfs on /sys/fs/cgroup type tmpfs (ro,nosuid,nodev,noexec,mode=755)
cgroup on /sys/fs/cgroup/systemd type cgroup (rw,nosuid,nodev,noexec,relatime,xattr,release_agent=/lib/systemd/systemd-cgroups-agent,name=systemd)
none on / type tmpfs (ro,relatime)
Unmount the device now:
umount /oldroot
Run a check on the disk:
fsck -Cfy /dev/vda1
Output:
fsck from util-linux 2.31.1
e2fsck 1.44.1 (24-Mar-2018)
cloudimg-rootfs: recovering journal
Pass 1: Checking inodes, blocks, and sizes
Pass 2: Checking directory structure
Pass 3: Checking directory connectivity
Pass 4: Checking reference counts
Pass 5: Checking group summary information
Free blocks count wrong (11805884, counted=11805839).
Fix? yes

Free inodes count wrong (6390026, counted=6390025).
Fix? yes


cloudimg-rootfs: ***** FILE SYSTEM WAS MODIFIED *****
cloudimg-rootfs: 61175/6451200 files (0.0% non-contiguous), 1272940/13078779 blocks
Resize the filesystem. In my case the VPS has 40 GB of disk, the FAT32 partition needs to be at least 4 GB to fit the extracted Windows 7 file. I resized the root partition to 35 GB:
resize2fs /dev/vda1 35G
Output:
resize2fs 1.44.1 (24-Mar-2018)
Resizing the filesystem on /dev/vda1 to 9175040 (4k) blocks.
The filesystem on /dev/vda1 is now 9175040 (4k) blocks long.
While you're at it, continue on and modify the partitions.
Create fat32 partition
Windows 7 doesn't seem to boot from an GPT/EFI disk. I tested my setup in VirtualBox first, where it worked fine. On DigitalOcean, the GPT partition table gave me some trouble, in the end I decided to convert it back to MBR. And of course there is a tool for that already.
While we're doing all these destructive things to the disk, lets convert the partition table from GPT back to MBR to get Windows 7 to boot.
Use the gdisk tool on /dev/vda:
gdisk /dev/vda
Output:
Command (? for help): r
Enter r.
Recovery/transformation command (? for help): g
Enter g:
MBR command (? for help): p
Enter p to print the converted MBR partition layout:
** NOTE: Partition numbers do NOT indicate final primary/logical status,
** unlike in most MBR partitioning tools!

** Extended partitions are not displayed, but will be generated as required.

Disk size is 104857600 sectors (50.0 GiB)
MBR disk identifier: 0x00000000
MBR partitions:

                                                   Can Be   Can Be
Number  Boot  Start Sector   End Sector   Status   Logical  Primary   Code
   1                227328      4612062   primary              Y      0x83
  14                  2048        10239   logical     Y        Y      0xEF
  15                 10240       227327   primary              Y      0x07
Enter w:
MBR command (? for help): w

Converted 3 partitions. Finalize and exit? (Y/N): y
Enter Y:
GPT data structures destroyed! You may now partition the disk using fdisk or
other utilities.
Reinstall GRUB to the partition, otherwise the VPS won't boot. Mount the disk:
mount /dev/vda1 /mnt
Install GRUB:
grub-install --root-directory=/mnt /dev/vda
Output:
Installing for i386-pc platform.
Installation finished. No error reported.
I use cfdisk, a console UI to manage partitions. Delete the linux partition
and re-create it with a smaller size. In my case, 36 GB (to make sure the
filesystem fits). Then create a new fat32 partition in the free space. Set the
Linux partiton as bootable.

You can use parted or fdisk, note the start and end numbers of the
partition. I prefer cfdisk.
After creating the partitions, reboot the machine. Either via:
echo b > /proc/sysrq-trigger
or via the VPS provider's control panel. SSH back in to your VPS afterwards and create the FAT filesystem:
mkfs.vfat /dev/vda2
Output:
mkfs.fat 3.0.28 (2015-05-16)
The block device layout now looks like this:
lsblk
Output:
NAME    MAJ:MIN RM  SIZE RO TYPE MOUNTPOINT
vda     253:0    0   50G  0 disk
|-vda1  253:1    0   36G  0 part /
|-vda2  253:2    0 13.9G  0 part
|-vda14 253:14   0    4M  0 part
`-vda15 253:15   0  106M  0 part /boot/efi
Mount the partition:
mount /dev/vda2 /mnt
The next step is to copy over the Windows ISO.
Copy Windows installation files to new partition
Copy over your Windows ISO to your VPS:
$ scp Win7_Pro_SP1_English_x32.iso root@192.0.2.10:
Win7_Pro_SP1_English_x32.iso         [it took a while]  100% 2446MB   3.2MB/s   12:36
Create a folder to mount it on:
mkdir /w
Mount the ISO:
mount -o loop /root/Win7_Pro_SP1_English_x32.iso /w
Output:
mount: /dev/loop0 is write-protected, mounting read-only
Copy over the files. I use rsync to get a progress indicator:
rsync -avz --progress /w/* /mnt/
Output:
sending incremental file list
autorun.inf
             43 100%    0.00kB/s    0:00:00 (xfr#1, ir-chk=1042/1043)
bootmgr
        383,786 100%    9.15MB/s    0:00:00 (xfr#2, ir-chk=1041/1043)
setup.exe
        112,400 100%    2.28MB/s    0:00:00 (xfr#3, ir-chk=1040/1043)
boot/
boot/bcd
        262,144 100%    4.90MB/s    0:00:00 (xfr#4, ir-chk=1034/1043)
[...]
upgrade/netfx/netfxupdate.exe
         73,728 100%  155.84kB/s    0:00:00 (xfr#877, to-chk=0/1077)

sent 2,436,207,244 bytes  received 17,955 bytes  17,463,979.92 bytes/sec
total size is 2,582,383,757  speedup is 1.06
This might take some time. Open another terminal and continue with the Grub editing.
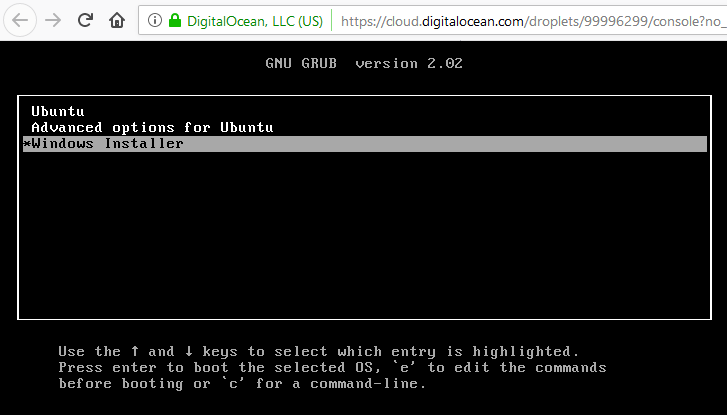
GRUB2 entry
Edit the Grub boot loader configuration to boot from your FAT32 partition with the Windows Installer.
vim /boot/grub/grub.cfg
No need to use the normal way since this disk is going to be wiped. Change the
timeout to 300, that way you can use the console of your provider instead of
pressing SHIFT to get the grub boot menu. Remove the timeout_style=hidden
option if you find it.
Add the following at the bottom of the file:
menuentry "Windows Installer" {
    insmod ntfs
    search --set=root --file /bootmgr
    ntldr /bootmgr
    boot
}
When the ISO is copied over, reboot and select the Windows option:
Now you should see the Windows 7 installer starting up:
A suprise in the end is that Windows 7 doesn't have a VirtIO Driver, so the installation is unable to continue on Digital Ocean.
Let's try it some other time with a newer version of Windows, 10 maybe.
Tags: gdisk , gpt , grub , mbr , microsoft , openstack , partitioning , server , tutorials , ubuntu , vps , windows