Raymii.org

אֶשָּׂא עֵינַי אֶל־הֶהָרִים מֵאַיִן יָבֹא עֶזְרִֽי׃Home | About | All pages | Cluster Status | RSS Feed
Olimex OlinuXino A20 LIME2 mainline 4.0.0 kernel, u-boot and debian rootfs image building tutorial
Published: 21-03-2015 | Author: Remy van Elst | Text only version of this article
❗ This post is over eleven years old. It may no longer be up to date. Opinions may have changed.
Table of Contents
This is a guide to build a linux image with Debian and the mainline 4.0 kernel for the Olimex A20-Lime2 board, from scratch. By default it comes with an 3.4 kernel with binary blobs and patches from Allwinner. Recently the mainline kernel has gained support for these boards, you can now run and use the mainline kernel without these awfull non-free binary blobs.
I have an Olimex A10 LIME board for which I've made a minimal image, see this page for details. It is a very awesome and powerfull ARM dev board with open source hardware. I like it so much that I decided to also get the A20.
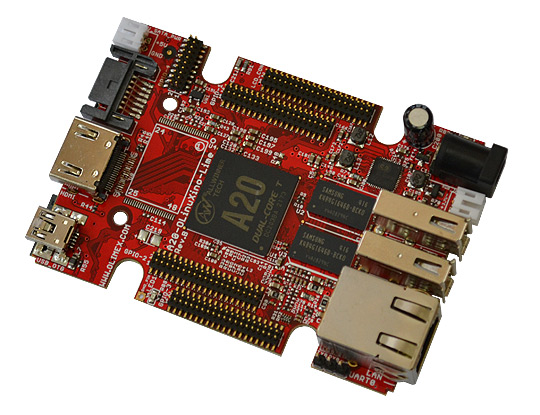
The Olimex A20-LIME2 is the big brother of the A10. The Olimex Olinuxino A20 LIME2, an open source hardware ARM (Allwinner A20) dual core based dev board with 160 GPIO's, 1,2 GHz/1 GB RAM, 2 USB 2.0 ports, 1 esata port, 1 hdmi port, USB-OTG, 1 gbit lan (not via the usb bus) and more of those nice features. The price is even more awesome, the device costs 45 euro's, add 5 euro's and you have yourself a nice black case. It consumes very little power, combined with all the features a perfect dev / tinkerboard.
Olimex sponsored a board for me to create the image, I would like to thank them very much for them.
The difference with the A10-LIME is the dual core ARM processor, 1 GB of ram instead of 512 and gigabit networking.
This tutorial is inspired by the build scripts of Igor Pecovnik, www.igorpecovnik.com. They've made a script which does this all for you in one easy go. If you just want an image and do not want to learn anything or experience the fun, enjoyment and fullfillment of doing it yourself you can use it.
Kernel 4.0 and Allwinner
Allwinner has done a code dump of the 3.4 kernel with specifics for their devices. 3.4 is quite an old kernel nowdays. If you run your Olimex (or other ARM) board as a server you might want to upgrade to a more recent kernel. This will have a few benefits, speed and newer features for example.
There are a few downsides, mostly driver and hardware support. For example, if you need graphical output (hdmi) or sound it will not work with the 4.0 kernel.
The 4.0 kernel does have basic support so you can run the A20-Lime2 as a server and use the GPIO's without problems.
This tutorial is easily adaptable to newer kernels, other distributions or other boards. The instructions are largely the same.
You can read more about the Linux Sunxi project on their, excellent, wiki and website: https://linux-sunxi.org.
If you want to build an image with the 3.4 kernel provided by Olimex/Allwinner, you can read my tutorial on it.
We are building the 4.0.0-rc4 version of the kernel, when 4.0 will be released this guide will be updated so that the commands and such are up to date.
This tutorial was tested on Ubuntu 14.04.
Install packages
Install the required packages for building the bootloader, kernel and rootfs:
apt-get install debconf-utils pv bc lzop zip binfmt-support bison build-essential ccache debootstrap flex gawk gcc-arm-linux-gnueabihf lvm2 qemu-user-static u-boot-tools uuid-dev zlib1g-dev unzip libusb-1.0-0-dev parted pkg-config expect gcc-arm-linux-gnueabi libncurses5-dev git vim screen
Also create a few working directories. We're working in /root/Lime-Debian/.
mkdir -p /root/Lime-Debian/output/
cd /root/Lime-Debian/
U Boot Bootloader
U-boot, or universal boot is the bootloader used by ARM and other embedded devices. It is similar to GRUB or LILO however much smaller. We'll be building it from source for the Olimex A20 LIME2 board.
Get the code:
git clone https://github.com/RobertCNelson/u-boot /root/Lime-Debian/output/u-boot
cd output/u-boot
Start the compile for the A20. See below if you have another board. I have 12
cores in my machine so I use -j12, if you have more or less cores, change the
number to that, -j8 for example.
make -s CROSS_COMPILE=arm-linux-gnueabihf- clean
make -j12 A20-OLinuXino-Lime2_defconfig CROSS_COMPILE=arm-linux-gnueabihf-
make -j12 CROSS_COMPILE=arm-linux-gnueabihf-
When the compile is finished we create a tar archive of the u-boot binary:
tar cPfz /root/Lime-Debian/output/u-boot/lime2_next_u-boot_4.0.0-rc4.tgz u-boot-sunxi-with-spl.bin
Go back to the working directory:
cd /root/Lime-Debian/
I'm building this for the Olimex A20 Lime2. To find all device targets from the
linux-sunxi project, clone the u-boot repo from Hans de Goede:
git clone https://github.com/jwrdegoede/u-boot-sunxi.git -b sunxi
And use the following command inside the u-boot-sunxi folder:
grep sunxi boards.cfg | awk '{print $7}'
Find your board model and add _config to the make command, like so: make
CROSS_COMPILE arm-linux-gnueabihf $target_config line.
Build the mainline kernel
First get the code. Do note that this is quite a lot of code so the clone might take some time.
git clone git://git.kernel.org/pub/scm/linux/kernel/git/stable/linux-stable.git /root/Lime-Debian/output/linux-mainline
We also need the sunxi-tools. This is some code specific for the Allwinner
boards. Allwinner uses the sunxi codename for their boards. The A10 is the
sunxi-4i, the A20 is the sunxi-5i and so on.
Clone that git repo as well:
git clone https://github.com/linux-sunxi/sunxi-tools.git /root/Lime-Debian/output/sunxi-tools
Navigate to the kernel folder:
cd /root/Lime-Debian/output/linux-mainline/
Start the compile. First we clean:
make CROSS_COMPILE=arm-linux-gnueabihf- clean
Download a default kernel config for the sunxi boards:
wget -O /root/Lime-Debian/output/linux-mainline/.config https://raymii.org/s/inc/software/olimex/linux-sunxi-next.config.txt
If you want to make changes to the default kernel config, you can now do a make
menuconfig:
make -j12 ARCH=arm CROSS_COMPILE=arm-linux-gnueabihf- menuconfig
You can for example remove all kinds of drivers. If you are not going to use a firewall, you can leave out netfilter. Or networking entirely if you want.
We start the compile of the uImage (u-boot bootloader image) and the kernel modules:
make -j12 ARCH=arm CROSS_COMPILE=arm-linux-gnueabihf- all zImage modules_prepare
You might get a compiler error about it being to old or buggy. This is a bug and has been fixed upstream. Remove that message for now with the following patch. Open the following file:
vim /root/Lime-Debian/output/linux-mainline/arch/arm/kernel/asm-offsets.c
Remove the version check:
#if (__GNUC__ == 3 && __GNUC_MINOR__ < 3)
#error Your compiler is too buggy; it is known to miscompile kernels.
#error Known good compilers: 3.3, 4.x
#endif
#if GCC_VERSION >= 40800 && GCC_VERSION < 40803
#error Your compiler is too buggy; it is known to miscompile kernels
#error and result in filesystem corruption and oopses.
#endif
We then start the debian package building of the kernel. We don't use threading here. Change my name and email address, otherwise it will seem like I've built your debian kernel packages:
make -j1 deb-pkg KDEB_PKGVERSION=1.5 LOCALVERSION=-lime2 KBUILD_DEBARCH=armhf ARCH=arm 'DEBFULLNAME=Raymii' DEBEMAIL=olimex@kernel.raymii CROSS_COMPILE=arm-linux-gnueabihf-
Create a folder for the kernel deb packages:
mkdir -p /root/Lime-Debian/output/kernel
Create a tar archive of the kernel, headers, libc and other packages and place it in the folder:
cd ..
tar -cPf /root/Lime-Debian/output/kernel/4.0.0-rc4-lime2-next.tar linux-headers-4.0.0-rc4-lime2_1.5_armhf.deb linux-image-4.0.0-rc4-lime2_1.5_armhf.deb linux-libc-dev_1.5_armhf.deb
If you need to save some space, you can now remove the packages from the working directory:
rm linux-headers-4.0.0-rc4-lime2_1.5_armhf.deb linux-image-4.0.0-rc4-lime2_1.5_armhf.deb linux-libc-dev_1.5_armhf.deb
Bootstrap Debian
We've built a kernel and we've built a boot loader. The only thing left now is to build a root filesystem and put it all together.
The root filesystem defines what distribution you run. I choose to set up Debian, but you can also get Ubuntu or for example Arch.
We are building the root filesystem (rootfs from now on) in an image. We mount the image as a loopback device, that is easier to work and build in. First create some folders:
mkdir -p /root/Lime-Debian/output/rootfs /root/Lime-Debian/output/sdcard/ /root/Lime-Debian/output/kernel
Go in to the build folder:
cd /root/Lime-Debian/output/
Create an empty image. The size in my case is 1.2 gigabytes, you can specify a larger or smaller image if you want. 512MB is a safe lowest choice.
dd if=/dev/zero of=/root/Lime-Debian/output/rootfs/wheezy.raw bs=1M count=1200 status=noxfer
Mount the image as loop device:
losetup /dev/loop0 /root/Lime-Debian/output/rootfs/wheezy.raw
We will a DOS partition table and 2 ext4 partitions. Other tutorials might specify a FAT based partition for the bootloader, we don't need that because we are using mainline u-boot and mainline kernel which both support ext4 and do not need a FAT boot partition anymore.
Create the DOS partition table:
parted -s /dev/loop0 -- mklabel msdos
Create the ext4 partition for booting:
parted -s /dev/loop0 -- mkpart primary ext4 2048s -1s
Update the partition table:
partprobe /dev/loop0
We detach the loop device and mount it again at a different offset to create the ext4 filesystem:
losetup -d /dev/loop0
losetup -o 1048576 /dev/loop0 /root/Lime-Debian/output/rootfs/wheezy.raw
mkfs.ext4 /dev/loop0
We do a performance tweak on the filesystem:
tune2fs -o journal_data_writeback /dev/loop0
This basically means that data may be written to the disk before the journal. The data consistency guarantees are the same as the ext3 file system. The downside is that if your system crashes before the journal gets written then you may loose new data, the old data may magically reappear. This is still better than ext2 because file system integrity is maintained, so the file system is at least consistent even after an unclean shutdown. In other words, you may loose data, but you won't have corrupt data.
We give the filesystem a name:
e2label /dev/loop0 lime2
And we mount it in our working directory:
mount -t ext4 /dev/loop0 /root/Lime-Debian/output/sdcard/
We can now start the debian bootstrap. The following command will start a basic debian bootstrap for the ARM board, to our freslhy mounted image:
debootstrap --include=openssh-server,debconf-utils --arch=armhf --foreign wheezy /root/Lime-Debian/output/sdcard/
Copy the qemu-arm-static binary to the image folder:
cp /usr/bin/qemu-arm-static /root/Lime-Debian/output/sdcard/usr/bin/
We need to do this because this is required for the next steps of the image build bootstrapping. That next step is the so called second stage of the bootstrap. You need to execute that in a chroot on the image.
The chroot will use the qemu binary to make it look like it is an ARM system.
chroot /root/Lime-Debian/output/sdcard /bin/bash -c '/debootstrap/debootstrap --second-stage'
This might take a while. When it is finished we set up a few mounts for /proc/
and /sys/ and such:
mount -t proc chproc /root/Lime-Debian/output/sdcard/proc
mount -t sysfs chsys /root/Lime-Debian/output/sdcard/sys
mount -t devtmpfs chdev /root/Lime-Debian/output/sdcard/dev
mount -t devpts chpts /root/Lime-Debian/output/sdcard/dev/pts
Place a sources.list file for the apt package manager.
vim /root/Lime-Debian/output/sdcard/etc/apt/sources.list
Contents:
deb http://ftp.nl.debian.org/debian stable main contrib non-free
deb-src http://ftp.nl.debian.org/debian stable main contrib non-free

deb http://ftp.nl.debian.org/debian/ wheezy-updates main contrib non-free
deb-src http://ftp.nl.debian.org/debian/ wheezy-updates main contrib non-free

deb http://security.debian.org/ wheezy/updates main contrib non-free
deb-src http://security.debian.org/ wheezy/updates main contrib non-free
You can change the ftp.nl. part to your country code to get a faster mirror.
Set up the system locale language variables and update the sources in the image:
LC_ALL=C
LANGUAGE=C
LANG=C
chroot /root/Lime-Debian/output/sdcard /bin/bash -c 'apt-get -y update'
Change the inittab file to not clean the first tty and not start up 6 other,
unneeded tty's. We do want to statup a serial console for UART access:
sed -e 's/1:2345:respawn:\/sbin\/getty 38400 tty1/1:2345:respawn:\/sbin\/getty --noclear 38400 tty1/g' -i /root/Lime-Debian/output/sdcard/etc/inittab
sed -e s/3:23:respawn/#3:23:respawn/g -i /root/Lime-Debian/output/sdcard/etc/inittab
sed -e s/4:23:respawn/#4:23:respawn/g -i /root/Lime-Debian/output/sdcard/etc/inittab
sed -e s/5:23:respawn/#5:23:respawn/g -i /root/Lime-Debian/output/sdcard/etc/inittab
sed -e s/6:23:respawn/#6:23:respawn/g -i /root/Lime-Debian/output/sdcard/etc/inittab
echo T0:2345:respawn:/sbin/getty -L ttyS0 115200 vt100 >> /root/Lime-Debian/output/sdcard/etc/inittab
Install the locale package in the image:
chroot /root/Lime-Debian/output/sdcard /bin/bash -c 'apt-get -y -qq install locales'
Set the locale to en-US.UTF-8 and generate the locales:
sed -i 's/^# en_US.UTF-8/en_US.UTF-8/' /root/Lime-Debian/output/sdcard/etc/locale.gen
chroot /root/Lime-Debian/output/sdcard /bin/bash -c 'locale-gen en_US.UTF-8'
chroot /root/Lime-Debian/output/sdcard /bin/bash -c 'LANG=en_US.UTF-8 LANGUAGE=en_US.UTF-8 DEBIAN_FRONTEND=noninteractive  LANG=en_US.UTF-8 LANGUAGE=en_US.UTF-8 LC_MESSAGES=POSIX update-locale'
Install a few more packages in the VM. You can leave out the ones you don't like. Remember you can also remove them later on.
chroot /root/Lime-Debian/output/sdcard /bin/bash -c 'apt-get -y install automake bash-completion bc bridge-utils build-essential cmake curl dosfstools evtest figlet fping git haveged hddtemp hdparm htop i2c-tools ifenslave-2.6 iperf ir-keytable iw less libbluetooth-dev libbluetooth3 libtool libwrap0-dev libfuse2 libnl-dev libssl-dev lsof makedev module-init-tools mtp-tools nano ntfs-3g ntp parted pkg-config pciutils pv python-smbus rfkill rsync screen stress sudo sysfsutils toilet u-boot-tools unattended-upgrades unzip usbutils wget'
Set the timezone in the image:
cp /root/Lime-Debian/output/sdcard/usr/share/zoneinfo/Europe/Amsterdam /root/Lime-Debian/output/sdcard/etc/localtime
Set the root password in the image:
chroot /root/Lime-Debian/output/sdcard /bin/bash -c '(echo olimex;echo olimex;) | passwd root'
If you want, you can set the expiry date of the root password to 0, that means that the first time you boot the image you need to set a new root password:
chroot /root/Lime-Debian/output/sdcard /bin/bash -c 'chage -d 0 root'
Setup /etc/fstab in the image:
echo '/dev/mmcblk0p1 / ext4 defaults,noatime,nodiratime,data=writeback,commit=600,errors=remount-ro 0 0' > /root/Lime-Debian/output/sdcard/etc/fstab
On the first boot of the image you need to regenerate the SSH host keys.
Otherwise all boards with this image will have the same SSH host keys. You can
place the following in /etc/rc.local. On this image build that is /root/Lime-
Debian/output/sdcard/etc/rc.local.
if [[ ! -f /var/lib/firstboot_ssh_host_keys ]]; then
    rm -f /etc/ssh/ssh_host*
    ssh-keygen -t dsa -N "" -f /etc/ssh/ssh_host_dsa_key
    ssh-keygen -t rsa -N "" -f /etc/ssh/ssh_host_rsa_key
    ssh-keygen -t ecdsa -N "" -f /etc/ssh/ssh_host_ecdsa_key
    touch /var/lib/firstboot_ssh_host_keys
fi
Also add the following to /etc/rc.local to enable irq on the second core on
the lime2:
echo 2 > /proc/irq/$(cat /proc/interrupts | grep eth0 | cut -f 1 -d ":" | tr -d " ")/smp_affinity
The above is NOT a command. Don't execute it, copy and paste it in
/etc/rc.local.
Set a default hostname of the board:
echo lime2 > /root/Lime-Debian/output/sdcard/etc/hostname
Set a default hosts file:
vim /root/Lime-Debian/output/sdcard/etc/hosts
Contents:
127.0.0.1   localhost lime2
::1         localhost lime2 ip6-localhost ip6-loopback
fe00::0     ip6-localnet
ff00::0     ip6-mcastprefix
ff02::1     ip6-allnodes
ff02::2     ip6-allrouters
Installing the kernel in the rootfs image
We've built a few nice kernel packages. To install these in the root fs image we need to execute a few more steps. We also do some more changes to setup kernel module loading, cpu frequency and network settings.Module loading:
echo 'hci_uart gpio_sunxi rfcomm hidp bonding spi_sun7i' > /root/Lime-Debian/output/sdcard/etc/modules
The actual kernel install in the image is actually quite easy. We mount the
/tmp/ folder of the image over our actual compile machine's /tmp/ folder. We
place the packages we've built earlier in /tmp/, then chroot in the image and
install them.
The bind mount is required because the paths need to be correct. You don't want to overwrite your compile machine's kernel with a ARM specific kernel. It will probably not boot anymore afterwards.
rm -rf /tmp/kernel
mkdir -p /tmp/kernel
cd /tmp/kernel
tar -xPf /root/Lime-Debian/output/kernel/4.0.0-rc4-lime2-next.tar
mount --bind /tmp/kernel/ /root/Lime-Debian/output/sdcard/tmp
chroot /root/Lime-Debian/output/sdcard /bin/bash -c 'dpkg -i /tmp/*.deb'
Once the kernel is installed in the chroot we can build some kernel header scripts:
chroot /root/Lime-Debian/output/sdcard /bin/bash -c 'cd /usr/src/linux-headers-4.0.0-rc4-lime2 && make scripts'
We are going to build and setup a new device tree. This is, as said earlier, the hardware layout of the board needed for the bootloader.
rm -rf /root/Lime-Debian/output/sdcard/boot/dtb/4.0.0-rc4-lime2.old
vim /root/Lime-Debian/output/sdcard/boot/boot-next.cmd
Contents:
setenv bootargs console=tty1 root=/dev/mmcblk0p1 rootwait panic=10
ext4load mmc 0 0x49000000 /boot/dtb/4.0.0-rc4-lime2${fdtfile}
ext4load mmc 0 0x46000000 /boot/vmlinuz-4.0.0-rc4-lime2
env set fdt_high ffffffff
bootz 0x46000000 - 0x49000000
We use this boot command file to create the binary form if it, the boot script file:
mkimage -C none -A arm -T script -d /root/Lime-Debian/output/sdcard/boot/boot-next.cmd /root/Lime-Debian/output/sdcard/boot/boot.scr
Download some linux firmware files and unzip these on the rootfs image:
wget -O /root/Lime-Debian/linux-firmware.zip https://raymii.org/s/inc/software/olimex/linux-firmware.zip
unzip /root/Lime-Debian/linux-firmware.zip -d /root/Lime-Debian/output/sdcard/lib/firmware
This contains firmware binary blobs for the network card and some wifi drivers.
Finishing up the rootfs
You can do any other changes to the image you want from in the chroot. You can start an interactive chroot with the following command:
chroot /root/Lime-Debian/output/sdcard /bin/bash
When you are done, unmount the extra partitions:
umount -l /root/Lime-Debian/output/sdcard/dev/pts
umount -l /root/Lime-Debian/output/sdcard/dev
umount -l /root/Lime-Debian/output/sdcard/proc
umount -l /root/Lime-Debian/output/sdcard/sys
Unmount the image:
umount -l /root/Lime-Debian/output/sdcard/
Detach the loop device:
losetup -d /dev/loop0
Install the bootloader
We are going to install the bootloader on the image. We mount and attach the loop device without the special offset we gave earlier:
cd /root/Lime-Debian/

tar xvfz /root/Lime-Debian/output/u-boot/lime2_next_u-boot_4.0.0-rc4.tgz

losetup /dev/loop1 /root/Lime-Debian/output/rootfs/wheezy.raw

dd if=u-boot-sunxi-with-spl.bin of=/dev/loop1 bs=1024 seek=8 status=noxfer
We detach the loop device again:
losetup -d /dev/loop1
Packing it up
We are going to create a zip file with the image and the md5sum of the image for easy shipping. Copy the image and create the md5sum:
mv /root/Lime-Debian/output/rootfs/wheezy.raw /root/Lime-Debian/output/Lime2_Debian_1.5_wheezy_4.0.0-rc4.raw

cd /root/Lime-Debian/output/

md5sum Lime2_Debian_1.5_wheezy_4.0.0-rc4.raw > Lime2_Debian_1.5_wheezy_4.0.0-rc4.md5
Create a zip file of the two files:
zip Lime2_Debian_1.5_wheezy_4.0.0-rc4.zip Lime2_Debian_1.5_wheezy_4.0.0-rc4.md5 Lime2_Debian_1.5_wheezy_4.0.0-rc4.raw
And that's it. You now have a fully working image for the Olimex a20-Lime2. You can copy and distribute the zipfile anywhere you like.
Installing the image
To install the image on your SD card, we take the zip file and extract it, so
that we have the Lime2_Debian_1.5_wheezy_4.0.0-rc4.raw file. We use dd to
put it on our SD card, which is at device /dev/mmcblk0:
dd if=Lime2_Debian_1.5_wheezy_4.0.0-rc4.raw of=/dev/mmcblk0 bs=1M
Put the SD card in the machine and boot it up. You can hook up UART to your machine or wait for the board to get DHCP. The SSH server will start up and you can login using your set root password.
The first boot might take a little longer since it will regenerate the host keys for the device.
Tags: a20 , allwinner , arm , articles , debian , gpio , minimal , olimex , olinuxino , raspberry-pi