This is a text-only version of the following page on https://raymii.org:
---
Title : Yocto boot2qt for the Raspberry Pi 4, both Qt 5.15 and 6.2
Author : Remy van Elst
Date : 21-02-2022
URL : https://raymii.org/s/tutorials/Yocto_boot2qt_for_the_Raspberry_Pi_4_both_Qt_6_and_Qt_5.html
Format : Markdown/HTML
---
In this guide we'll build a linux distribution for Raspberry Pi 4, using the Yocto project and the `boot2qt` stack provided by Qt. This `boot2qt` image can be written to an SD card and when booted up, the Raspberry Pi runs a software stack that integrates nicely with Qt Creator (the Qt IDE), for example, one click deployment to the device. You can run your own Qt application on the Pi, full screen, it will boot right into it.
This guide covers both Qt 5.15 and Qt 6.2. The 5.15 build process is a bit convoluted due to a few upstream issues. The guide also covers changing the default startup app to your own app and Qt Creator integration.
We end up with a `boot2qt` image for the Raspberry Pi 4. [I have an 8 GB model][18]
here, but it works just as fine with less RAM. This guide also covers the Qt
Creator kit and device setup afterwards.
Recently I removed all Google Ads from this site due to their invasive tracking, as well as Google Analytics. Please, if you found this content useful, consider a small donation using any of the options below. It means the world to me if you show your appreciation and you'll help pay the server costs:
GitHub Sponsorship
PCBWay referral link (You get $5, I get $20 after you've placed an order)
Digital Ocea referral link ($200 credit for 60 days. Spend $25 after your credit expires and I'll get $25!)
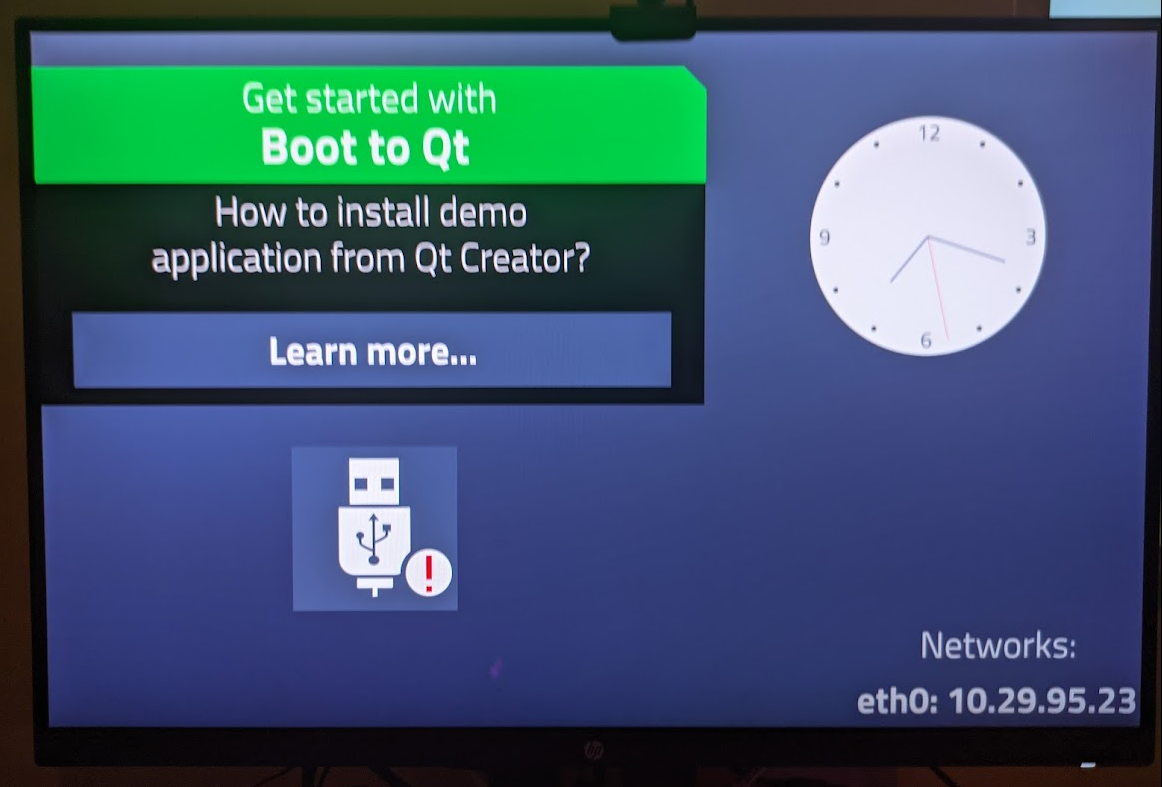 > The default app of `boot2qt` 6.2 running on the Raspberry Pi 4.
 > The default apps of `boot2qt` 5.15 on my Raspberry Pi 4.
Here is [a video][11] of boot2qt booting straight in to [my custom Qt][19] app:
**If a step is for a specific Qt version, that is mentioned. Otherwise,
the step applies to both versions.**
This guide is for the Raspberry Pi 4 but should work for any of the
other Raspberry Pi models supported by Qt. Replace the `MACHINE`
variable later on with a different model.
### What is yocto, what is boot2qt
There is a lot of ground to cover, if you are not familiar with the Yocto
project, here is a quick, _simplified_, overview of all the terms.
Yocto is an open-source project which provides a build framework and metadata
to help to create a custom image for your target board. Yocto uses so-called
(meta) layers and recipes. Recipes are `.bb`(for bitbake) files that contain
build instructions and layers are a collection of specific recipes, classes
and configuration files. You could have a layer named `meta-raspberry`
(all layers, by convention, start with `meta-`) that has recipes applicable
only for the Raspberry Pi.
Yocto helps you to build a linux distro, their reference distro is named
`poky`. The primary build tool is a python command line tool named `bitbake`.
It parses all the recipes and then, one by one, gathers the source code
and compiles all the software, then packages that up into an image for your
board.
Yocto is aimed at embedded linux devices, at work we use it to create our own
Linux distribution (not boot2qt) to run on the coffee machines. Many
different boards are supported, most vendors provide a so called board
support package (bsp). Often this contains a kernel and drivers for your
board. There is a board support package for the Raspberry Pi, which we will
use.
`boot2qt` is an set of layers for Yocto which builds a simple linux system
that starts up without a desktop, right into a Qt application. It also builds
a cross-compile SDK for your desktop, which you can use in Qt Creator to
cross-compile your application for the target device. Often the device you
develop for does not have the same CPU architecture as your desktop
workstation. To top this all up, it also integrates into Qt Creator, allowing
you to one-click deploy and run your application, via the network, on your
device.
All three parts save you a huge amount of work. Because we have our own yocto
build I know what kind of work that involves, the boot2qt stack saves so much
time, as long as your board is supported. You can see the list of board [here][1]
Qt 5.15 and [here][2] for Qt 6.2.
`boot2qt` also provide a set of scripts to make the `yocto` setup very easy, so
the process you see in this guide is not the same as a default `yocto` setup. It's
specifically for `boot2qt` and for the Raspberry Pi 4.
So to summarize, `boot2qt` provides a layer on top of yocto that adds
integration between your embedded linux device and the Qt suite of tools,
saving a boatload of time doing manual busywork.
### Development host
The machine that is going to build your `boot2qt` image (the host that runs
`bitbake`) needs a few packages before we can get started building. You need
at least 50 GB's of free space, but my host has 300 GB. Cross-compiling all
the packages takes a huge amount of time, so the more cores and RAM you have,
the better. My test build machine has 4 cores and 8 GB of RAM, the entire image
build took 3 whole days. At work we have a few beefy servers, there the build
takes about 2 hours. Yocto does support incremental builds, so if you change
one recipe, only that part has to be rebuilt, not all the other parts.
My build machine runs Ubuntu 20.04 for the Qt 5.15 build and Debian 11 for
the Qt 6 build. Install the required packages first:
apt-get install gawk wget git diffstat unzip texinfo gcc build-essential
chrpath socat cpio python3 python3-pip python3-pexpect xz-utils
debianutils iputils-ping python3-git python3-jinja2 libegl1-mesa
libsdl1.2-dev pylint3 xterm python3-subunit mesa-common-dev python
git-lfs g++-multilib gcc-multilib libxkbcommon-dev
libxkbcommon-x11-dev libwayland-cursor++0 libwayland-cursor0
These are a bit more packages than the Qt site recommends, I had build issues
when building the `qbsp` layer, which is where most of the extra packages
come from.
Next you need `repo`, a git management tool [by Google][3]. It hides most of
the complexity of submodules and different repo's by putting all of that
extra information in a manifest file. You can install it using apt:
apt install repo
If it's not in the repository, check the [instructions][3], installation
process is just a simple copy of one executable.
Create a folder where all of yocto will reside:
mkdir b2qt
cd b2qt
Use the `repo` tool to clone all the git repositories of the Yocto project
and `boot2qt` at once. First initialize for the correct Qt version:
# for Qt 6.2:
repo init -u git://code.qt.io/yocto/boot2qt-manifest -m v6.2.3.xml
# for Qt 5.15
repo init -u git://code.qt.io/yocto/boot2qt-manifest -m v5.15.2.xml
Then sync the repositories:
repo sync
You must tell which board you want to build for, then source a
script:
export MACHINE=raspberrypi4 && source ./setup-environment.sh
**This step must be repeated on every login**.
Output:
### Shell environment set up for builds. ###
You can now run 'bitbake '
Common targets are:
b2qt-embedded-qt6-image
meta-toolchain-b2qt-embedded-qt6-sdk
QBSP target is:
meta-b2qt-embedded-qbsp
For creating toolchain or QBSP for Windows, set environment variable before running bitbake:
SDKMACHINE=x86_64-mingw32
For more information about Boot to Qt, see https://doc.qt.io/QtForDeviceCreation/
You should now be in a folder named `build-raspberrypi4`. Using the `repo` tool and
sourcing this script has made a nifty folder structure for yocto:
* `build-$boardname`: build directory for the board, you are in this folder
after sourcing the `setup-environment.sh` file.
* `sources`: has all the `bitbake` layers and recipes
* `download`: folder where all the source code is downloaded (git repo's,
tar.gz archives)
In the `build-*` directory there is a `conf` folder, that has two important
files. `bblayers.conf` and `local.conf`. I had issues with the `oom-killer`
while building the image, the `do_compile` of `qtwebengine` kept crashing
(killed). I had to set the following variables to `1`, to make the build
pass:
# Default to setting automatically based on cpu count
BB_NUMBER_THREADS ?= "1"
#
# Default to setting automatically based on cpu count
PARALLEL_MAKE ?= "-j1"
This is probably due to my limited hardware for the build machine, but if you
experience out of memory killer issues during a build, you know where to
look.
You're all set up now. I recommend you start a `screen` or `tmux` session as
the build will take a long time.
### Building boot2qt
For Qt 6 the following step runs without problems, for Qt 5 you must do some
manual patching. The patches I had to do are at the bottom of this article.
If you pay for Qt 5.15 LTS then you have no problems. The last open source
Qt 5 version at this moment is 5.15.2 and the commercial version is 5.15.8, in
the commercial release these issues are fixed, in the open source release we
have to edit a few recipes ourselves and download newer firmware.
The following command builds the full `boot2qt` image (and all packages) which
you can flash to an SD card:
# for Qt 6
bitbake b2qt-embedded-qt6-image
# for Qt 5
bitbake b2qt-embedded-qt5-image
The build process takes a long time, because it compiles all the source code. Output
is like below for Qt 5:
remy@host:~/b2qt/build-raspberrypi4$ bitbake b2qt-embedded-qt5-image
WARNING: Host distribution "ubuntu-20.04" has not been validated with this version of the build system; you may possibly experience unexpected failures. It is recommended that you use a tested distribution.
Loading cache: 100% |#################################################################################################| Time: 0:00:00
Loaded 4132 entries from dependency cache.
Parsing recipes: 100% |###############################################################################################| Time: 0:00:00
Parsing of 2779 .bb files complete (2778 cached, 1 parsed). 4132 targets, 299 skipped, 1 masked, 0 errors.
NOTE: Resolving any missing task queue dependencies
Build Configuration:
BB_VERSION = "1.44.0"
BUILD_SYS = "x86_64-linux"
NATIVELSBSTRING = "universal"
TARGET_SYS = "arm-poky-linux-gnueabi"
MACHINE = "raspberrypi4"
DISTRO = "b2qt"
DISTRO_VERSION = "3.0.4"
TUNE_FEATURES = "arm vfp cortexa7 neon vfpv4 thumb callconvention-hard"
TARGET_FPU = "hard"
SDKMACHINE = "x86_64"
meta
meta-poky = "HEAD:f2eb22a8783f1eecf99bd4042695bab920eed00e"
meta-raspberrypi = "HEAD:0e05098853eea77032bff9cf81955679edd2f35d"
meta-oe
meta-python
meta-networking
meta-initramfs
meta-multimedia = "HEAD:2b5dd1eb81cd08bc065bc76125f2856e9383e98b"
meta-python2 = "HEAD:4400f9155ec193d028208cf0c66aeed2ba2b00ab"
meta-boot2qt
meta-boot2qt-distro = "HEAD:5f23cb2d6836bbad3a1fa982089ccf20bf0c6245"
meta-mingw = "HEAD:756963cc28ebc163df7d7f4b4ee004c18d3d3260"
meta-qt5 = "HEAD:72459ce0639eb3ce408558a7abede945e1f8ddc9"
Initialising tasks: 100% |############################################################################################| Time: 0:00:05
Sstate summary: Wanted 513 Found 295 Missed 218 Current 1721 (57% match, 90% complete)
NOTE: Executing Tasks
NOTE: Setscene tasks completed
Currently 5 running tasks (4391 of 6968) 63% |#################################################### |
0: qtquickcontrols2-5.15.2+gitAUTOINC+16f27dfa35-r0 do_compile - 9m41s (pid 4102272)
1: qtmultimedia-5.15.2+gitAUTOINC+fd30913d46-r0 do_compile - 9m33s (pid 4104096)
2: qtlocation-5.15.2+gitAUTOINC+02a21217a9_d3101bbc22-r0 do_compile - 8m16s (pid 4107720)
3: qtconnectivity-5.15.2+gitAUTOINC+ca6cc606d9-r0 do_compile - 6m51s (pid 4110585)
4: qtwayland-5.15.2+gitAUTOINC+3cc17177b1-r0 do_compile - 6m20s (pid 4111432)
At the bottom of the output you see different tasks running, it could be a
`do_fetch` (download the source), `do_compile` (cross-compile the code) or a
`do_package` (make a package), or a few other `do_*` steps.
You see that there are almost `7000` tasks, so, again, it will take a lot of time.
Check up regularly, because changes are that your build fails. Yocto error messages are
clear including log files.
For Qt 6.2 the output is like below:
remy@host:~/b2qt/build-raspberrypi4$ bitbake b2qt-embedded-qt6-image
WARNING: Host distribution "debian-11" has not been validated with this version of the build system; you may possibly experience unex
pected failures. It is recommended that you use a tested distribution.
Loading cache: 100% |#################################################################################################| Time: 0:00:00
Loaded 4368 entries from dependency cache.
NOTE: Resolving any missing task queue dependencies
Build Configuration:
BB_VERSION = "1.50.0"
BUILD_SYS = "x86_64-linux"
NATIVELSBSTRING = "universal"
TARGET_SYS = "arm-poky-linux-gnueabi"
MACHINE = "raspberrypi4"
DISTRO = "b2qt"
DISTRO_VERSION = "3.3.4"
TUNE_FEATURES = "arm vfp cortexa7 neon vfpv4 thumb callconvention-hard"
TARGET_FPU = "hard"
SDKMACHINE = "x86_64"
meta
meta-poky = "HEAD:c40ac16d79026169639f47be76a3f7b9d8b5178e"
meta-raspberrypi = "HEAD:b4ec97e4eb8e36efd1f7e2f8ae020a9e55cfc239"
meta-oe
meta-python
meta-networking
meta-initramfs
meta-multimedia = "HEAD:f72a73b42fa740130b388ba8555cdbefdee8d37d"
meta-python2 = "HEAD:810d6d842f103eb59f18b06426106462b15de7e2"
meta-boot2qt
meta-boot2qt-distro = "HEAD:e59a2e20697e0afc2a0b068835cd90e102dec589"
meta-mingw = "HEAD:422b96cb2b6116442be1f40dfb5bd77447d1219e"
meta-qt6 = "HEAD:eb3719266fc03b96d5056980b135b371f31811f4"
meta-raymii = "master:0789f30e221712462748cf56b9afddeec3613be1"
Initialising tasks: 100% |############################################################################################| Time: 0:00:09
Sstate summary: Wanted 482 Local 356 Network 0 Missed 126 Current 2730 (73% match, 96% complete)
NOTE: Executing Tasks
Currently 4 running tasks (4425 of 9263) 47% |######################################## |
0: qtwebengine-6.2.3-r0 do_compile (pid 527778) 0% | |
1: qtwayland-6.2.3-r0 do_install_ptest_base - 1m2s (pid 527854)
2: qtdeclarative-6.2.3-r0 do_package_write_ipk - 1m0s (pid 527980)
3: qtmultimedia-6.2.3-r0 do_package_write_ipk - 30s (pid 529522)
Even more tasks, [It's Over 9000!][7].
As stated in the intro, I had issues compiling Qt WebEngine, which were solved
by using less concurrent cores. For Qt 5.15.2 there were more issues, but those
fixes are down below on this page. When everything is built continue on to the
next paragraph which goes into flashing the image.
### Flashing the Yocto Image
Once the Yocto build is complete, you should have an image file which you can
flash to an SD card to boot the Raspberry Pi. Yocto generates many more
files, packages for each individual piece of software, support files like
device trees and a few other files, at the moment we're only interested in
the image file.
The two different `boot2qt` versions (Qt 5 and Qt 6) build a different image
file. Qt 5 has an image which you can just `dd` to an SD card and boot, Qt 6
has a `bmap` file. `bmap` is a special format which should be faster to flash
and verifies data during flash, initially created by Intel for their Tizen
project.
For Qt 5 you get the following, in the
`b2qt/build-raspberrypi4/tmp/deploy/images/raspberrypi4` folder:
ls -larSh tmp/deploy/images/raspberrypi4/ # ls sorted by size
Output:
-rw-r--r-- 2 remy remy 40K Feb 15 15:22 bcm2711-rpi-4-b-1-4.19.93+git0+3fdcc814c5-r0-raspberrypi4-20220215123308.dtb
drwxr-xr-x 3 remy remy 52K Feb 17 06:14 .
-rw-r--r-- 1 remy remy 193K Feb 17 06:09 b2qt-embedded-qt5-image-raspberrypi4-20220217055709.rootfs.manifest
-rw-r--r-- 1 remy remy 335K Feb 17 06:09 b2qt-embedded-qt5-image-raspberrypi4-20220217055709.testdata.json
-rw-r--r-- 2 remy remy 5.7M Feb 15 15:21 zImage-1-4.19.93+git0+3fdcc814c5-r0-raspberrypi4-20220215123308.bin
-rw-rw-r-- 2 remy remy 19M Feb 15 15:22 modules-1-4.19.93+git0+3fdcc814c5-r0-raspberrypi4-20220215123308.tgz
-rw-r--r-- 1 remy remy 322M Feb 17 06:13 b2qt-embedded-qt5-image-raspberrypi4-20220217055709.7z
-rw-r--r-- 1 remy remy 488M Feb 17 06:10 b2qt-embedded-qt5-image-raspberrypi4-20220217055709.rootfs.tar.bz2
-rw-r--r-- 1 remy remy 1.7G Feb 17 06:10 b2qt-embedded-qt5-image-raspberrypi4-20220217055709.rootfs.ext3
-rw-r--r-- 1 remy remy 1.8G Feb 17 06:10 b2qt-embedded-qt5-image-raspberrypi4-20220217055709.rootfs.rpi-sdimg
The last file, the `*-sdimg` file, can be flashed to your SD card using `dd`:
dd if=b2qt-embedded-qt5-image-raspberrypi4-20220217055709.rootfs.rpi-sdimg of=/dev/sdX bs=4M conv=fsync
I'm using an external SD card reader, if you have a builtin reader you should
probably use `of=/dev/mmcblk0` as output device, not `/dev/sdX`. Do note that
the image file has a date, and you should replace the filename in my example
by your build output filename.
For Qt 6 you have a `bmap` image file file:
-rw-r--r-- 2 remy remy 29K Feb 15 18:03 bcm2710-rpi-3-b-plus-1-5.10.31+git0+a19886b00e_89399e6e7e-r0-raspberrypi4-20220215145419.dtb
-rw-r--r-- 2 remy remy 35K Feb 15 18:03 sx150x-1-5.10.31+git0+a19886b00e_89399e6e7e-r0-raspberrypi4-20220215145419.dtbo
-rw-r--r-- 2 remy remy 49K Feb 15 18:03 bcm2711-rpi-400-1-5.10.31+git0+a19886b00e_89399e6e7e-r0-raspberrypi4-20220215145419.dtb
-rw-r--r-- 2 remy remy 49K Feb 15 18:03 bcm2711-rpi-4-b-1-5.10.31+git0+a19886b00e_89399e6e7e-r0-raspberrypi4-20220215145419.dtb
-rw-r--r-- 2 remy remy 49K Feb 15 18:03 bcm2711-rpi-cm4-1-5.10.31+git0+a19886b00e_89399e6e7e-r0-raspberrypi4-20220215145419.dtb
drwxr-xr-x 3 remy remy 60K Feb 16 22:57 .
-rw-r--r-- 1 remy remy 216K Feb 16 22:53 b2qt-embedded-qt6-image-raspberrypi4-20220216200033.rootfs.manifest
-rw-r--r-- 1 remy remy 346K Feb 16 22:53 b2qt-embedded-qt6-image-raspberrypi4-20220216200033.testdata.json
-rw-r--r-- 2 remy remy 7.1M Feb 15 18:03 zImage-1-5.10.31+git0+a19886b00e_89399e6e7e-r0-raspberrypi4-20220215145419.bin
-rw-r--r-- 2 remy remy 19M Feb 15 18:03 modules-1-5.10.31+git0+a19886b00e_89399e6e7e-r0-raspberrypi4-20220215145419.tgz
-rw-r--r-- 1 remy remy 374M Feb 16 22:57 b2qt-embedded-qt6-image-raspberrypi4-20220216200033.7z
-rw-r--r-- 1 remy remy 374M Feb 16 22:57 b2qt-embedded-qt6-image-raspberrypi4-20220216200033.rootfs.wic.xz
-rw-r--r-- 1 remy remy 579M Feb 16 22:53 b2qt-embedded-qt6-image-raspberrypi4-20220216200033.rootfs.tar.bz2
-rw-r--r-- 1 remy remy 596M Feb 16 22:54 b2qt-embedded-qt6-image-raspberrypi4-20220216200033.rootfs.wic.bz2
-rw-r--r-- 1 remy remy 2.0G Feb 16 22:54 b2qt-embedded-qt6-image-raspberrypi4-20220216200033.rootfs.ext3
If you run Ubuntu, you must install the `bmap-tools` package and use the
following command to flash the image to the SD card:
$ sudo bmaptool copy b2qt-embedded-qt6-image-raspberrypi4.wic.bz2 --bmap b2qt-embedded-qt6-image-raspberrypi4.wic.bmap /dev/sda
bmaptool: info: block map format version 2.0
bmaptool: info: 687923 blocks of size 4096 (2.6 GiB), mapped 374929 blocks (1.4 GiB or 54.5%)
bmaptool: info: copying image 'b2qt-embedded-qt6-image-raspberrypi4.wic.bz2' to block device '/dev/sda' using bmap file 'b2qt-embedded-qt6-image-raspberrypi4.wic.bmap'
If you don't have the `bmap` package, just extract the `*.rootfs.wic.bz2` file
and use `dd` to write it to your SD card. Takes a bit longer and lacks
validation of written data, but works just as well.
Once written to the SD card, pop it into your Raspberry Pi and boot. After a
short bootup sequence, you should be greeted with a nice Boot 2 Qt screen.
In the case of Qt 6 the IP address is printed on screen. You can SSH to that
IP with the username `root` and no password. If all went well, you should be
greeted with a shell prompt. If so, continue on with the Qt Creator
integration. In the case of Qt 5, you can run a few demo applications right
away.
### Qt Creator integration
One big advantage of `boot2qt` is the integration with the other Qt tooling,
like the IDE Qt Creator.
Qt Creator has the concept of Kits, which basically is a compiler
configuration. You can have multiple versions of Qt or GCC (or CLANG)
installed, and within a kit you tell Qt Creator which specific versions to
use. I have specific kits for Qt 5.15, both Android and desktop linux and for
Qt 6.2. I also have a cross-compiler kit installed, that allows me to compile
for the Raspberry Pi from my x86 desktop.
Yocto can build a native SDK, which has all the required compile tools for your
specific environment. `boot2qt` extends this, it also includes the entire Qt
stack in the cross compile SDK and a few helper scripts.
The steps to integrate your device into Qt Creator are:
- Build the Cross-compile SDK
- Install the cross-compile SDK
- Add the SDK as a kit to Qt Creator
- Clone that kit and set it up correctly
- Add a remote device (your Pi)
- Update the kit to deploy to the device
- Add the kit to your project
Lots of moving parts, but once you have it all setup and running,
it's a breeze. Qt creator cross-compiles your app and copies it
directly to your device, no manual tasks.
#### Building the cross-compile SDK
You must build the SDK before you can use it, it's not automatically built
when you build the boot image. Make sure you're in the `b2qt` folder and have
setup the environment:
export MACHINE=raspberrypi4 && source ./setup-environment.sh
Execute the bitbake command to build the SDK:
bitbake meta-toolchain-b2qt-embedded-qt6-sdk
The build can take a few hours, depending on your host machine's
specifications. Not as long as building the entire image, but still quite a
while. The output looks a lot like the earlier output you saw when building
the image:
remy@host:~/b2qt/build-raspberrypi4$ bitbake meta-toolchain-b2qt-embedded-qt6-sdk
WARNING: Host distribution "debian-11" has not been validated with this version of the build system; you may possibly experience unexpected failures. It is recommended that you use a tested distribution.
Loading cache: 100% |#################################################################################################| Time: 0:00:00
Loaded 4368 entries from dependency cache.
NOTE: Resolving any missing task queue dependencies
Build Configuration:
BB_VERSION = "1.50.0"
BUILD_SYS = "x86_64-linux"
NATIVELSBSTRING = "universal"
TARGET_SYS = "arm-poky-linux-gnueabi"
MACHINE = "raspberrypi4"
DISTRO = "b2qt"
DISTRO_VERSION = "3.3.4"
TUNE_FEATURES = "arm vfp cortexa7 neon vfpv4 thumb callconvention-hard"
TARGET_FPU = "hard"
SDKMACHINE = "x86_64"
meta
meta-poky = "HEAD:c40ac16d79026169639f47be76a3f7b9d8b5178e"
meta-raspberrypi = "HEAD:b4ec97e4eb8e36efd1f7e2f8ae020a9e55cfc239"
meta-oe
meta-python
meta-networking
meta-initramfs
meta-multimedia = "HEAD:f72a73b42fa740130b388ba8555cdbefdee8d37d"
meta-python2 = "HEAD:810d6d842f103eb59f18b06426106462b15de7e2"
meta-boot2qt
meta-boot2qt-distro = "HEAD:e59a2e20697e0afc2a0b068835cd90e102dec589"
meta-mingw = "HEAD:422b96cb2b6116442be1f40dfb5bd77447d1219e"
meta-qt6 = "HEAD:eb3719266fc03b96d5056980b135b371f31811f4"
meta-raymii = "master:0789f30e221712462748cf56b9afddeec3613be1"
Initialising tasks: 100% |############################################################################################| Time: 0:00:10
Sstate summary: Wanted 1340 Local 292 Network 0 Missed 1048 Current 2252 (21% match, 70% complete)
NOTE: Executing Tasks
NOTE: Tasks Summary: Attempted 10059 tasks of which 7511 didn't need to be rerun and all succeeded.
NOTE: Build completion summary:
NOTE: do_populate_sysroot: 0.0% sstate reuse(0 setscene, 146 scratch)
NOTE: do_deploy_source_date_epoch: 0.0% sstate reuse(0 setscene, 146 scratch)
NOTE: do_package_qa: 0.0% sstate reuse(0 setscene, 150 scratch)
NOTE: do_package: 0.0% sstate reuse(0 setscene, 150 scratch)
NOTE: do_packagedata: 0.0% sstate reuse(0 setscene, 150 scratch)
NOTE: do_package_write_ipk: 2.0% sstate reuse(3 setscene, 150 scratch)
NOTE: do_populate_lic: 0.0% sstate reuse(0 setscene, 154 scratch)
Once the build is finished, you have an installable shell script in the `tmp/deploy/sdk` folder:
remy@host:~/b2qt/build-raspberrypi4$ ls tmp/deploy/sdk/ -larSh
total 1.6G
-rw-r--r-- 1 remy remy 0 Feb 18 15:43 b2qt-x86_64-meta-toolchain-b2qt-embedded-qt6-sdk-raspberrypi4.host.manifest
-rw-r--r-- 1 remy remy 90K Feb 18 15:42 b2qt-x86_64-meta-toolchain-b2qt-embedded-qt6-sdk-raspberrypi4.target.manifest
-rw-r--r-- 1 remy remy 324K Feb 18 15:42 b2qt-x86_64-meta-toolchain-b2qt-embedded-qt6-sdk-raspberrypi4.testdata.json
-rwxr-xr-x 1 remy remy 1.6G Feb 18 15:58 b2qt-x86_64-meta-toolchain-b2qt-embedded-qt6-sdk-raspberrypi4.sh
You can execute the `b2qt-x86_64-meta-toolchain-b2qt-embedded-qt6-sdk-raspberrypi4.sh` file to install the
SDK on your local machine:
$ ./b2qt-x86_64-meta-toolchain-b2qt-embedded-qt6-sdk-raspberrypi4.sh
Boot to Qt for Embedded Linux SDK installer version 3.3.4
=========================================================
Enter target directory for SDK (default: /opt/b2qt/3.3.4):
You are about to install the SDK to "/opt/b2qt/3.3.4". Proceed [Y/n]? y
[sudo] password for remy:
Extracting SDK...
done
Setting it up...done
SDK has been successfully set up and is ready to be used.
Each time you wish to use the SDK in a new shell session, you need to source the environment setup script e.g.
$ . /opt/b2qt/3.3.4/environment-setup-cortexa7t2hf-neon-vfpv4-poky-linux-gnueabi
The build command for Qt 5 is:
bitbake meta-toolchain-b2qt-embedded-qt5-sdk
Output is almost identical, and once that build is done you have the installer in the same folder, `tmp/deploy/sdk`:
remy@host:~/b2qt/build-raspberrypi4$ ls -larSh tmp/deploy/sdk/
total 1.7G
-rw-r--r-- 1 remy remy 59K Feb 19 22:25 b2qt-x86_64-meta-toolchain-b2qt-embedded-qt5-sdk-raspberrypi4.host.manifest
-rw-r--r-- 1 remy remy 199K Feb 19 22:24 b2qt-x86_64-meta-toolchain-b2qt-embedded-qt5-sdk-raspberrypi4.target.manifest
-rw-r--r-- 1 remy remy 303K Feb 19 22:24 b2qt-x86_64-meta-toolchain-b2qt-embedded-qt5-sdk-raspberrypi4.testdata.json
-rwxr-xr-x 1 remy remy 1.7G Feb 19 22:47 b2qt-x86_64-meta-toolchain-b2qt-embedded-qt5-sdk-raspberrypi4.sh
This script can installed just as the Qt 6 one, no workarounds or issues there:
$ ./b2qt-x86_64-meta-toolchain-b2qt-embedded-qt5-sdk-raspberrypi4.sh
Boot to Qt for Embedded Linux SDK installer version 3.0.4
=========================================================
Enter target directory for SDK (default: /opt/b2qt/3.0.4):
You are about to install the SDK to "/opt/b2qt/3.0.4". Proceed [Y/n]? Y
[sudo] password for remy:
Extracting SDK...done
Setting it up...done
SDK has been successfully set up and is ready to be used.
Each time you wish to use the SDK in a new shell session, you need to source the environment setup script e.g.
$ . /opt/b2qt/3.0.4/environment-setup-cortexa7t2hf-neon-vfpv4-poky-linux-gnueabi
#### Adding the kit in Qt Creator
Configuring kit's in Qt creator is a tedious process, but `boot2qt` provides
a script to make this part a bit easier as well. Once you have the native
SDK installed, you can use the `configure-qtcreator.sh` script to have a
kit added. Close Qt Creator first, then execute script:
/opt/b2qt/3.3.4/configure-qtcreator.sh --config /opt/b2qt/3.3.4/environment-setup-cortexa7t2hf-neon-vfpv4-poky-linux-gnueabi --qtcreator /mnt/DATADISK/qt2021/Tools/QtCreator/ --name qt6-pi4-template
* `--config`: points to the file that the SDK installer tells you to source.
* `--qtcreator`: points to the folder QtCreator is installed in. I have it on an extra disk, my path is different
* `--name`: the name of the kit
You cannot edit this kit later on, therefore I added `-template` to the name. We can make changes, but
the kit must be cloned first.
Output:
Configured Qt Creator with new kit: qt6-pi4-template
Fire up Qt Creator, navigate to `Preferences`, then `Kits`. You should see
the new kit, click the `Clone` button:
![qt creator][13]
The most important setting to change is the `Qt Version`. Not sure
why it didn't detect it, but for me it stated `None`. Select the
correct Qt version in the drop down. If you're unsure which one to
use, switch to the `Qt Versions` tab and check which one you need.
Here's a picture of the settings I have:
![qt versions][14]
You can now configure this kit for your own project, but before
we do that, add your Pi (running the `boot2qt` image) as a remote
device to deploy to.
#### Adding a remote device
Also in settings, under `Devices`. Click the `Add` button. Add a `Generic
Linux Device` with the following settings, but replace the IP with your
board's IP:
![device][12]
The `boot2qt` image's username is `root` and there is no password. You can
deploy a public key, but that is not required. Once your device is added,
use the Test button to make sure everything works.
Go back to the Kit settings and select this device under the `Device`
drop down.
After adding the device to the kit you can configure the kit for your project.
Open up your project and click the `Project` button in the left-hand menu.
Add the new kit by clicking it, then building your project. The compile
output should show the path to the Yocto SDK instead of your regular
compiler:
15:09:01: Starting: "/opt/b2qt/3.3.4/sysroots/x86_64-pokysdk-linux/usr/bin/make" -j12
/opt/b2qt/3.3.4/sysroots/x86_64-pokysdk-linux/usr/bin/arm-poky-linux-gnueabi/arm-poky-linux-gnueabi-g++ -mthumb -mfpu=neon-vfpv4 -mfloat-abi=hard -mcpu=cortex-a7 --sysroot=/opt/b2qt/3.3.4/sysroots/cortexa7t2hf-neon-vfpv4-poky-linux-gnueabi -c -pipe -g -std=gnu++1z -Wall -Wextra -D_REENTRANT -fPIC -DQT_QML_DEBUG -DQT_QUICK_LIB -DQT_OPENGL_LIB -DQT_GUI_LIB -DQT_QMLMODELS_LIB -DQT_QML_LIB -DQT_NETWORK_LIB -DQT_CORE_LIB -I../dragdropexample -I. -I/opt/b2qt/3.3.4/sysroots/cortexa7t2hf-neon-vfpv4-poky-linux-gnueabi/usr/include/QtQuick -I/opt/b2qt/3.3.4/sysroots/cortexa7t2hf-neon-vfpv4-poky-linux-gnueabi/usr/include/QtOpenGL -I/opt/b2qt/3.3.4/sysroots/cortexa7t2hf-neon-vfpv4-poky-linux-gnueabi/usr/include/QtGui -I/opt/b2qt/3.3.4/sysroots/cortexa7t2hf-neon-vfpv4-poky-linux-gnueabi/usr/include/QtQmlModels -I/opt/b2qt/3.3.4/sysroots/cortexa7t2hf-neon-vfpv4-poky-linux-gnueabi/usr/include/QtQml -I/opt/b2qt/3.3.4/sysroots/cortexa7t2hf-neon-vfpv4-poky-linux-gnueabi/usr/include/QtNetwork -I/opt/b2qt/3.3.4/sysroots/cortexa7t2hf-neon-vfpv4-poky-linux-gnueabi/usr/include/QtCore -I. -I/opt/b2qt/3.3.4/sysroots/cortexa7t2hf-neon-vfpv4-poky-linux-gnueabi/usr/lib/mkspecs/linux-oe-g++ -o main.o ../dragdropexample/main.cpp
#### One click deploy
The Qt documentation lists one of the options under the
`Run` step of the kit as `Change Default App`, but I don't
have that option, probably because I did not install the
`qbsp` package. However, not a big problem, since we
can just tell Qt Creator the correct command by hand.
Under the `Run` settings, check the `Alternate executable on device`
and change the path to `/usr/bin/appcontroller`. Add
the full path of your app to the `Command Line Arguments` textfield,
like in the image below. The full path to your app is listed in
the same settings dialog:
![deploy][15]
Next time you deploy, it will kill any running instances of `appcontroller`
and start it with your application as command line argument,
effectively deploying your app to the device.
### Changing the default boot2qt startup application in Yocto
You can change the default app that boots up once your system is
running with the following command:
appcontroller --make-default /path/to/your/app
What that does is not much more than [make a symlink][17] to
`/usr/bin/b2qt`.
However, you might want to bake your app into the image. This is
a quick short section to make your own layer and recipe and to include
that recipe in the image by extending the Qt image. We'll do so by
making a recipe that places your binary on the filesystem and symlinks
it, as well as extending the default image.
If you do plan to ship production images via this guide, remember that
this is a development image, SSH is wide open and there is a lot left
in the image to setup correctly. Please do dive in to Yocto a bit more
for more on that.
Start by making a few folders for your layer, in the `b2qt` folder:
mkdir -p sources/meta-raymii/recipes-myapp/myapp/files/
mkdir -p sources/meta-raymii/conf/
mkdir -p sources/meta-raymii/recipes-qt/images/
Edit the following file:
sources/meta-raymii/conf/layer.conf
Place the below contents:
BBPATH .= ":${LAYERDIR}"
BBFILES += "${LAYERDIR}/recipes*/*/*.bb \
${LAYERDIR}/recipes*/*/*.bbappend \
"
BBFILE_COLLECTIONS += "raymii"
BBFILE_PATTERN_raymii := "^${LAYERDIR}/"
BBFILE_PRIORITY_raymii = "1"
LAYERSERIES_COMPAT_raymii = "thud zeus dunfell gatesgarth hardknott"
Next, edit the following file, which is your app's recipe:
sources/meta-raymii/recipes-myapp/myapp/myapp_1.0.bb
The filename format (`myapp` `underscore` `versionMajor.versionMinor`) is important.
Don't mix up the `underscore` for a `dash`. A newer version of your app could be
named `myapp_1.1.bb`, or you could up the `PR="r0"` for a minor release.
Contents:
DESCRIPTION = "My Custom Qt App"
AUTHOR = "boot2qt-guide@raymii.org"
LICENSE = "CLOSED"
PR = "r0"
SRC_URI =+ "file://myapp \
"
DEPENDS += "qtbase qtdeclarative qtdeclarative-native"
do_install() {
install -d ${D}/${bindir}
install -m 0755 ${WORKDIR}/myapp ${D}/${bindir}/myapp
lnr ${D}/${bindir}/myapp ${D}/${bindir}/b2qt
}
FILES_${PN} = "${bindir}/myapp \
${bindir}/b2qt \
"
This recipe will copy your app to the correct place with the correct permissions
and it makes a symlink (`lnr`) to `/usr/bin/b2qt`. The `DEPENDS` line makes sure the relevant
Qt pieces are installed. With `boot2qt` that's the case, but if you omit that line,
you'll get a build error because Yocto is intelligent enough to scan your program
executable.
Make sure the cross-compiled version of your program in the `files` folder:
remy@host:~/b2qt$ file sources/meta-raymii/recipes-myapp/myapp/files/myapp
sources/meta-raymii/recipes-myapp/myapp/files/myapp: ELF 32-bit LSB
pie executable, ARM, EABI5 version 1 (SYSV), dynamically linked,
interpreter /lib/ld-linux-armhf.so.3, for GNU/Linux 3.2.0, BuildID
[sha1]=f313bc93bfc28c7a8af0eb046c0270ab55378502, with debug_info, not
stripped
Add the layer to the Yocto build config:
build-raspberrypi4/conf/bblayers.conf
At the bottom, don't forget the trailing slash (`\`):
BBLAYERS ?= " \
${BSPDIR}/sources/poky/meta \
[...]
${BSPDIR}/sources/meta-qt6 \
${BSPDIR}/sources/meta-raymii \
"
The following file is a `.bbappend` file, which, if it has the same name, path
and version, will, as you might expect, append stuff to the original. In this
case, we will extend the default `b2qt-embedded-qt6-image` image to include
our `myapp` recipe in the installation. This is the same for Qt 5, just change
the filename accordingly. Edit this file
sources/meta-raymii/recipes-qt/images/b2qt-embedded-qt6-image.bbappend
Contents:
SUMMARY = "Add myapp to Qt image"
IMAGE_INSTALL_prepend := "myapp"
Once you've did all the above, rebuild the image (`bitbake b2qt-embedded-qt6-image`)
and flash it to your SD card. Once booted up, instead of the default, your own
program will now start up.
If you want to make sure you're on the correct image, you can check the file
`/etc/build` once logged in via SSH to see the layers and git commits used
to build the image:
root@b2qt-raspberrypi4:~# cat /etc/build
-----------------------
Build Configuration: |
-----------------------
DISTRO = b2qt
DISTRO_VERSION = 3.3.4
QT_VERSION = 6.2.3
-----------------------
Layer Revisions: |
-----------------------
meta = HEAD:c40ac16d79026169639f47be76a3f7b9d8b5178e -- modified
meta-poky = HEAD:c40ac16d79026169639f47be76a3f7b9d8b5178e -- modified
meta-raspberrypi = HEAD:b4ec97e4eb8e36efd1f7e2f8ae020a9e55cfc239
meta-oe = HEAD:f72a73b42fa740130b388ba8555cdbefdee8d37d
meta-python = HEAD:f72a73b42fa740130b388ba8555cdbefdee8d37d
meta-networking = HEAD:f72a73b42fa740130b388ba8555cdbefdee8d37d
meta-initramfs = HEAD:f72a73b42fa740130b388ba8555cdbefdee8d37d
meta-multimedia = HEAD:f72a73b42fa740130b388ba8555cdbefdee8d37d
meta-python2 = HEAD:810d6d842f103eb59f18b06426106462b15de7e2
meta-boot2qt = HEAD:e59a2e20697e0afc2a0b068835cd90e102dec589
meta-boot2qt-distro = HEAD:e59a2e20697e0afc2a0b068835cd90e102dec589
meta-mingw = HEAD:422b96cb2b6116442be1f40dfb5bd77447d1219e
meta-qt6 = HEAD:eb3719266fc03b96d5056980b135b371f31811f4
meta-raymii = master:0789f30e221712462748cf56b9afddeec3613be1 -- modified
The `image-buildinfo` class writes information to the target filesystem and the Qt image
has this class enabled by default. The image inherits `meta-boot2qt/classes/deploy-buildinfo.bbclass`
which inherits `image-buildinfo` and extends it with some Qt version information.
### Qt 5.15.2 issues
A few issues popped up when building boot2qt for 5.15.2. Upstream git repositories changes
their [branch name][4], so for the fonts I had to update a few recipes related to fonts:
- `b2qt/sources/meta-boot2qt/meta-boot2qt/recipes-graphics/fonts/otf-noto_git.bb`
- `b2qt/sources/meta-boot2qt/meta-boot2qt/recipes-graphics/fonts/ttf-opensans_git.bb`
Change the following:
SRC_URI = "git://github.com/googlei18n/noto-cjk.git"
Add `;branch=main` to the end:
SRC_URI = "git://github.com/googlei18n/noto-cjk.git;branch=main"
Rinse and repeat for any other font recipes that complain.
---
My Raspberry Pi 4b 8 GB failed to boot with this image, the
bootloader complaining with the following error:
start4x.elf is not compatible
This board requires newer software
> The default apps of `boot2qt` 5.15 on my Raspberry Pi 4.
Here is [a video][11] of boot2qt booting straight in to [my custom Qt][19] app:
**If a step is for a specific Qt version, that is mentioned. Otherwise,
the step applies to both versions.**
This guide is for the Raspberry Pi 4 but should work for any of the
other Raspberry Pi models supported by Qt. Replace the `MACHINE`
variable later on with a different model.
### What is yocto, what is boot2qt
There is a lot of ground to cover, if you are not familiar with the Yocto
project, here is a quick, _simplified_, overview of all the terms.
Yocto is an open-source project which provides a build framework and metadata
to help to create a custom image for your target board. Yocto uses so-called
(meta) layers and recipes. Recipes are `.bb`(for bitbake) files that contain
build instructions and layers are a collection of specific recipes, classes
and configuration files. You could have a layer named `meta-raspberry`
(all layers, by convention, start with `meta-`) that has recipes applicable
only for the Raspberry Pi.
Yocto helps you to build a linux distro, their reference distro is named
`poky`. The primary build tool is a python command line tool named `bitbake`.
It parses all the recipes and then, one by one, gathers the source code
and compiles all the software, then packages that up into an image for your
board.
Yocto is aimed at embedded linux devices, at work we use it to create our own
Linux distribution (not boot2qt) to run on the coffee machines. Many
different boards are supported, most vendors provide a so called board
support package (bsp). Often this contains a kernel and drivers for your
board. There is a board support package for the Raspberry Pi, which we will
use.
`boot2qt` is an set of layers for Yocto which builds a simple linux system
that starts up without a desktop, right into a Qt application. It also builds
a cross-compile SDK for your desktop, which you can use in Qt Creator to
cross-compile your application for the target device. Often the device you
develop for does not have the same CPU architecture as your desktop
workstation. To top this all up, it also integrates into Qt Creator, allowing
you to one-click deploy and run your application, via the network, on your
device.
All three parts save you a huge amount of work. Because we have our own yocto
build I know what kind of work that involves, the boot2qt stack saves so much
time, as long as your board is supported. You can see the list of board [here][1]
Qt 5.15 and [here][2] for Qt 6.2.
`boot2qt` also provide a set of scripts to make the `yocto` setup very easy, so
the process you see in this guide is not the same as a default `yocto` setup. It's
specifically for `boot2qt` and for the Raspberry Pi 4.
So to summarize, `boot2qt` provides a layer on top of yocto that adds
integration between your embedded linux device and the Qt suite of tools,
saving a boatload of time doing manual busywork.
### Development host
The machine that is going to build your `boot2qt` image (the host that runs
`bitbake`) needs a few packages before we can get started building. You need
at least 50 GB's of free space, but my host has 300 GB. Cross-compiling all
the packages takes a huge amount of time, so the more cores and RAM you have,
the better. My test build machine has 4 cores and 8 GB of RAM, the entire image
build took 3 whole days. At work we have a few beefy servers, there the build
takes about 2 hours. Yocto does support incremental builds, so if you change
one recipe, only that part has to be rebuilt, not all the other parts.
My build machine runs Ubuntu 20.04 for the Qt 5.15 build and Debian 11 for
the Qt 6 build. Install the required packages first:
apt-get install gawk wget git diffstat unzip texinfo gcc build-essential
chrpath socat cpio python3 python3-pip python3-pexpect xz-utils
debianutils iputils-ping python3-git python3-jinja2 libegl1-mesa
libsdl1.2-dev pylint3 xterm python3-subunit mesa-common-dev python
git-lfs g++-multilib gcc-multilib libxkbcommon-dev
libxkbcommon-x11-dev libwayland-cursor++0 libwayland-cursor0
These are a bit more packages than the Qt site recommends, I had build issues
when building the `qbsp` layer, which is where most of the extra packages
come from.
Next you need `repo`, a git management tool [by Google][3]. It hides most of
the complexity of submodules and different repo's by putting all of that
extra information in a manifest file. You can install it using apt:
apt install repo
If it's not in the repository, check the [instructions][3], installation
process is just a simple copy of one executable.
Create a folder where all of yocto will reside:
mkdir b2qt
cd b2qt
Use the `repo` tool to clone all the git repositories of the Yocto project
and `boot2qt` at once. First initialize for the correct Qt version:
# for Qt 6.2:
repo init -u git://code.qt.io/yocto/boot2qt-manifest -m v6.2.3.xml
# for Qt 5.15
repo init -u git://code.qt.io/yocto/boot2qt-manifest -m v5.15.2.xml
Then sync the repositories:
repo sync
You must tell which board you want to build for, then source a
script:
export MACHINE=raspberrypi4 && source ./setup-environment.sh
**This step must be repeated on every login**.
Output:
### Shell environment set up for builds. ###
You can now run 'bitbake '
Common targets are:
b2qt-embedded-qt6-image
meta-toolchain-b2qt-embedded-qt6-sdk
QBSP target is:
meta-b2qt-embedded-qbsp
For creating toolchain or QBSP for Windows, set environment variable before running bitbake:
SDKMACHINE=x86_64-mingw32
For more information about Boot to Qt, see https://doc.qt.io/QtForDeviceCreation/
You should now be in a folder named `build-raspberrypi4`. Using the `repo` tool and
sourcing this script has made a nifty folder structure for yocto:
* `build-$boardname`: build directory for the board, you are in this folder
after sourcing the `setup-environment.sh` file.
* `sources`: has all the `bitbake` layers and recipes
* `download`: folder where all the source code is downloaded (git repo's,
tar.gz archives)
In the `build-*` directory there is a `conf` folder, that has two important
files. `bblayers.conf` and `local.conf`. I had issues with the `oom-killer`
while building the image, the `do_compile` of `qtwebengine` kept crashing
(killed). I had to set the following variables to `1`, to make the build
pass:
# Default to setting automatically based on cpu count
BB_NUMBER_THREADS ?= "1"
#
# Default to setting automatically based on cpu count
PARALLEL_MAKE ?= "-j1"
This is probably due to my limited hardware for the build machine, but if you
experience out of memory killer issues during a build, you know where to
look.
You're all set up now. I recommend you start a `screen` or `tmux` session as
the build will take a long time.
### Building boot2qt
For Qt 6 the following step runs without problems, for Qt 5 you must do some
manual patching. The patches I had to do are at the bottom of this article.
If you pay for Qt 5.15 LTS then you have no problems. The last open source
Qt 5 version at this moment is 5.15.2 and the commercial version is 5.15.8, in
the commercial release these issues are fixed, in the open source release we
have to edit a few recipes ourselves and download newer firmware.
The following command builds the full `boot2qt` image (and all packages) which
you can flash to an SD card:
# for Qt 6
bitbake b2qt-embedded-qt6-image
# for Qt 5
bitbake b2qt-embedded-qt5-image
The build process takes a long time, because it compiles all the source code. Output
is like below for Qt 5:
remy@host:~/b2qt/build-raspberrypi4$ bitbake b2qt-embedded-qt5-image
WARNING: Host distribution "ubuntu-20.04" has not been validated with this version of the build system; you may possibly experience unexpected failures. It is recommended that you use a tested distribution.
Loading cache: 100% |#################################################################################################| Time: 0:00:00
Loaded 4132 entries from dependency cache.
Parsing recipes: 100% |###############################################################################################| Time: 0:00:00
Parsing of 2779 .bb files complete (2778 cached, 1 parsed). 4132 targets, 299 skipped, 1 masked, 0 errors.
NOTE: Resolving any missing task queue dependencies
Build Configuration:
BB_VERSION = "1.44.0"
BUILD_SYS = "x86_64-linux"
NATIVELSBSTRING = "universal"
TARGET_SYS = "arm-poky-linux-gnueabi"
MACHINE = "raspberrypi4"
DISTRO = "b2qt"
DISTRO_VERSION = "3.0.4"
TUNE_FEATURES = "arm vfp cortexa7 neon vfpv4 thumb callconvention-hard"
TARGET_FPU = "hard"
SDKMACHINE = "x86_64"
meta
meta-poky = "HEAD:f2eb22a8783f1eecf99bd4042695bab920eed00e"
meta-raspberrypi = "HEAD:0e05098853eea77032bff9cf81955679edd2f35d"
meta-oe
meta-python
meta-networking
meta-initramfs
meta-multimedia = "HEAD:2b5dd1eb81cd08bc065bc76125f2856e9383e98b"
meta-python2 = "HEAD:4400f9155ec193d028208cf0c66aeed2ba2b00ab"
meta-boot2qt
meta-boot2qt-distro = "HEAD:5f23cb2d6836bbad3a1fa982089ccf20bf0c6245"
meta-mingw = "HEAD:756963cc28ebc163df7d7f4b4ee004c18d3d3260"
meta-qt5 = "HEAD:72459ce0639eb3ce408558a7abede945e1f8ddc9"
Initialising tasks: 100% |############################################################################################| Time: 0:00:05
Sstate summary: Wanted 513 Found 295 Missed 218 Current 1721 (57% match, 90% complete)
NOTE: Executing Tasks
NOTE: Setscene tasks completed
Currently 5 running tasks (4391 of 6968) 63% |#################################################### |
0: qtquickcontrols2-5.15.2+gitAUTOINC+16f27dfa35-r0 do_compile - 9m41s (pid 4102272)
1: qtmultimedia-5.15.2+gitAUTOINC+fd30913d46-r0 do_compile - 9m33s (pid 4104096)
2: qtlocation-5.15.2+gitAUTOINC+02a21217a9_d3101bbc22-r0 do_compile - 8m16s (pid 4107720)
3: qtconnectivity-5.15.2+gitAUTOINC+ca6cc606d9-r0 do_compile - 6m51s (pid 4110585)
4: qtwayland-5.15.2+gitAUTOINC+3cc17177b1-r0 do_compile - 6m20s (pid 4111432)
At the bottom of the output you see different tasks running, it could be a
`do_fetch` (download the source), `do_compile` (cross-compile the code) or a
`do_package` (make a package), or a few other `do_*` steps.
You see that there are almost `7000` tasks, so, again, it will take a lot of time.
Check up regularly, because changes are that your build fails. Yocto error messages are
clear including log files.
For Qt 6.2 the output is like below:
remy@host:~/b2qt/build-raspberrypi4$ bitbake b2qt-embedded-qt6-image
WARNING: Host distribution "debian-11" has not been validated with this version of the build system; you may possibly experience unex
pected failures. It is recommended that you use a tested distribution.
Loading cache: 100% |#################################################################################################| Time: 0:00:00
Loaded 4368 entries from dependency cache.
NOTE: Resolving any missing task queue dependencies
Build Configuration:
BB_VERSION = "1.50.0"
BUILD_SYS = "x86_64-linux"
NATIVELSBSTRING = "universal"
TARGET_SYS = "arm-poky-linux-gnueabi"
MACHINE = "raspberrypi4"
DISTRO = "b2qt"
DISTRO_VERSION = "3.3.4"
TUNE_FEATURES = "arm vfp cortexa7 neon vfpv4 thumb callconvention-hard"
TARGET_FPU = "hard"
SDKMACHINE = "x86_64"
meta
meta-poky = "HEAD:c40ac16d79026169639f47be76a3f7b9d8b5178e"
meta-raspberrypi = "HEAD:b4ec97e4eb8e36efd1f7e2f8ae020a9e55cfc239"
meta-oe
meta-python
meta-networking
meta-initramfs
meta-multimedia = "HEAD:f72a73b42fa740130b388ba8555cdbefdee8d37d"
meta-python2 = "HEAD:810d6d842f103eb59f18b06426106462b15de7e2"
meta-boot2qt
meta-boot2qt-distro = "HEAD:e59a2e20697e0afc2a0b068835cd90e102dec589"
meta-mingw = "HEAD:422b96cb2b6116442be1f40dfb5bd77447d1219e"
meta-qt6 = "HEAD:eb3719266fc03b96d5056980b135b371f31811f4"
meta-raymii = "master:0789f30e221712462748cf56b9afddeec3613be1"
Initialising tasks: 100% |############################################################################################| Time: 0:00:09
Sstate summary: Wanted 482 Local 356 Network 0 Missed 126 Current 2730 (73% match, 96% complete)
NOTE: Executing Tasks
Currently 4 running tasks (4425 of 9263) 47% |######################################## |
0: qtwebengine-6.2.3-r0 do_compile (pid 527778) 0% | |
1: qtwayland-6.2.3-r0 do_install_ptest_base - 1m2s (pid 527854)
2: qtdeclarative-6.2.3-r0 do_package_write_ipk - 1m0s (pid 527980)
3: qtmultimedia-6.2.3-r0 do_package_write_ipk - 30s (pid 529522)
Even more tasks, [It's Over 9000!][7].
As stated in the intro, I had issues compiling Qt WebEngine, which were solved
by using less concurrent cores. For Qt 5.15.2 there were more issues, but those
fixes are down below on this page. When everything is built continue on to the
next paragraph which goes into flashing the image.
### Flashing the Yocto Image
Once the Yocto build is complete, you should have an image file which you can
flash to an SD card to boot the Raspberry Pi. Yocto generates many more
files, packages for each individual piece of software, support files like
device trees and a few other files, at the moment we're only interested in
the image file.
The two different `boot2qt` versions (Qt 5 and Qt 6) build a different image
file. Qt 5 has an image which you can just `dd` to an SD card and boot, Qt 6
has a `bmap` file. `bmap` is a special format which should be faster to flash
and verifies data during flash, initially created by Intel for their Tizen
project.
For Qt 5 you get the following, in the
`b2qt/build-raspberrypi4/tmp/deploy/images/raspberrypi4` folder:
ls -larSh tmp/deploy/images/raspberrypi4/ # ls sorted by size
Output:
-rw-r--r-- 2 remy remy 40K Feb 15 15:22 bcm2711-rpi-4-b-1-4.19.93+git0+3fdcc814c5-r0-raspberrypi4-20220215123308.dtb
drwxr-xr-x 3 remy remy 52K Feb 17 06:14 .
-rw-r--r-- 1 remy remy 193K Feb 17 06:09 b2qt-embedded-qt5-image-raspberrypi4-20220217055709.rootfs.manifest
-rw-r--r-- 1 remy remy 335K Feb 17 06:09 b2qt-embedded-qt5-image-raspberrypi4-20220217055709.testdata.json
-rw-r--r-- 2 remy remy 5.7M Feb 15 15:21 zImage-1-4.19.93+git0+3fdcc814c5-r0-raspberrypi4-20220215123308.bin
-rw-rw-r-- 2 remy remy 19M Feb 15 15:22 modules-1-4.19.93+git0+3fdcc814c5-r0-raspberrypi4-20220215123308.tgz
-rw-r--r-- 1 remy remy 322M Feb 17 06:13 b2qt-embedded-qt5-image-raspberrypi4-20220217055709.7z
-rw-r--r-- 1 remy remy 488M Feb 17 06:10 b2qt-embedded-qt5-image-raspberrypi4-20220217055709.rootfs.tar.bz2
-rw-r--r-- 1 remy remy 1.7G Feb 17 06:10 b2qt-embedded-qt5-image-raspberrypi4-20220217055709.rootfs.ext3
-rw-r--r-- 1 remy remy 1.8G Feb 17 06:10 b2qt-embedded-qt5-image-raspberrypi4-20220217055709.rootfs.rpi-sdimg
The last file, the `*-sdimg` file, can be flashed to your SD card using `dd`:
dd if=b2qt-embedded-qt5-image-raspberrypi4-20220217055709.rootfs.rpi-sdimg of=/dev/sdX bs=4M conv=fsync
I'm using an external SD card reader, if you have a builtin reader you should
probably use `of=/dev/mmcblk0` as output device, not `/dev/sdX`. Do note that
the image file has a date, and you should replace the filename in my example
by your build output filename.
For Qt 6 you have a `bmap` image file file:
-rw-r--r-- 2 remy remy 29K Feb 15 18:03 bcm2710-rpi-3-b-plus-1-5.10.31+git0+a19886b00e_89399e6e7e-r0-raspberrypi4-20220215145419.dtb
-rw-r--r-- 2 remy remy 35K Feb 15 18:03 sx150x-1-5.10.31+git0+a19886b00e_89399e6e7e-r0-raspberrypi4-20220215145419.dtbo
-rw-r--r-- 2 remy remy 49K Feb 15 18:03 bcm2711-rpi-400-1-5.10.31+git0+a19886b00e_89399e6e7e-r0-raspberrypi4-20220215145419.dtb
-rw-r--r-- 2 remy remy 49K Feb 15 18:03 bcm2711-rpi-4-b-1-5.10.31+git0+a19886b00e_89399e6e7e-r0-raspberrypi4-20220215145419.dtb
-rw-r--r-- 2 remy remy 49K Feb 15 18:03 bcm2711-rpi-cm4-1-5.10.31+git0+a19886b00e_89399e6e7e-r0-raspberrypi4-20220215145419.dtb
drwxr-xr-x 3 remy remy 60K Feb 16 22:57 .
-rw-r--r-- 1 remy remy 216K Feb 16 22:53 b2qt-embedded-qt6-image-raspberrypi4-20220216200033.rootfs.manifest
-rw-r--r-- 1 remy remy 346K Feb 16 22:53 b2qt-embedded-qt6-image-raspberrypi4-20220216200033.testdata.json
-rw-r--r-- 2 remy remy 7.1M Feb 15 18:03 zImage-1-5.10.31+git0+a19886b00e_89399e6e7e-r0-raspberrypi4-20220215145419.bin
-rw-r--r-- 2 remy remy 19M Feb 15 18:03 modules-1-5.10.31+git0+a19886b00e_89399e6e7e-r0-raspberrypi4-20220215145419.tgz
-rw-r--r-- 1 remy remy 374M Feb 16 22:57 b2qt-embedded-qt6-image-raspberrypi4-20220216200033.7z
-rw-r--r-- 1 remy remy 374M Feb 16 22:57 b2qt-embedded-qt6-image-raspberrypi4-20220216200033.rootfs.wic.xz
-rw-r--r-- 1 remy remy 579M Feb 16 22:53 b2qt-embedded-qt6-image-raspberrypi4-20220216200033.rootfs.tar.bz2
-rw-r--r-- 1 remy remy 596M Feb 16 22:54 b2qt-embedded-qt6-image-raspberrypi4-20220216200033.rootfs.wic.bz2
-rw-r--r-- 1 remy remy 2.0G Feb 16 22:54 b2qt-embedded-qt6-image-raspberrypi4-20220216200033.rootfs.ext3
If you run Ubuntu, you must install the `bmap-tools` package and use the
following command to flash the image to the SD card:
$ sudo bmaptool copy b2qt-embedded-qt6-image-raspberrypi4.wic.bz2 --bmap b2qt-embedded-qt6-image-raspberrypi4.wic.bmap /dev/sda
bmaptool: info: block map format version 2.0
bmaptool: info: 687923 blocks of size 4096 (2.6 GiB), mapped 374929 blocks (1.4 GiB or 54.5%)
bmaptool: info: copying image 'b2qt-embedded-qt6-image-raspberrypi4.wic.bz2' to block device '/dev/sda' using bmap file 'b2qt-embedded-qt6-image-raspberrypi4.wic.bmap'
If you don't have the `bmap` package, just extract the `*.rootfs.wic.bz2` file
and use `dd` to write it to your SD card. Takes a bit longer and lacks
validation of written data, but works just as well.
Once written to the SD card, pop it into your Raspberry Pi and boot. After a
short bootup sequence, you should be greeted with a nice Boot 2 Qt screen.
In the case of Qt 6 the IP address is printed on screen. You can SSH to that
IP with the username `root` and no password. If all went well, you should be
greeted with a shell prompt. If so, continue on with the Qt Creator
integration. In the case of Qt 5, you can run a few demo applications right
away.
### Qt Creator integration
One big advantage of `boot2qt` is the integration with the other Qt tooling,
like the IDE Qt Creator.
Qt Creator has the concept of Kits, which basically is a compiler
configuration. You can have multiple versions of Qt or GCC (or CLANG)
installed, and within a kit you tell Qt Creator which specific versions to
use. I have specific kits for Qt 5.15, both Android and desktop linux and for
Qt 6.2. I also have a cross-compiler kit installed, that allows me to compile
for the Raspberry Pi from my x86 desktop.
Yocto can build a native SDK, which has all the required compile tools for your
specific environment. `boot2qt` extends this, it also includes the entire Qt
stack in the cross compile SDK and a few helper scripts.
The steps to integrate your device into Qt Creator are:
- Build the Cross-compile SDK
- Install the cross-compile SDK
- Add the SDK as a kit to Qt Creator
- Clone that kit and set it up correctly
- Add a remote device (your Pi)
- Update the kit to deploy to the device
- Add the kit to your project
Lots of moving parts, but once you have it all setup and running,
it's a breeze. Qt creator cross-compiles your app and copies it
directly to your device, no manual tasks.
#### Building the cross-compile SDK
You must build the SDK before you can use it, it's not automatically built
when you build the boot image. Make sure you're in the `b2qt` folder and have
setup the environment:
export MACHINE=raspberrypi4 && source ./setup-environment.sh
Execute the bitbake command to build the SDK:
bitbake meta-toolchain-b2qt-embedded-qt6-sdk
The build can take a few hours, depending on your host machine's
specifications. Not as long as building the entire image, but still quite a
while. The output looks a lot like the earlier output you saw when building
the image:
remy@host:~/b2qt/build-raspberrypi4$ bitbake meta-toolchain-b2qt-embedded-qt6-sdk
WARNING: Host distribution "debian-11" has not been validated with this version of the build system; you may possibly experience unexpected failures. It is recommended that you use a tested distribution.
Loading cache: 100% |#################################################################################################| Time: 0:00:00
Loaded 4368 entries from dependency cache.
NOTE: Resolving any missing task queue dependencies
Build Configuration:
BB_VERSION = "1.50.0"
BUILD_SYS = "x86_64-linux"
NATIVELSBSTRING = "universal"
TARGET_SYS = "arm-poky-linux-gnueabi"
MACHINE = "raspberrypi4"
DISTRO = "b2qt"
DISTRO_VERSION = "3.3.4"
TUNE_FEATURES = "arm vfp cortexa7 neon vfpv4 thumb callconvention-hard"
TARGET_FPU = "hard"
SDKMACHINE = "x86_64"
meta
meta-poky = "HEAD:c40ac16d79026169639f47be76a3f7b9d8b5178e"
meta-raspberrypi = "HEAD:b4ec97e4eb8e36efd1f7e2f8ae020a9e55cfc239"
meta-oe
meta-python
meta-networking
meta-initramfs
meta-multimedia = "HEAD:f72a73b42fa740130b388ba8555cdbefdee8d37d"
meta-python2 = "HEAD:810d6d842f103eb59f18b06426106462b15de7e2"
meta-boot2qt
meta-boot2qt-distro = "HEAD:e59a2e20697e0afc2a0b068835cd90e102dec589"
meta-mingw = "HEAD:422b96cb2b6116442be1f40dfb5bd77447d1219e"
meta-qt6 = "HEAD:eb3719266fc03b96d5056980b135b371f31811f4"
meta-raymii = "master:0789f30e221712462748cf56b9afddeec3613be1"
Initialising tasks: 100% |############################################################################################| Time: 0:00:10
Sstate summary: Wanted 1340 Local 292 Network 0 Missed 1048 Current 2252 (21% match, 70% complete)
NOTE: Executing Tasks
NOTE: Tasks Summary: Attempted 10059 tasks of which 7511 didn't need to be rerun and all succeeded.
NOTE: Build completion summary:
NOTE: do_populate_sysroot: 0.0% sstate reuse(0 setscene, 146 scratch)
NOTE: do_deploy_source_date_epoch: 0.0% sstate reuse(0 setscene, 146 scratch)
NOTE: do_package_qa: 0.0% sstate reuse(0 setscene, 150 scratch)
NOTE: do_package: 0.0% sstate reuse(0 setscene, 150 scratch)
NOTE: do_packagedata: 0.0% sstate reuse(0 setscene, 150 scratch)
NOTE: do_package_write_ipk: 2.0% sstate reuse(3 setscene, 150 scratch)
NOTE: do_populate_lic: 0.0% sstate reuse(0 setscene, 154 scratch)
Once the build is finished, you have an installable shell script in the `tmp/deploy/sdk` folder:
remy@host:~/b2qt/build-raspberrypi4$ ls tmp/deploy/sdk/ -larSh
total 1.6G
-rw-r--r-- 1 remy remy 0 Feb 18 15:43 b2qt-x86_64-meta-toolchain-b2qt-embedded-qt6-sdk-raspberrypi4.host.manifest
-rw-r--r-- 1 remy remy 90K Feb 18 15:42 b2qt-x86_64-meta-toolchain-b2qt-embedded-qt6-sdk-raspberrypi4.target.manifest
-rw-r--r-- 1 remy remy 324K Feb 18 15:42 b2qt-x86_64-meta-toolchain-b2qt-embedded-qt6-sdk-raspberrypi4.testdata.json
-rwxr-xr-x 1 remy remy 1.6G Feb 18 15:58 b2qt-x86_64-meta-toolchain-b2qt-embedded-qt6-sdk-raspberrypi4.sh
You can execute the `b2qt-x86_64-meta-toolchain-b2qt-embedded-qt6-sdk-raspberrypi4.sh` file to install the
SDK on your local machine:
$ ./b2qt-x86_64-meta-toolchain-b2qt-embedded-qt6-sdk-raspberrypi4.sh
Boot to Qt for Embedded Linux SDK installer version 3.3.4
=========================================================
Enter target directory for SDK (default: /opt/b2qt/3.3.4):
You are about to install the SDK to "/opt/b2qt/3.3.4". Proceed [Y/n]? y
[sudo] password for remy:
Extracting SDK...
done
Setting it up...done
SDK has been successfully set up and is ready to be used.
Each time you wish to use the SDK in a new shell session, you need to source the environment setup script e.g.
$ . /opt/b2qt/3.3.4/environment-setup-cortexa7t2hf-neon-vfpv4-poky-linux-gnueabi
The build command for Qt 5 is:
bitbake meta-toolchain-b2qt-embedded-qt5-sdk
Output is almost identical, and once that build is done you have the installer in the same folder, `tmp/deploy/sdk`:
remy@host:~/b2qt/build-raspberrypi4$ ls -larSh tmp/deploy/sdk/
total 1.7G
-rw-r--r-- 1 remy remy 59K Feb 19 22:25 b2qt-x86_64-meta-toolchain-b2qt-embedded-qt5-sdk-raspberrypi4.host.manifest
-rw-r--r-- 1 remy remy 199K Feb 19 22:24 b2qt-x86_64-meta-toolchain-b2qt-embedded-qt5-sdk-raspberrypi4.target.manifest
-rw-r--r-- 1 remy remy 303K Feb 19 22:24 b2qt-x86_64-meta-toolchain-b2qt-embedded-qt5-sdk-raspberrypi4.testdata.json
-rwxr-xr-x 1 remy remy 1.7G Feb 19 22:47 b2qt-x86_64-meta-toolchain-b2qt-embedded-qt5-sdk-raspberrypi4.sh
This script can installed just as the Qt 6 one, no workarounds or issues there:
$ ./b2qt-x86_64-meta-toolchain-b2qt-embedded-qt5-sdk-raspberrypi4.sh
Boot to Qt for Embedded Linux SDK installer version 3.0.4
=========================================================
Enter target directory for SDK (default: /opt/b2qt/3.0.4):
You are about to install the SDK to "/opt/b2qt/3.0.4". Proceed [Y/n]? Y
[sudo] password for remy:
Extracting SDK...done
Setting it up...done
SDK has been successfully set up and is ready to be used.
Each time you wish to use the SDK in a new shell session, you need to source the environment setup script e.g.
$ . /opt/b2qt/3.0.4/environment-setup-cortexa7t2hf-neon-vfpv4-poky-linux-gnueabi
#### Adding the kit in Qt Creator
Configuring kit's in Qt creator is a tedious process, but `boot2qt` provides
a script to make this part a bit easier as well. Once you have the native
SDK installed, you can use the `configure-qtcreator.sh` script to have a
kit added. Close Qt Creator first, then execute script:
/opt/b2qt/3.3.4/configure-qtcreator.sh --config /opt/b2qt/3.3.4/environment-setup-cortexa7t2hf-neon-vfpv4-poky-linux-gnueabi --qtcreator /mnt/DATADISK/qt2021/Tools/QtCreator/ --name qt6-pi4-template
* `--config`: points to the file that the SDK installer tells you to source.
* `--qtcreator`: points to the folder QtCreator is installed in. I have it on an extra disk, my path is different
* `--name`: the name of the kit
You cannot edit this kit later on, therefore I added `-template` to the name. We can make changes, but
the kit must be cloned first.
Output:
Configured Qt Creator with new kit: qt6-pi4-template
Fire up Qt Creator, navigate to `Preferences`, then `Kits`. You should see
the new kit, click the `Clone` button:
![qt creator][13]
The most important setting to change is the `Qt Version`. Not sure
why it didn't detect it, but for me it stated `None`. Select the
correct Qt version in the drop down. If you're unsure which one to
use, switch to the `Qt Versions` tab and check which one you need.
Here's a picture of the settings I have:
![qt versions][14]
You can now configure this kit for your own project, but before
we do that, add your Pi (running the `boot2qt` image) as a remote
device to deploy to.
#### Adding a remote device
Also in settings, under `Devices`. Click the `Add` button. Add a `Generic
Linux Device` with the following settings, but replace the IP with your
board's IP:
![device][12]
The `boot2qt` image's username is `root` and there is no password. You can
deploy a public key, but that is not required. Once your device is added,
use the Test button to make sure everything works.
Go back to the Kit settings and select this device under the `Device`
drop down.
After adding the device to the kit you can configure the kit for your project.
Open up your project and click the `Project` button in the left-hand menu.
Add the new kit by clicking it, then building your project. The compile
output should show the path to the Yocto SDK instead of your regular
compiler:
15:09:01: Starting: "/opt/b2qt/3.3.4/sysroots/x86_64-pokysdk-linux/usr/bin/make" -j12
/opt/b2qt/3.3.4/sysroots/x86_64-pokysdk-linux/usr/bin/arm-poky-linux-gnueabi/arm-poky-linux-gnueabi-g++ -mthumb -mfpu=neon-vfpv4 -mfloat-abi=hard -mcpu=cortex-a7 --sysroot=/opt/b2qt/3.3.4/sysroots/cortexa7t2hf-neon-vfpv4-poky-linux-gnueabi -c -pipe -g -std=gnu++1z -Wall -Wextra -D_REENTRANT -fPIC -DQT_QML_DEBUG -DQT_QUICK_LIB -DQT_OPENGL_LIB -DQT_GUI_LIB -DQT_QMLMODELS_LIB -DQT_QML_LIB -DQT_NETWORK_LIB -DQT_CORE_LIB -I../dragdropexample -I. -I/opt/b2qt/3.3.4/sysroots/cortexa7t2hf-neon-vfpv4-poky-linux-gnueabi/usr/include/QtQuick -I/opt/b2qt/3.3.4/sysroots/cortexa7t2hf-neon-vfpv4-poky-linux-gnueabi/usr/include/QtOpenGL -I/opt/b2qt/3.3.4/sysroots/cortexa7t2hf-neon-vfpv4-poky-linux-gnueabi/usr/include/QtGui -I/opt/b2qt/3.3.4/sysroots/cortexa7t2hf-neon-vfpv4-poky-linux-gnueabi/usr/include/QtQmlModels -I/opt/b2qt/3.3.4/sysroots/cortexa7t2hf-neon-vfpv4-poky-linux-gnueabi/usr/include/QtQml -I/opt/b2qt/3.3.4/sysroots/cortexa7t2hf-neon-vfpv4-poky-linux-gnueabi/usr/include/QtNetwork -I/opt/b2qt/3.3.4/sysroots/cortexa7t2hf-neon-vfpv4-poky-linux-gnueabi/usr/include/QtCore -I. -I/opt/b2qt/3.3.4/sysroots/cortexa7t2hf-neon-vfpv4-poky-linux-gnueabi/usr/lib/mkspecs/linux-oe-g++ -o main.o ../dragdropexample/main.cpp
#### One click deploy
The Qt documentation lists one of the options under the
`Run` step of the kit as `Change Default App`, but I don't
have that option, probably because I did not install the
`qbsp` package. However, not a big problem, since we
can just tell Qt Creator the correct command by hand.
Under the `Run` settings, check the `Alternate executable on device`
and change the path to `/usr/bin/appcontroller`. Add
the full path of your app to the `Command Line Arguments` textfield,
like in the image below. The full path to your app is listed in
the same settings dialog:
![deploy][15]
Next time you deploy, it will kill any running instances of `appcontroller`
and start it with your application as command line argument,
effectively deploying your app to the device.
### Changing the default boot2qt startup application in Yocto
You can change the default app that boots up once your system is
running with the following command:
appcontroller --make-default /path/to/your/app
What that does is not much more than [make a symlink][17] to
`/usr/bin/b2qt`.
However, you might want to bake your app into the image. This is
a quick short section to make your own layer and recipe and to include
that recipe in the image by extending the Qt image. We'll do so by
making a recipe that places your binary on the filesystem and symlinks
it, as well as extending the default image.
If you do plan to ship production images via this guide, remember that
this is a development image, SSH is wide open and there is a lot left
in the image to setup correctly. Please do dive in to Yocto a bit more
for more on that.
Start by making a few folders for your layer, in the `b2qt` folder:
mkdir -p sources/meta-raymii/recipes-myapp/myapp/files/
mkdir -p sources/meta-raymii/conf/
mkdir -p sources/meta-raymii/recipes-qt/images/
Edit the following file:
sources/meta-raymii/conf/layer.conf
Place the below contents:
BBPATH .= ":${LAYERDIR}"
BBFILES += "${LAYERDIR}/recipes*/*/*.bb \
${LAYERDIR}/recipes*/*/*.bbappend \
"
BBFILE_COLLECTIONS += "raymii"
BBFILE_PATTERN_raymii := "^${LAYERDIR}/"
BBFILE_PRIORITY_raymii = "1"
LAYERSERIES_COMPAT_raymii = "thud zeus dunfell gatesgarth hardknott"
Next, edit the following file, which is your app's recipe:
sources/meta-raymii/recipes-myapp/myapp/myapp_1.0.bb
The filename format (`myapp` `underscore` `versionMajor.versionMinor`) is important.
Don't mix up the `underscore` for a `dash`. A newer version of your app could be
named `myapp_1.1.bb`, or you could up the `PR="r0"` for a minor release.
Contents:
DESCRIPTION = "My Custom Qt App"
AUTHOR = "boot2qt-guide@raymii.org"
LICENSE = "CLOSED"
PR = "r0"
SRC_URI =+ "file://myapp \
"
DEPENDS += "qtbase qtdeclarative qtdeclarative-native"
do_install() {
install -d ${D}/${bindir}
install -m 0755 ${WORKDIR}/myapp ${D}/${bindir}/myapp
lnr ${D}/${bindir}/myapp ${D}/${bindir}/b2qt
}
FILES_${PN} = "${bindir}/myapp \
${bindir}/b2qt \
"
This recipe will copy your app to the correct place with the correct permissions
and it makes a symlink (`lnr`) to `/usr/bin/b2qt`. The `DEPENDS` line makes sure the relevant
Qt pieces are installed. With `boot2qt` that's the case, but if you omit that line,
you'll get a build error because Yocto is intelligent enough to scan your program
executable.
Make sure the cross-compiled version of your program in the `files` folder:
remy@host:~/b2qt$ file sources/meta-raymii/recipes-myapp/myapp/files/myapp
sources/meta-raymii/recipes-myapp/myapp/files/myapp: ELF 32-bit LSB
pie executable, ARM, EABI5 version 1 (SYSV), dynamically linked,
interpreter /lib/ld-linux-armhf.so.3, for GNU/Linux 3.2.0, BuildID
[sha1]=f313bc93bfc28c7a8af0eb046c0270ab55378502, with debug_info, not
stripped
Add the layer to the Yocto build config:
build-raspberrypi4/conf/bblayers.conf
At the bottom, don't forget the trailing slash (`\`):
BBLAYERS ?= " \
${BSPDIR}/sources/poky/meta \
[...]
${BSPDIR}/sources/meta-qt6 \
${BSPDIR}/sources/meta-raymii \
"
The following file is a `.bbappend` file, which, if it has the same name, path
and version, will, as you might expect, append stuff to the original. In this
case, we will extend the default `b2qt-embedded-qt6-image` image to include
our `myapp` recipe in the installation. This is the same for Qt 5, just change
the filename accordingly. Edit this file
sources/meta-raymii/recipes-qt/images/b2qt-embedded-qt6-image.bbappend
Contents:
SUMMARY = "Add myapp to Qt image"
IMAGE_INSTALL_prepend := "myapp"
Once you've did all the above, rebuild the image (`bitbake b2qt-embedded-qt6-image`)
and flash it to your SD card. Once booted up, instead of the default, your own
program will now start up.
If you want to make sure you're on the correct image, you can check the file
`/etc/build` once logged in via SSH to see the layers and git commits used
to build the image:
root@b2qt-raspberrypi4:~# cat /etc/build
-----------------------
Build Configuration: |
-----------------------
DISTRO = b2qt
DISTRO_VERSION = 3.3.4
QT_VERSION = 6.2.3
-----------------------
Layer Revisions: |
-----------------------
meta = HEAD:c40ac16d79026169639f47be76a3f7b9d8b5178e -- modified
meta-poky = HEAD:c40ac16d79026169639f47be76a3f7b9d8b5178e -- modified
meta-raspberrypi = HEAD:b4ec97e4eb8e36efd1f7e2f8ae020a9e55cfc239
meta-oe = HEAD:f72a73b42fa740130b388ba8555cdbefdee8d37d
meta-python = HEAD:f72a73b42fa740130b388ba8555cdbefdee8d37d
meta-networking = HEAD:f72a73b42fa740130b388ba8555cdbefdee8d37d
meta-initramfs = HEAD:f72a73b42fa740130b388ba8555cdbefdee8d37d
meta-multimedia = HEAD:f72a73b42fa740130b388ba8555cdbefdee8d37d
meta-python2 = HEAD:810d6d842f103eb59f18b06426106462b15de7e2
meta-boot2qt = HEAD:e59a2e20697e0afc2a0b068835cd90e102dec589
meta-boot2qt-distro = HEAD:e59a2e20697e0afc2a0b068835cd90e102dec589
meta-mingw = HEAD:422b96cb2b6116442be1f40dfb5bd77447d1219e
meta-qt6 = HEAD:eb3719266fc03b96d5056980b135b371f31811f4
meta-raymii = master:0789f30e221712462748cf56b9afddeec3613be1 -- modified
The `image-buildinfo` class writes information to the target filesystem and the Qt image
has this class enabled by default. The image inherits `meta-boot2qt/classes/deploy-buildinfo.bbclass`
which inherits `image-buildinfo` and extends it with some Qt version information.
### Qt 5.15.2 issues
A few issues popped up when building boot2qt for 5.15.2. Upstream git repositories changes
their [branch name][4], so for the fonts I had to update a few recipes related to fonts:
- `b2qt/sources/meta-boot2qt/meta-boot2qt/recipes-graphics/fonts/otf-noto_git.bb`
- `b2qt/sources/meta-boot2qt/meta-boot2qt/recipes-graphics/fonts/ttf-opensans_git.bb`
Change the following:
SRC_URI = "git://github.com/googlei18n/noto-cjk.git"
Add `;branch=main` to the end:
SRC_URI = "git://github.com/googlei18n/noto-cjk.git;branch=main"
Rinse and repeat for any other font recipes that complain.
---
My Raspberry Pi 4b 8 GB failed to boot with this image, the
bootloader complaining with the following error:
start4x.elf is not compatible
This board requires newer software
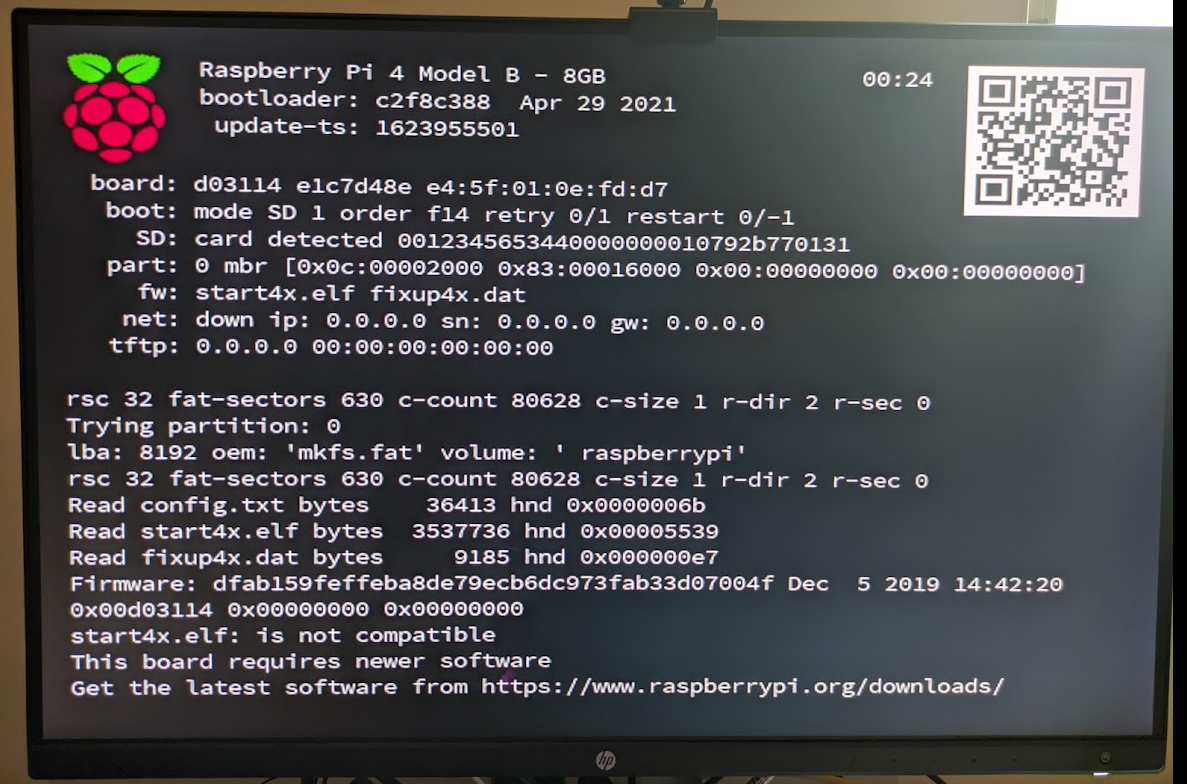 I'm not sure if this is specific to the 8 GB version, I only have one
Raspberry Pi 4, so I can't test it on a 4 GB model. Try flashing the image
first, and only update the following recipes if you experience the same issue.
There are two recipes you need to update to get a newer firmware file. In the
earlier yocto layer example to change the default app I used overrides, but
in this case I'm brute-forcing my way to a fix, my overriding other recipes.
Not the prettiest way, but it works.
Update the following file:
b2qt/sources/meta-raspberrypi/recipes-bsp/common/raspberrypi-firmware.inc
Remove all existing content and paste in the following:
RPIFW_DATE ?= "20210421"
SRCREV ?= "2ac4de4eaac5c1d1b25acec4a5e0a9fdb16f0c91"
RPIFW_SRC_URI ?= "https://github.com/raspberrypi/firmware/archive/${SRCREV}.tar.gz;downloadfilename=raspberrypi-firmware-${SRCREV}.tar.gz"
RPIFW_S ?= "${WORKDIR}/firmware-${SRCREV}"
SRC_URI = "${RPIFW_SRC_URI}"
SRC_URI[sha256sum] = "c687aa1b5127a8dc0773e8aefb1f009f24bf71ccb4c9e8b40a1d46cbbb7bee0c"
PV = "${RPIFW_DATE}"
Update the following file:
b2qt/sources/meta-raspberrypi/recipes-kernel/linux-firmware-rpidistro/linux-firmware-rpidistro_git.bb
Remove all existing content and paste in the following:
SUMMARY = "Linux kernel firmware files from Raspbian distribution"
DESCRIPTION = "Updated firmware files for RaspberryPi hardware. \
RPi-Distro obtains these directly from Cypress; they are not submitted \
to linux-firmware for general use."
HOMEPAGE = "https://github.com/RPi-Distro/firmware-nonfree"
SECTION = "kernel"
# In maintained upstream linux-firmware:
# * brcmfmac43430-sdio falls under LICENSE.cypress
# * brcmfmac43455-sdio falls under LICENSE.broadcom_bcm43xx
# * brcmfmac43456-sdio falls under LICENSE.broadcom_bcm43xx
#
# It is likely[^1] that both of these should be under LICENSE.cypress.
# Further, at this time the text of LICENSE.broadcom_bcm43xx is the same
# in linux-firmware and RPi-Distro/firmware-nonfree, but this may
# change.
#
# Rather than make assumptions about what's supposed to be what, we'll
# use the license implied by the source of these files, named to avoid
# conflicts with linux-firmware.
#
# [^1]: https://github.com/RPi-Distro/bluez-firmware/issues/1
LICENSE = "\
Firmware-broadcom_bcm43xx-rpidistro \
"
LIC_FILES_CHKSUM = "\
file://debian/config/brcm80211/LICENSE;md5=8cba1397cda6386db37210439a0da3eb \
"
# These are not common licenses, set NO_GENERIC_LICENSE for them
# so that the license files will be copied from fetched source
NO_GENERIC_LICENSE[Firmware-broadcom_bcm43xx-rpidistro] = "debian/config/brcm80211/LICENSE"
SRC_URI = "git://github.com/RPi-Distro/firmware-nonfree;branch=bullseye;protocol=https"
SRCREV = "b3eec612566ca08913f0830d299f4df70297428f"
PV = "20210315-3+rpt4"
S = "${WORKDIR}/git"
inherit allarch
CLEANBROKEN = "1"
do_compile() {
:
}
do_install() {
install -d ${D}${nonarch_base_libdir}/firmware/brcm ${D}${nonarch_base_libdir}/firmware/cypress
cp debian/config/brcm80211/LICENSE ${D}${nonarch_base_libdir}/firmware/LICENSE.broadcom_bcm43xx-rpidistro
# Replace outdated linux-firmware files with updated ones from
# raspbian firmware-nonfree. Raspbian adds blobs and nvram
# definitions that are also necessary so copy those too.
for fw in brcmfmac43430-sdio brcmfmac43436-sdio brcmfmac43436s-sdio brcmfmac43455-sdio brcmfmac43456-sdio ; do
cp -R --no-dereference --preserve=mode,links -v debian/config/brcm80211/brcm/${fw}.* ${D}${nonarch_base_libdir}/firmware/brcm/
done
cp -R --no-dereference --preserve=mode,links -v debian/config/brcm80211/cypress/* ${D}${nonarch_base_libdir}/firmware/cypress/
# add compat links. Fixes errors like
# brcmfmac mmc1:0001:1: Direct firmware load for brcm/brcmfmac43455-sdio.raspberrypi,4-model-compute-module.txt failed with error -2
ln -s brcmfmac43455-sdio.txt ${D}${nonarch_base_libdir}/firmware/brcm/brcmfmac43455-sdio.raspberrypi,4-compute-module.txt
}
PACKAGES = "\
${PN}-broadcom-license \
${PN}-bcm43430 \
${PN}-bcm43455 \
${PN}-bcm43456 \
${PN}-bcm43436 \
${PN}-bcm43436s \
"
LICENSE_${PN}-bcm43430 = "Firmware-broadcom_bcm43xx-rpidistro"
LICENSE_${PN}-bcm43436 = "Firmware-broadcom_bcm43xx-rpidistro"
LICENSE_${PN}-bcm43436s = "Firmware-broadcom_bcm43xx-rpidistro"
LICENSE_${PN}-bcm43455 = "Firmware-broadcom_bcm43xx-rpidistro"
LICENSE_${PN}-bcm43456 = "Firmware-broadcom_bcm43xx-rpidistro"
LICENSE_${PN}-broadcom-license = "Firmware-broadcom_bcm43xx-rpidistro"
FILES_${PN}-broadcom-license = "${nonarch_base_libdir}/firmware/LICENSE.broadcom_bcm43xx-rpidistro"
FILES_${PN}-bcm43430 = "${nonarch_base_libdir}/firmware/brcm/brcmfmac43430* ${nonarch_base_libdir}/firmware/cypress/cyfmac43430-sdio.bin"
FILES_${PN}-bcm43436 = "${nonarch_base_libdir}/firmware/brcm/brcmfmac43436-*"
FILES_${PN}-bcm43436s = "${nonarch_base_libdir}/firmware/brcm/brcmfmac43436s*"
FILES_${PN}-bcm43455 = "${nonarch_base_libdir}/firmware/brcm/brcmfmac43455* ${nonarch_base_libdir}/firmware/cypress/cyfmac43455-sdio.*"
FILES_${PN}-bcm43456 = "${nonarch_base_libdir}/firmware/brcm/brcmfmac43456*"
RDEPENDS_${PN}-bcm43430 += "${PN}-broadcom-license"
RDEPENDS_${PN}-bcm43436 += "${PN}-broadcom-license"
RDEPENDS_${PN}-bcm43436s += "${PN}-broadcom-license"
RDEPENDS_${PN}-bcm43455 += "${PN}-broadcom-license"
RDEPENDS_${PN}-bcm43456 += "${PN}-broadcom-license"
RCONFLICTS_${PN}-bcm43430 = "\
linux-firmware-bcm43430 \
linux-firmware-raspbian-bcm43430 \
"
RREPLACES_${PN}-bcm43430 = "\
linux-firmware-bcm43430 \
linux-firmware-raspbian-bcm43430 \
"
RCONFLICTS_${PN}-bcm43436 = "\
linux-firmware-bcm43436 \
linux-firmware-raspbian-bcm43436 \
"
RREPLACES_${PN}-bcm43436 = "\
linux-firmware-bcm43436 \
linux-firmware-raspbian-bcm43436 \
"
RCONFLICTS_${PN}-bcm43436s = "\
linux-firmware-bcm43436s \
linux-firmware-raspbian-bcm43436s \
"
RREPLACES_${PN}-bcm43436s = "\
linux-firmware-bcm43436s \
linux-firmware-raspbian-bcm43436s \
"
RCONFLICTS_${PN}-bcm43455 = "\
linux-firmware-bcm43455 \
linux-firmware-raspbian-bcm43455 \
"
RREPLACES_${PN}-bcm43455 = "\
linux-firmware-bcm43455 \
linux-firmware-raspbian-bcm43455 \
"
RCONFLICTS_${PN}-bcm43456 = "\
linux-firmware-bcm43456 \
linux-firmware-raspbian-bcm43456 \
"
RREPLACES_${PN}-bcm43456 = "\
linux-firmware-bcm43456 \
linux-firmware-raspbian-bcm43456 \
"
# Firmware files are generally not run on the CPU, so they can be
# allarch despite being architecture specific
INSANE_SKIP = "arch"
Both recipes come from the latest master branch of the `meta-raspberry` layer,
but the last file has the colons (`:`) replaces with underscores (`_`), due
to the older yocto version not supporting colons (`:`).
As stated in the introduction, if you pay for the commercial LTS version of Qt
5.15 these issues are resolved. At work we have that license, but
I **explicitly have not looked at the commercial boot2qt 5.15 source code**,
just applied my general troubleshooting knowledge to fix these errors. The
fonts fix is public on the[qt site][5] and the `start4x.elf` issue is from
the `meta-raspberry` layer, not a boot2qt layer. That issue could also be
because I was experimenting with bootloader that supports [network booting]
[6] as well.
[1]: https://web.archive.org/web/20220219190502/https://doc.qt.io/QtForDeviceCreation-5.15/qtee-custom-embedded-linux-image.html
[2]: https://web.archive.org/web/20220219191035/https://doc.qt.io/QtForDeviceCreation/qtdc-supported-platforms.html
[3]: https://web.archive.org/web/20220219191821/https://gerrit.googlesource.com/git-repo/
[4]: https://web.archive.org/web/20220219194958/https://bugreports.qt.io/browse/QTBUG-91791
[5]: https://codereview.qt-project.org/c/yocto/meta-boot2qt/+/338895/2/meta-boot2qt/recipes-graphics/fonts/otf-noto_git.bb#41
[6]: https://web.archive.org/web/20220219200056/https://www.jeffgeerling.com/blog/2022/testing-raspberry-pis-new-network-install-feature
[7]: https://en.wikipedia.org/wiki/It's_Over_9000!
[11]: https://www.youtube.com/watch?v=iBNKr3kKxhU
[12]: /s/inc/img/boot2qt-4.png
[13]: /s/inc/img/boot2qt-5.png
[14]: /s/inc/img/boot2qt-6.png
[15]: /s/inc/img/boot2qt-7.png
[16]: https://www.yoctoproject.org/docs/current/mega-manual/mega-manual.html#using-bbappend-files
[17]: https://web.archive.org/web/20220221152205/https://code.qt.io/cgit/qt-apps/boot2qt-appcontroller.git/tree/main.cpp#n303
[18]: /s/blog/Using_IceWM_and_sharing_my_config_and_tips_tricks.html
[19]: /s/tutorials/Qml_Drag_and_Drop_example_including_reordering_the_Cpp_Model.html
---
License:
All the text on this website is free as in freedom unless stated otherwise.
This means you can use it in any way you want, you can copy it, change it
the way you like and republish it, as long as you release the (modified)
content under the same license to give others the same freedoms you've got
and place my name and a link to this site with the article as source.
This site uses Google Analytics for statistics and Google Adwords for
advertisements. You are tracked and Google knows everything about you.
Use an adblocker like ublock-origin if you don't want it.
All the code on this website is licensed under the GNU GPL v3 license
unless already licensed under a license which does not allows this form
of licensing or if another license is stated on that page / in that software:
This program is free software: you can redistribute it and/or modify
it under the terms of the GNU General Public License as published by
the Free Software Foundation, either version 3 of the License, or
(at your option) any later version.
This program is distributed in the hope that it will be useful,
but WITHOUT ANY WARRANTY; without even the implied warranty of
MERCHANTABILITY or FITNESS FOR A PARTICULAR PURPOSE. See the
GNU General Public License for more details.
You should have received a copy of the GNU General Public License
along with this program. If not, see .
Just to be clear, the information on this website is for meant for educational
purposes and you use it at your own risk. I do not take responsibility if you
screw something up. Use common sense, do not 'rm -rf /' as root for example.
If you have any questions then do not hesitate to contact me.
See https://raymii.org/s/static/About.html for details.
I'm not sure if this is specific to the 8 GB version, I only have one
Raspberry Pi 4, so I can't test it on a 4 GB model. Try flashing the image
first, and only update the following recipes if you experience the same issue.
There are two recipes you need to update to get a newer firmware file. In the
earlier yocto layer example to change the default app I used overrides, but
in this case I'm brute-forcing my way to a fix, my overriding other recipes.
Not the prettiest way, but it works.
Update the following file:
b2qt/sources/meta-raspberrypi/recipes-bsp/common/raspberrypi-firmware.inc
Remove all existing content and paste in the following:
RPIFW_DATE ?= "20210421"
SRCREV ?= "2ac4de4eaac5c1d1b25acec4a5e0a9fdb16f0c91"
RPIFW_SRC_URI ?= "https://github.com/raspberrypi/firmware/archive/${SRCREV}.tar.gz;downloadfilename=raspberrypi-firmware-${SRCREV}.tar.gz"
RPIFW_S ?= "${WORKDIR}/firmware-${SRCREV}"
SRC_URI = "${RPIFW_SRC_URI}"
SRC_URI[sha256sum] = "c687aa1b5127a8dc0773e8aefb1f009f24bf71ccb4c9e8b40a1d46cbbb7bee0c"
PV = "${RPIFW_DATE}"
Update the following file:
b2qt/sources/meta-raspberrypi/recipes-kernel/linux-firmware-rpidistro/linux-firmware-rpidistro_git.bb
Remove all existing content and paste in the following:
SUMMARY = "Linux kernel firmware files from Raspbian distribution"
DESCRIPTION = "Updated firmware files for RaspberryPi hardware. \
RPi-Distro obtains these directly from Cypress; they are not submitted \
to linux-firmware for general use."
HOMEPAGE = "https://github.com/RPi-Distro/firmware-nonfree"
SECTION = "kernel"
# In maintained upstream linux-firmware:
# * brcmfmac43430-sdio falls under LICENSE.cypress
# * brcmfmac43455-sdio falls under LICENSE.broadcom_bcm43xx
# * brcmfmac43456-sdio falls under LICENSE.broadcom_bcm43xx
#
# It is likely[^1] that both of these should be under LICENSE.cypress.
# Further, at this time the text of LICENSE.broadcom_bcm43xx is the same
# in linux-firmware and RPi-Distro/firmware-nonfree, but this may
# change.
#
# Rather than make assumptions about what's supposed to be what, we'll
# use the license implied by the source of these files, named to avoid
# conflicts with linux-firmware.
#
# [^1]: https://github.com/RPi-Distro/bluez-firmware/issues/1
LICENSE = "\
Firmware-broadcom_bcm43xx-rpidistro \
"
LIC_FILES_CHKSUM = "\
file://debian/config/brcm80211/LICENSE;md5=8cba1397cda6386db37210439a0da3eb \
"
# These are not common licenses, set NO_GENERIC_LICENSE for them
# so that the license files will be copied from fetched source
NO_GENERIC_LICENSE[Firmware-broadcom_bcm43xx-rpidistro] = "debian/config/brcm80211/LICENSE"
SRC_URI = "git://github.com/RPi-Distro/firmware-nonfree;branch=bullseye;protocol=https"
SRCREV = "b3eec612566ca08913f0830d299f4df70297428f"
PV = "20210315-3+rpt4"
S = "${WORKDIR}/git"
inherit allarch
CLEANBROKEN = "1"
do_compile() {
:
}
do_install() {
install -d ${D}${nonarch_base_libdir}/firmware/brcm ${D}${nonarch_base_libdir}/firmware/cypress
cp debian/config/brcm80211/LICENSE ${D}${nonarch_base_libdir}/firmware/LICENSE.broadcom_bcm43xx-rpidistro
# Replace outdated linux-firmware files with updated ones from
# raspbian firmware-nonfree. Raspbian adds blobs and nvram
# definitions that are also necessary so copy those too.
for fw in brcmfmac43430-sdio brcmfmac43436-sdio brcmfmac43436s-sdio brcmfmac43455-sdio brcmfmac43456-sdio ; do
cp -R --no-dereference --preserve=mode,links -v debian/config/brcm80211/brcm/${fw}.* ${D}${nonarch_base_libdir}/firmware/brcm/
done
cp -R --no-dereference --preserve=mode,links -v debian/config/brcm80211/cypress/* ${D}${nonarch_base_libdir}/firmware/cypress/
# add compat links. Fixes errors like
# brcmfmac mmc1:0001:1: Direct firmware load for brcm/brcmfmac43455-sdio.raspberrypi,4-model-compute-module.txt failed with error -2
ln -s brcmfmac43455-sdio.txt ${D}${nonarch_base_libdir}/firmware/brcm/brcmfmac43455-sdio.raspberrypi,4-compute-module.txt
}
PACKAGES = "\
${PN}-broadcom-license \
${PN}-bcm43430 \
${PN}-bcm43455 \
${PN}-bcm43456 \
${PN}-bcm43436 \
${PN}-bcm43436s \
"
LICENSE_${PN}-bcm43430 = "Firmware-broadcom_bcm43xx-rpidistro"
LICENSE_${PN}-bcm43436 = "Firmware-broadcom_bcm43xx-rpidistro"
LICENSE_${PN}-bcm43436s = "Firmware-broadcom_bcm43xx-rpidistro"
LICENSE_${PN}-bcm43455 = "Firmware-broadcom_bcm43xx-rpidistro"
LICENSE_${PN}-bcm43456 = "Firmware-broadcom_bcm43xx-rpidistro"
LICENSE_${PN}-broadcom-license = "Firmware-broadcom_bcm43xx-rpidistro"
FILES_${PN}-broadcom-license = "${nonarch_base_libdir}/firmware/LICENSE.broadcom_bcm43xx-rpidistro"
FILES_${PN}-bcm43430 = "${nonarch_base_libdir}/firmware/brcm/brcmfmac43430* ${nonarch_base_libdir}/firmware/cypress/cyfmac43430-sdio.bin"
FILES_${PN}-bcm43436 = "${nonarch_base_libdir}/firmware/brcm/brcmfmac43436-*"
FILES_${PN}-bcm43436s = "${nonarch_base_libdir}/firmware/brcm/brcmfmac43436s*"
FILES_${PN}-bcm43455 = "${nonarch_base_libdir}/firmware/brcm/brcmfmac43455* ${nonarch_base_libdir}/firmware/cypress/cyfmac43455-sdio.*"
FILES_${PN}-bcm43456 = "${nonarch_base_libdir}/firmware/brcm/brcmfmac43456*"
RDEPENDS_${PN}-bcm43430 += "${PN}-broadcom-license"
RDEPENDS_${PN}-bcm43436 += "${PN}-broadcom-license"
RDEPENDS_${PN}-bcm43436s += "${PN}-broadcom-license"
RDEPENDS_${PN}-bcm43455 += "${PN}-broadcom-license"
RDEPENDS_${PN}-bcm43456 += "${PN}-broadcom-license"
RCONFLICTS_${PN}-bcm43430 = "\
linux-firmware-bcm43430 \
linux-firmware-raspbian-bcm43430 \
"
RREPLACES_${PN}-bcm43430 = "\
linux-firmware-bcm43430 \
linux-firmware-raspbian-bcm43430 \
"
RCONFLICTS_${PN}-bcm43436 = "\
linux-firmware-bcm43436 \
linux-firmware-raspbian-bcm43436 \
"
RREPLACES_${PN}-bcm43436 = "\
linux-firmware-bcm43436 \
linux-firmware-raspbian-bcm43436 \
"
RCONFLICTS_${PN}-bcm43436s = "\
linux-firmware-bcm43436s \
linux-firmware-raspbian-bcm43436s \
"
RREPLACES_${PN}-bcm43436s = "\
linux-firmware-bcm43436s \
linux-firmware-raspbian-bcm43436s \
"
RCONFLICTS_${PN}-bcm43455 = "\
linux-firmware-bcm43455 \
linux-firmware-raspbian-bcm43455 \
"
RREPLACES_${PN}-bcm43455 = "\
linux-firmware-bcm43455 \
linux-firmware-raspbian-bcm43455 \
"
RCONFLICTS_${PN}-bcm43456 = "\
linux-firmware-bcm43456 \
linux-firmware-raspbian-bcm43456 \
"
RREPLACES_${PN}-bcm43456 = "\
linux-firmware-bcm43456 \
linux-firmware-raspbian-bcm43456 \
"
# Firmware files are generally not run on the CPU, so they can be
# allarch despite being architecture specific
INSANE_SKIP = "arch"
Both recipes come from the latest master branch of the `meta-raspberry` layer,
but the last file has the colons (`:`) replaces with underscores (`_`), due
to the older yocto version not supporting colons (`:`).
As stated in the introduction, if you pay for the commercial LTS version of Qt
5.15 these issues are resolved. At work we have that license, but
I **explicitly have not looked at the commercial boot2qt 5.15 source code**,
just applied my general troubleshooting knowledge to fix these errors. The
fonts fix is public on the[qt site][5] and the `start4x.elf` issue is from
the `meta-raspberry` layer, not a boot2qt layer. That issue could also be
because I was experimenting with bootloader that supports [network booting]
[6] as well.
[1]: https://web.archive.org/web/20220219190502/https://doc.qt.io/QtForDeviceCreation-5.15/qtee-custom-embedded-linux-image.html
[2]: https://web.archive.org/web/20220219191035/https://doc.qt.io/QtForDeviceCreation/qtdc-supported-platforms.html
[3]: https://web.archive.org/web/20220219191821/https://gerrit.googlesource.com/git-repo/
[4]: https://web.archive.org/web/20220219194958/https://bugreports.qt.io/browse/QTBUG-91791
[5]: https://codereview.qt-project.org/c/yocto/meta-boot2qt/+/338895/2/meta-boot2qt/recipes-graphics/fonts/otf-noto_git.bb#41
[6]: https://web.archive.org/web/20220219200056/https://www.jeffgeerling.com/blog/2022/testing-raspberry-pis-new-network-install-feature
[7]: https://en.wikipedia.org/wiki/It's_Over_9000!
[11]: https://www.youtube.com/watch?v=iBNKr3kKxhU
[12]: /s/inc/img/boot2qt-4.png
[13]: /s/inc/img/boot2qt-5.png
[14]: /s/inc/img/boot2qt-6.png
[15]: /s/inc/img/boot2qt-7.png
[16]: https://www.yoctoproject.org/docs/current/mega-manual/mega-manual.html#using-bbappend-files
[17]: https://web.archive.org/web/20220221152205/https://code.qt.io/cgit/qt-apps/boot2qt-appcontroller.git/tree/main.cpp#n303
[18]: /s/blog/Using_IceWM_and_sharing_my_config_and_tips_tricks.html
[19]: /s/tutorials/Qml_Drag_and_Drop_example_including_reordering_the_Cpp_Model.html
---
License:
All the text on this website is free as in freedom unless stated otherwise.
This means you can use it in any way you want, you can copy it, change it
the way you like and republish it, as long as you release the (modified)
content under the same license to give others the same freedoms you've got
and place my name and a link to this site with the article as source.
This site uses Google Analytics for statistics and Google Adwords for
advertisements. You are tracked and Google knows everything about you.
Use an adblocker like ublock-origin if you don't want it.
All the code on this website is licensed under the GNU GPL v3 license
unless already licensed under a license which does not allows this form
of licensing or if another license is stated on that page / in that software:
This program is free software: you can redistribute it and/or modify
it under the terms of the GNU General Public License as published by
the Free Software Foundation, either version 3 of the License, or
(at your option) any later version.
This program is distributed in the hope that it will be useful,
but WITHOUT ANY WARRANTY; without even the implied warranty of
MERCHANTABILITY or FITNESS FOR A PARTICULAR PURPOSE. See the
GNU General Public License for more details.
You should have received a copy of the GNU General Public License
along with this program. If not, see .
Just to be clear, the information on this website is for meant for educational
purposes and you use it at your own risk. I do not take responsibility if you
screw something up. Use common sense, do not 'rm -rf /' as root for example.
If you have any questions then do not hesitate to contact me.
See https://raymii.org/s/static/About.html for details.