This is a text-only version of the following page on https://raymii.org:
---
Title : Self-signed Root CA in Kubernetes with k3s, cert-manager and traefik. Bonus howto on regular certificates
Author : Remy van Elst
Date : 17-07-2024 04:22
URL : https://raymii.org/s/tutorials/Self_signed_Root_CA_in_Kubernetes_with_k3s_cert-manager_and_traefik.html
Format : Markdown/HTML
---
Now that I'm learning Kubernetes for a few weeks, I'm finally at the point where I was 20 years ago with regular boring old tech, being able to [host multiple domains](/s/tutorials/Kubernetes_k3s_Ingress_for_different_domains_like_virtual_hosts.html), [password protection](/s/tutorials/Password_protect_web_services_in_Kubernetes_k3s_traefik_with_basic_auth.html) and [high available clusters](/s/tutorials/High_Available_k3s_kubernetes_cluster_with_keepalived_galera_and_longhorn.html). It seems we have to re-invent the wheel every time but in the end, it's just resume-driven development, the underlying stack costs more, is way more complex but for the user, nothing changes, they see the same website as always. [Not all change is progress](https://luddites.latenightlinux.com/). Enough of being a curmudgeon, time to continue with Kubernetes. In this episode of 'Remy discovers Kubernetes', I'm setting up `cert-manager`, **not with Lets Encrypt**, but with a self-signed certificate authority. I'll also show you how to set up a regular certificate, one you've for example bought somewhere. I'll also cover `nameConstraints` to make the risk of compromise of your trusted root ca lower.
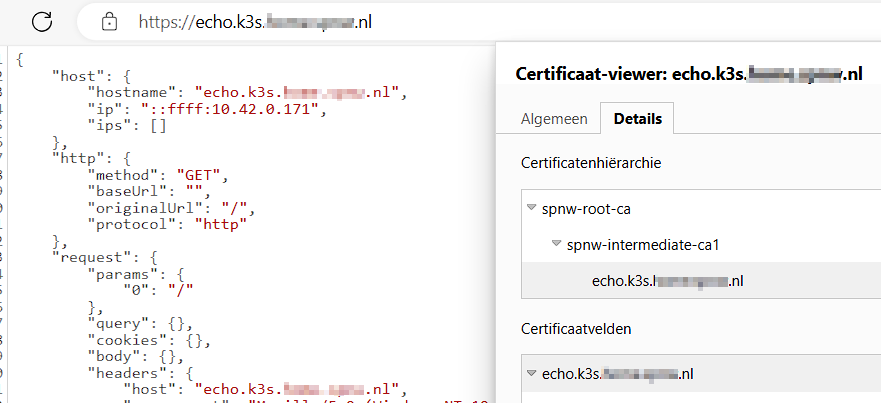
Here's what we'll end up with, a trusted local Root CA, Intermediate CA and
Leaf Certificate for a web service:
I'm using Kubernetes / k3s version `v1.30.2+k3s1`.
### But why not Let's Encrypt?
Not that I'm not a huge fan of Let's Encrypt, [8 years ago I wrote a guide on
using it with DirectAdmin](/s/articles/Lets_Encrypt_Directadmin.html), but
[my Kubernetes cluster](/s/tutorials/My_First_Kubernetes_k3s_cluster_on_3_Orange_Pi_Zero_3s_including_k8s_dashboard_hello-node_and_failover.html)
is local only, not reachable from the internet.
That means I cannot use the `HTTP-01` [challenge](https://web.archive.org/web/20240715160300/https://letsencrypt.org/docs/challenge-types/)
and my domain provider has no plugin for the `DNS-01` challenge. So no
automated certificates for me, since I'm not exposing this setup to the
internet.
Kubernetes [cert-manager](https://web.archive.org/web/20240703163618/https://cert-manager.io/) is a
native application that automates the management and issuance of TLS
certificates within Kubernetes clusters. It provides a set of custom
resources to issue certificates, attach them to services, and simplifies the
process of obtaining, renewing, and using those certificates.
In my case, it is possible to use [your own CA](https://web.archive.org/web/20240715160644/https://cert-manager.io/docs/configuration/ca/)
and get the benefit of automated issuance, secret management and renewal.
I can simply trust the self signed root certificate and all certificates
issued by that CA will be trusted in my browser.
You can also buy a certificate, for example, an extended validation (EV) cert
and set that up. I'll cover that later on in this guide as well.
### Installing cert-manager
I'm using `Helm` to install `cert-manager`. In [my first article](/s/tutorials/My_First_Kubernetes_k3s_cluster_on_3_Orange_Pi_Zero_3s_including_k8s_dashboard_hello-node_and_failover.html)
I covered the admin workstation setup so I assume you have `kubectl` set up.
I'll also assume you have a [domain name for your cluster](/s/tutorials/Kubernetes_k3s_Ingress_for_different_domains_like_virtual_hosts.html)
to use in the certificate. I'm continuing with the `echoapp` from[that guide](/s/tutorials/Kubernetes_k3s_Ingress_for_different_domains_like_virtual_hosts.html).
Use the following commands to add the Helm repo:
helm repo add jetstack https://charts.jetstack.io
helm repo update
Install `cert-manager` with Helm:
helm install \
cert-manager jetstack/cert-manager \
--namespace cert-manager \
--create-namespace \
--version v1.15.1 \
--set crds.enabled=true \
--set webhook.timeoutSeconds=4 \
--set replicaCount=2 \
--set podDisruptionBudget.enabled=true \
--set podDisruptionBudget.minAvailable=1
Output:
cert-manager v1.15.1 has been deployed successfully!
In order to begin issuing certificates, you will need to set up a ClusterIssuer
or Issuer resource (for example, by creating a 'letsencrypt-staging' issuer).
More information on the different types of issuers and how to configure them
can be found in our documentation:
https://cert-manager.io/docs/configuration/
For information on how to configure cert-manager to automatically provision
Certificates for Ingress resources, take a look at the `ingress-shim`
documentation:
https://cert-manager.io/docs/usage/ingress/
Create a folder for your yaml files:
mkdir certmanager
cd certmanager
### A warning on security and `nameConstraints`
You are at risk if the Root CA key is compromised. If the key is stolen, it can be
used to create trusted certificates for everything. Luckily there is something
we can do, using `nameConstraints` to limit the scope of the Root Certificate to,
in our case, a single domain (`k3s.homelab.mydomain.org`). This means that if
your key would be compromised, it would only be able to issue certificates for
anything under that domain, not your bank for example.
[RFC 5280](https://tools.ietf.org/html/rfc5280) provides for something called
`Name Constraints`, which allow an X.509 CA to have a scope limited to
certain names, including the parent domains of the certificates issued by the
CA. For example, a host constraint of `.example.com` allows the CA to issue
certificates for anything under `.example.com`, but not any other host. For
other hosts, clients will fail to validate the chain. [More info here]
(https://web.archive.org/web/20240415204151/http://www.pkiglobe.org/name_constraints.html).
**See [my guide on nameConstraints](/s/tutorials/nameConstraints_on_your_Self_Signed_Root_CA_in_Kubernetes_with_cert_manager.html)
to set that up along with this guide.**
### Create the self signed root CA
The topmost certificate in our certificate chain will be a self signed
certificate authority, the so called `Root CA`. The Root CA signs one or
more intermediate CA's, which in turn sign leaf certificates. For example,
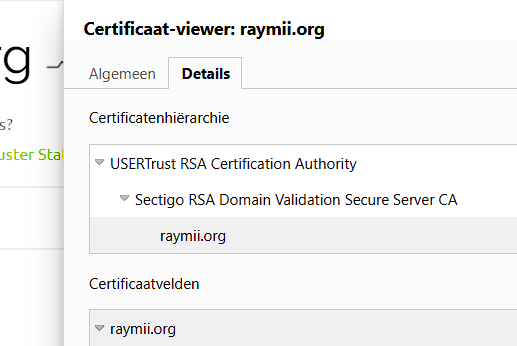
for `raymii.org`, the Root CA is `USERTrust RSA Certification Authority`. The
intermediate CA is `Sectigo RSA Domain Validation Secure Server CA` and the
leaf certificate is for this site, `raymii.org`:
For an actual trusted root CA, the root certificate would be offline in a [HSM
(hardware security module)](https://raymii.org/s/articles/Get_Started_With_The_Nitrokey_HSM.html)
and is only used to sign intermediate CA's once in a while.
For our setup, this `Root CA` certificate is the only certificate you have to
import in your OS / browser to make all issued certificates trusted.
Create a file to describe this resource:
vim spnw-root-ca.yaml
Contents:
apiVersion: cert-manager.io/v1
kind: ClusterIssuer
metadata:
name: spnw-root-ca-issuer-selfsigned
spec:
selfSigned: {}
---
apiVersion: cert-manager.io/v1
kind: Certificate
metadata:
name: spnw-root-ca
namespace: cert-manager
spec:
isCA: true
commonName: spnw-root-ca
secretName: spnw-root-ca-secret
duration: 87600h # 10y
renewBefore: 78840h # 9y
privateKey:
algorithm: ECDSA
size: 256
issuerRef:
name: spnw-root-ca-issuer-selfsigned
kind: ClusterIssuer
group: cert-manager.io
---
apiVersion: cert-manager.io/v1
kind: ClusterIssuer
metadata:
name: spnw-root-ca-issuer
spec:
ca:
secretName: spnw-root-ca-secret
Things to note are the `isCA` attribute, the `duration` and the `renewBefore`.
For a Root CA you want those to be long.
Apply it:
kubectl -n cert-manager apply -f spnw-root-ca.yaml
Output:
clusterissuer.cert-manager.io/spnw-root-ca-issuer-selfsigned created
certificate.cert-manager.io/spnw-root-ca created
clusterissuer.cert-manager.io/spnw-root-ca-issuer created
Check if creation worked and view info about the root certificate:
kubectl describe ClusterIssuer -n cert-manager
Output:
Name: spnw-root-ca-issuer
Namespace:
Labels:
Annotations:
API Version: cert-manager.io/v1
Kind: ClusterIssuer
Metadata:
Creation Timestamp: 2024-07-16T03:56:25Z
Generation: 1
Resource Version: 2329384
UID: 70[...]59
Spec:
Ca:
Secret Name: spnw-root-ca-secret
Status:
Conditions:
Last Transition Time: 2024-07-16T03:56:25Z
Message: Signing CA verified
Observed Generation: 1
Reason: KeyPairVerified
Status: True
Type: Ready
Events:
Type Reason Age From Message
---- ------ ---- ---- -------
Normal KeyPairVerified 37s (x2 over 37s) cert-manager-clusterissuers Signing CA verified
Name: spnw-root-ca-issuer-selfsigned
Namespace:
Labels:
Annotations:
API Version: cert-manager.io/v1
Kind: ClusterIssuer
Metadata:
Creation Timestamp: 2024-07-16T03:56:25Z
Generation: 1
Resource Version: 2329379
UID: 9e[...]e
Spec:
Self Signed:
Status:
Conditions:
Last Transition Time: 2024-07-16T03:56:25Z
Observed Generation: 1
Reason: IsReady
Status: True
Type: Ready
Events:
You can query the `Secret` to fetch the `Certificate` which in turn can be
fed into `openssl` to see the attributes:
kubectl get secret spnw-root-ca-secret -n cert-manager -o jsonpath='
{.data.tls\.crt}' | base64 --decode | openssl x509 -noout -text
The secret has multiple filenames, `tls.crt` contains the certificate,
`tls.key` contains the private key.
Output:
Certificate:
Data:
Version: 3 (0x2)
Serial Number:
86:9[...]d:e8
Signature Algorithm: ecdsa-with-SHA256
Issuer: CN = spnw-root-ca
Validity
Not Before: Jul 16 04:04:23 2024 GMT
Not After : Jul 14 04:04:23 2034 GMT
Subject: CN = spnw-root-ca
Subject Public Key Info:
Public Key Algorithm: id-ecPublicKey
Public-Key: (256 bit)
pub:
04:8[...]f5
ASN1 OID: prime256v1
NIST CURVE: P-256
X509v3 extensions:
X509v3 Key Usage: critical
Digital Signature, Key Encipherment, Certificate Sign
X509v3 Basic Constraints: critical
CA:TRUE
X509v3 Subject Key Identifier:
70:[...]:45
Signature Algorithm: ecdsa-with-SHA256
Note the `Not After` date being 10 years later than the `Not Before` date. For
a root certificate you want long validity.
### Create the intermediate CA
This intermediate CA will sign the certificates for our services. The YAML
looks a lot like the root ca, but it's missing the `SelfSigned` issuer and
the actual `Issuer` is our freshly created root ca.
vim spnw-intermediate-ca1.yaml
Contents:
apiVersion: cert-manager.io/v1
kind: Certificate
metadata:
name: spnw-intermediate-ca1
namespace: cert-manager
spec:
isCA: true
commonName: spnw-intermediate-ca1
secretName: spnw-intermediate-ca1-secret
duration: 43800h # 5y
renewBefore: 35040h # 4y
privateKey:
algorithm: ECDSA
size: 256
issuerRef:
name: spnw-root-ca-issuer
kind: ClusterIssuer
group: cert-manager.io
---
apiVersion: cert-manager.io/v1
kind: ClusterIssuer
metadata:
name: spnw-intermediate-ca1-issuer
spec:
ca:
secretName: spnw-intermediate-ca1-secret
This intermediate CA has a shorter validity. You can get information on the CA
the same way as before:
kubectl describe ClusterIssuer -n cert-manager
Output:
Name: spnw-intermediate-ca1-issuer
Namespace:
Labels:
Annotations:
API Version: cert-manager.io/v1
Kind: ClusterIssuer
Metadata:
Creation Timestamp: 2024-07-16T04:15:03Z
Generation: 1
Resource Version: 2334652
UID: b[...]9e04
Spec:
Ca:
Secret Name: spnw-intermediate-ca1-secret
Status:
Conditions:
Last Transition Time: 2024-07-16T04:15:28Z
Message: Signing CA verified
Observed Generation: 1
Reason: KeyPairVerified
Status: True
Type: Ready
And as before, you can query the `Secret` to get the certificate data in OpenSSL:
kubectl get secret spnw-intermediate-ca1-secret -n cert-manager -o
jsonpath='{.data.tls\.crt}' | base64 --decode | openssl
x509 -noout -text
Output:
Certificate:
Data:
Version: 3 (0x2)
Serial Number:
bc:09:f4:5e:75:92:11:c3:af:68:81:45:30:22:06:76
Signature Algorithm: ecdsa-with-SHA256
Issuer: CN = spnw-root-ca
Validity
Not Before: Jul 16 04:15:08 2024 GMT
Not After : Jul 15 04:15:08 2029 GMT
Subject: CN = spnw-intermediate-ca1
You can also use `openssl` to test that the intermediate CA was actually
signed by the Root CA:
openssl verify -CAfile <(kubectl -n cert-manager get secret
spnw-root-ca-secret -o jsonpath='{.data.tls\.crt}' | base64 --decode) <
(kubectl -n cert-manager get secret spnw-intermediate-ca1-secret -o
jsonpath='{.data.tls\.crt}' | base64 --decode)
This commands queries the two secrets for the public keys, then passes the
output of that as a file to `openssl`, using the `<()` [process substitution syntax](https://web.archive.org/web/20240716174815/https://superuser.com/questions/1059781/what-exactly-is-in-bash-and-in-zsh/1060002#1060002).
Output:
/dev/fd/62: OK
If you get an error like below:
error 20 at 0 depth lookup: unable to get local issuer certificate
error /dev/fd/62: verification failed
Then something went wrong. `openssl x509` is your friend when debugging.
If you want to remove and re-issue all the above, you must also delete the
secrets associated. This will not happen automatically if you `kubectl
delete -f .` the resources:
kubectl -n cert-manager delete secret spnw-root-ca-secret spnw-intermediate-ca1-secret
Otherwise you might notice that your certificates have not changed, even
though you thought you re-issued them.
### Testing the certificates
This step is optional, but might help you troubleshoot any issues. We're going
to issue a test certificate, which we'll test with the `openssl` command line
tooling to validate our certificate and chain.
Create a yaml file:
vim test-cert.yaml
Contents:
apiVersion: v1
kind: Namespace
metadata:
name: cert-test
---
apiVersion: cert-manager.io/v1
kind: Certificate
metadata:
name: test-server
namespace: cert-test
spec:
secretName: test-server-secret
isCA: false
usages:
- server auth
- client auth
dnsNames:
- "test-server.cert-test.svc.cluster.local"
- "test-server"
issuerRef:
name: spnw-intermediate-ca1-issuer
kind: ClusterIssuer
Apply:
kubectl apply -f test-cert.yaml
Output:
namespace/cert-test created
certificate.cert-manager.io/test-server created
Use the `openssl verify` command to check the chain. The first parameter is
`-CAFile`, with the `<()` shell construct to get the output of the `kubectl`
command which gets the `Secret` for the Root CA. The second parameter,
`-untrusted`, contains our intermediate CA in the same way and the last,
unnamed, parameter contains our leaf certificate:
openssl verify -CAfile <(kubectl -n cert-manager get secret
spnw-root-ca-secret -o jsonpath='{.data.tls\.crt}' |
base64 --decode) -untrusted <(kubectl -n cert-manager get secret
spnw-intermediate-ca1-secret -o jsonpath='{.data.tls\.crt}' |
base64 --decode) <(kubectl -n cert-test get secret test-server-secret -o
jsonpath='{.data.tls\.crt}' | base64 --decode)
Output:
/dev/fd/61: OK
See [this link](http://web.archive.org/web/20240716044328/https://stackoverflow.com/questions/25482199/verify-a-certificate-chain-using-openssl-verify/26520714#26520714)
for more info on why we must provide the intermediate CA via the `-untrusted` parameter.
You can also use this shell command to feed all certificates in the `Secret`
to `openssl`. The `sed` magic is there because `openssl` only parses the
first certificate in the output, and there might be multiple.
OLDIFS=$IFS; IFS=':' certificates=$(kubectl get secret
test-server-secret -n cert-test -o json | jq -r '.data["tls.crt"]' |
base64 --decode | sed -n '/-----BEGIN/,/-----END/{/-----BEGIN/ s/^/:/;
p}'); for certificate in ${certificates#:}; do echo $certificate |
openssl x509 -noout -ext subjectAltName -subject -issuer; echo;
done; IFS=$OLDIFS
Output:
X509v3 Subject Alternative Name: critical
DNS:test-server.cert-test.svc.cluster.local, DNS:test-server
subject=
issuer=CN = spnw-intermediate-ca1
No extensions in certificate
subject=CN = spnw-intermediate-ca1
issuer=CN = spnw-root-ca
Same for the CA as known by our issued test certificate. This file has only 1
certificate in my case, but it's good practice to make sure the command goes
well if in the future there might be multiple certificates in such output:
OLDIFS=$IFS; IFS=':' certificates=$(kubectl get secret
test-server-secret -n cert-test -o json | jq -r '.data["ca.crt"]' |
base64 --decode | sed -n '/-----BEGIN/,/-----END/{/-----BEGIN/ s/^/:/;
p}'); for certificate in ${certificates#:}; do echo $certificate |
openssl x509 -noout -ext subjectAltName -subject -issuer; echo "---";
done; IFS=$OLDIFS
Output:
No extensions in certificate
subject=CN = spnw-root-ca
issuer=CN = spnw-root-ca
After testing you can delete the test certificates and namespace:
kubectl delete -f test-certificate.yaml
Output:
namespace "cert-test" deleted
certificate.cert-manager.io "test-server" deleted
### Ingress (Service) Certificate
After all that hard setup and testing we can finally use our self signed CA to
automatically issue a certificate for our `echo` app.
In [my other article on how to host multiple domains](/s/tutorials/Kubernetes_k3s_Ingress_for_different_domains_like_virtual_hosts.html),
I set up an `echo` app service as a simple test and coupled a hostname to
that app (`echo.k3s.homelab.mydomain.org`). I assume you have that setup as
well.
Edit (or create) the `Ingress`:
vim echoapp-ingress.yaml
Contents:
apiVersion: networking.k8s.io/v1
kind: Ingress
metadata:
name: echo-ingress
namespace: echoapp
annotations:
cert-manager.io/cluster-issuer: spnw-intermediate-ca1-issuer
cert-manager.io/common-name: "echo.k3s.homelab.mydomain.org"
spec:
ingressClassName: traefik
rules:
- host: echo.k3s.homelab.mydomain.org
http:
paths:
- pathType: Prefix
path: "/"
backend:
service:
name: echo-service
port:
number: 80
tls:
- hosts:
- echo.k3s.homelab.mydomain.org
secretName: echo-cert-secret
Things to note in this file are the `annotations` and the `tls` part.
annotations:
cert-manager.io/cluster-issuer: spnw-intermediate-ca1-issuer
cert-manager.io/common-name: "echo.k3s.homelab.mydomain.org"
The annotation `cluster-issuer` tells `ingress-shim` which `ClusterIssuer` to
use and for backwards compatibility I've included the annotation
`common-name`. If you omit the latter annotation, you will be issued a
`Certificate` with an empty `Subject`. This is not a [bad thing](https://web.archive.org/web/20240716170039/https://github.com/caddyserver/caddy/issues/3755)
but not all software understands `Subject Alternative Names` and not all
software can handle an empty `Subject`.
The sub-component `ingress-shim` watches `Ingress` resources across your
cluster. If it observes an `Ingress` with annotations described in
[the Supported Annotations](https://web.archive.org/web/20240716165737/https://cert-manager.io/docs/usage/ingress/)
section, it will ensure a `Certificate` resource with the name provided in
the `tls.secretName` field and configured as described on the `Ingress`
exists in the `Ingress's` namespace.
As you can see, the `tls` section contains the hostname and a `Secret` to use:
tls:
- hosts:
- echo.k3s.homelab.mydomain.org
secretName: echo-cert-secret
If this secret already exists, it will use `tls.crt`, `ca.crt` and `tls.key`
respectively. If the secret does not exist, `ingress-shim` will make sure a
new `Certificate` is issued.
Apply the config:
kubectl -n echoapp apply -f echoapp-ingress.yaml
Output:
ingress.networking.k8s.io/echo-ingress created
You can check if the `Certificate` was issued correctly:
kubectl describe Certificate -n echoapp
Output:
Name: echo-cert-secret
Namespace: echoapp
API Version: cert-manager.io/v1
Kind: Certificate
Metadata:
Kind: Ingress
Name: echo-ingress
[...]
Spec:
Common Name: echo.k3s.homelab.mydomain.org
Dns Names:
echo.k3s.homelab.mydomain.org
Issuer Ref:
Group: cert-manager.io
Kind: ClusterIssuer
Name: spnw-intermediate-ca1-issuer
Secret Name: echo-cert-secret
Usages:
digital signature
key encipherment
Status:
Conditions:
Last Transition Time: 2024-07-16T04:57:57Z
Message: Certificate is up to date and has not expired
Observed Generation: 1
Reason: Ready
Status: True
Type: Ready
Not After: 2024-10-14T04:57:56Z
Not Before: 2024-07-16T04:57:56Z
Renewal Time: 2024-09-14T04:57:56Z
Events:
As we did above, you can get the contents of the `Certificate` and pipe that
into `openssl` to see more info:
kubectl get secret echo-cert -n echoapp -o jsonpath='{.data.tls\.crt}' |
base64 --decode | openssl x509 -noout -ext
subjectAltName -subject -issuer
Output:
X509v3 Subject Alternative Name:
DNS:echo.k3s.homelab.mydomain.org
subject=CN = echo.k3s.homelab.mydomain.org
issuer=CN = spnw-intermediate-ca1
After importing the root CA (as a `.crt` file containing the PEM contents) in
Windows via `certmgr.msc` as a `Trusted Root Certificate Authority`:
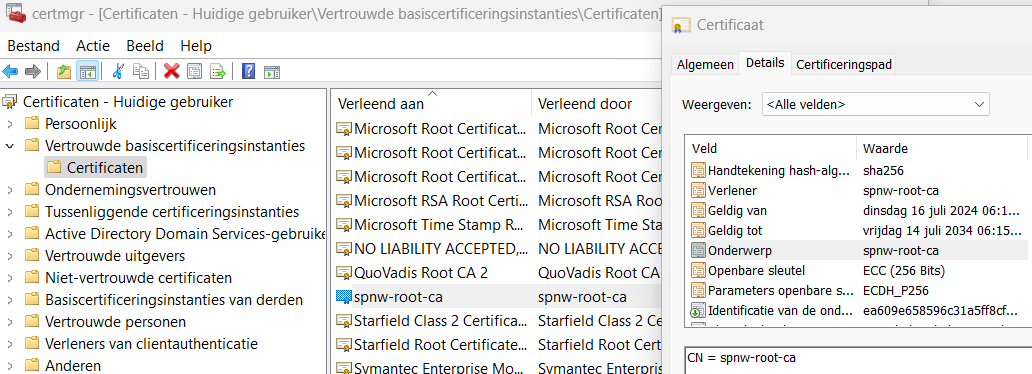
All browsers trust sites with a certificate issued by our Root CA:

### Using an existing regular certificate (not self signed)
If you have bought a certificate somewhere (like `Sectigo`), or a certificate
issues by another internal CA (not in Kubernetes) and want to use that on
your cluster, you can create a secret manually and use it in your `Ingress`.
You must omit the `cert-manager.io` `annotations` in your `Ingress` and
reference the existing `Secret` in your `tls` section.
Place the PEM encoded certificate you received from your CA in a file named
`tls.crt`. Append the (entire) intermediate chain to that file, so at the top
you have your certificate and below, in order, the certificate chain.
Place your PEM encoded private key in a file named `tls.key`. Execute the
following command to create a `Secret`. Note that it is a `generic` secret,
not a `tls` type secret. `tls` type secrets are handled by `cert-manager` and
we don't want that in this case.
kubectl create secret generic
echo-cert-official --from-file=tls.crt=tls.crt --from-file=tls.key=tls.key
-n echoapp
Output:
secret/echo-cert-official created
In your `Ingress` yaml file, you must refer to the secret by name:
tls:
[...]
secretName: echo-cert-official
Apply the `Ingress` and after a few seconds, your site will serve
the "official" certificate.
---
License:
All the text on this website is free as in freedom unless stated otherwise.
This means you can use it in any way you want, you can copy it, change it
the way you like and republish it, as long as you release the (modified)
content under the same license to give others the same freedoms you've got
and place my name and a link to this site with the article as source.
This site uses Google Analytics for statistics and Google Adwords for
advertisements. You are tracked and Google knows everything about you.
Use an adblocker like ublock-origin if you don't want it.
All the code on this website is licensed under the GNU GPL v3 license
unless already licensed under a license which does not allows this form
of licensing or if another license is stated on that page / in that software:
This program is free software: you can redistribute it and/or modify
it under the terms of the GNU General Public License as published by
the Free Software Foundation, either version 3 of the License, or
(at your option) any later version.
This program is distributed in the hope that it will be useful,
but WITHOUT ANY WARRANTY; without even the implied warranty of
MERCHANTABILITY or FITNESS FOR A PARTICULAR PURPOSE. See the
GNU General Public License for more details.
You should have received a copy of the GNU General Public License
along with this program. If not, see .
Just to be clear, the information on this website is for meant for educational
purposes and you use it at your own risk. I do not take responsibility if you
screw something up. Use common sense, do not 'rm -rf /' as root for example.
If you have any questions then do not hesitate to contact me.
See https://raymii.org/s/static/About.html for details.