You can use this guide to set up a limited resource for one team for example, to make sure they cannot mess up other parts of the cluster or slow down other stuff due to claiming too many resources. My sysadmin / devops experience tells me that no matter what, if there are no limits or guard rails, developers (especially web and PHP developers, they are the worst kind, see [this article for example, a hacked cluster and all the web-developers did was scale up due to "performance". An actually skilled developer would look into the problem, do profiling and fix pain points before scaling out (and have their basic security in order).](https://it-notes.dragas.net/2024/07/04/from-cloud-chaos-to-freebsd-efficiency/#lessons-learned)) will mess up operations, no matter how well intended. Better to protect them against themselves than to be woken up in the middle of the night. 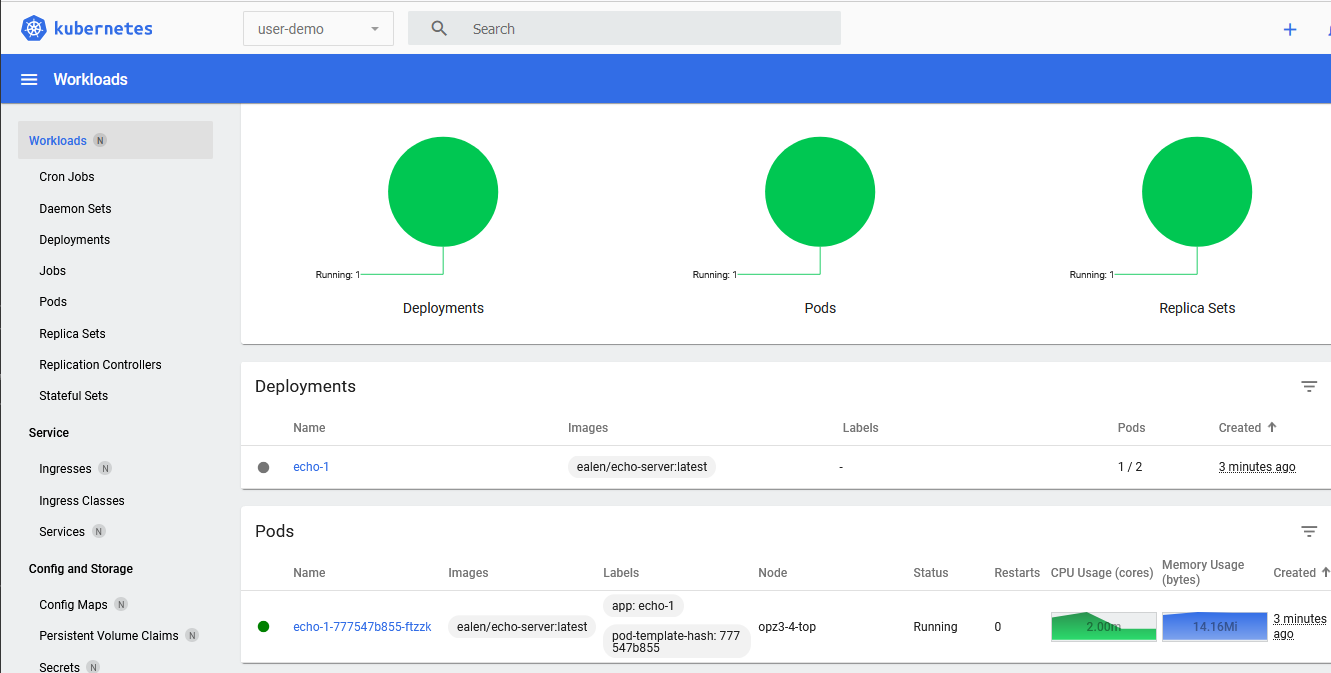 > The Kubernetes Dashboard for this one user with permissions in only that namespace 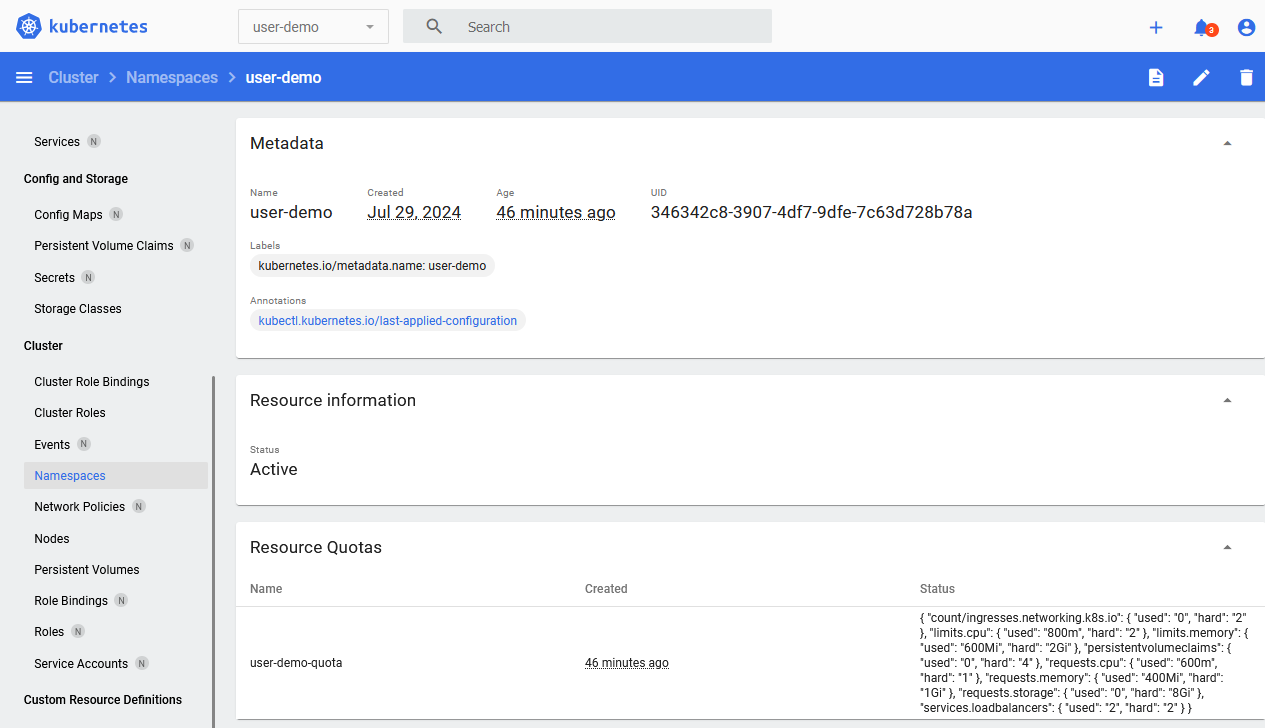 > Resource limits in the namespace To read all my [Kubernetes posts, click here](/s/tags/kubernetes.html). I'm using Kubernetes / k3s version ` v1.30.2+k3s1` and for the purposes of this guide I assume you have `kubectl` set up and working with an admin user. The [official documentation] (https://web.archive.org/web/20240729082142/https://kubernetes.io/docs/reference/access-authn-authz/rbac/) is a great resource which explains this stuff in more detail. This is a practical guide for a single purpose (namely to create a namespace for a user with resource limits and denying the user access to further namespaces). Make sure to also read up on [privilege escalation] (https://web.archive.org/web/20240729102458/https://kubernetes.io/docs/reference/access-authn-authz/rbac/#privilege-escalation-prevention-and-bootstrapping) in Kubernetes. A few terms require some more explanation: - `Role`: A role contains rules that represent a set of permissions. A role is used to grant access to resources within a namespace. Permissions are purely additive (there are no "deny" rules). A `Role` is always Namespaced (as opposed to a `ClusterRole`) - `RoleBinding`: A role binding is used to grant the permissions defined in a role to a user or set of users. It holds a list of subjects (users, groups, or service accounts), and a reference to the role being granted - `Service Account`: account meant for processes, which run in pods (something that talks to Kubernetes). Or in our case, `kubeconfig` Create a folder in which we will put all the `yaml` files: mkdir user-demo cd user-demo ### Creating a Namespace with a `ResourceQuota` Create a file for your namespace: vim namespace.yml Contents: apiVersion: v1 kind: Namespace metadata: name: user-demo Apply it: kubectl apply -f namespace.yml Output: namespace/user-demo created Create a file with the resource limits for this namespace: vim resource-quota.yml Contents: apiVersion: v1 kind: ResourceQuota metadata: name: user-demo-quota namespace: user-demo spec: hard: requests.cpu: "1" requests.memory: 1Gi limits.cpu: "2" limits.memory: 2Gi Apply the quota: kubectl apply -f resource-quota.yml The above `ResourceQuota` places these requirements on the `user-demo` namespace: - For every Pod in the namespace, each container must have a memory request, memory limit, cpu request, and cpu limit. - The memory request total for all Pods in that namespace must not exceed 800 MiB. The memory limit total for all Pods in that namespace must not exceed 950 MiB. - The CPU request total for all Pods in that namespace must not exceed 1 cpu. - The CPU limit total for all Pods in that namespace must not exceed 2 cpu. This means that in your `Deployment` yaml files you must make sure there are resource limits. Below is an example. ### Create a Deployment with resource limits We'll create two deployments, one of which will succeed and one of which will fail due to resource limitations. Create a file for our test deployments: vim deployment.yml Contents: --- apiVersion: apps/v1 kind: Deployment metadata: name: echo-1 namespace: user-demo spec: replicas: 1 selector: matchLabels: app: echo-1 template: metadata: labels: app: echo-1 spec: containers: - name: echo-1 image: ealen/echo-server:latest ports: - containerPort: 80 livenessProbe: httpGet: path: /?echo_code=200 port: 80 readinessProbe: httpGet: path: /?echo_code=200 port: 80 resources: limits: cpu: 800m memory: 600Mi requests: cpu: 600m memory: 400Mi --- apiVersion: apps/v1 kind: Deployment metadata: name: echo-2 namespace: user-demo spec: replicas: 1 selector: matchLabels: app: echo-2 template: metadata: labels: app: echo-2 spec: containers: - name: echo-2 image: ealen/echo-server:latest ports: - containerPort: 80 livenessProbe: httpGet: path: /?echo_code=200 port: 80 readinessProbe: httpGet: path: /?echo_code=200 port: 80 resources: limits: cpu: 800m memory: 600Mi requests: cpu: 600m memory: 400Mi You might wonder what `cpu:600m` means. In our case the limit is `1` and this sort of means, `0.6`. I've used the [echo-server](/s/tutorials/Kubernetes_k3s_Ingress_for_different_domains_like_virtual_hosts.html) in earlier guides. Apply the file: kubectl apply -f deployment.yml Output deployment.apps/echo-1 created deployment.apps/echo-2 created If you query the status of the deployments you'll see the first being created successfully, the second is not: kubectl -n user-demo get deployments Output: NAME READY UP-TO-DATE AVAILABLE AGE echo-1 1/1 1 1 54s echo-2 0/1 0 0 54s To figure out why, query the `Deployment`: kubectl -n user-demo describe deployment echo-2 Output, trimmed: Conditions: Type Status Reason ---- ------ ------ Progressing True NewReplicaSetCreated Available False MinimumReplicasUnavailable ReplicaFailure True FailedCreate Something is wrong with our `ReplicaSet`. Let's query that: $ kubectl -n user-demo get replicaset Output: NAME DESIRED CURRENT READY AGE echo-1-777547b855 1 1 1 2m11s echo-2-6fbd7564f7 1 0 0 2m11s Query the second `ReplicaSet`: kubectl -n user-demo describe replicaset echo-2-6fbd7564f7 Output, trimmed: Name: echo-2-6fbd7564f7 Namespace: user-demo [...] Replicas: 0 current / 1 desired Pods Status: 0 Running / 0 Waiting / 0 Succeeded / 0 Failed Pod Template: [...] Limits: cpu: 800m memory: 600Mi Requests: cpu: 600m memory: 400Mi [...] Conditions: Type Status Reason ---- ------ ------ ReplicaFailure True FailedCreate Events: Type Reason Age From Message ---- ------ ---- ---- ------- Warning FailedCreate 2m31s replicaset-controller Error creating: pods "echo-2-6fbd7564f7-bbnld" is forbidden: exceeded quota: user-demo-quota, requested: requests.cpu=600m, used: requests.cpu=600m, limited: requests.cpu=1 Warning FailedCreate 2m31s replicaset-controller Error creating: pods "echo-2-6fbd7564f7-vhfdk" is forbidden: exceeded quota: user-demo-quota, requested: requests.cpu=600m, used: requests.cpu=600m, limited: requests.cpu=1 Warning FailedCreate 2m31s replicaset-controller Error creating: pods "echo-2-6fbd7564f7-6qpht" is forbidden: exceeded quota: user-demo-quota, requested: requests.cpu=600m, used: requests.cpu=600m, limited: requests.cpu=1 [...] The error is quite clear, we're out of resources! Exactly what we want. There is more info on resource limits in the documentation, you can also limit [the amount of Pods](https://web.archive.org/web/20240727083328/https://kubernetes.io/docs/tasks/administer-cluster/manage-resources/quota-pod-namespace/) and [here you can find other limits, for Storage or Ingress or Services](https://web.archive.org/web/20240729085730/https://kubernetes.io/docs/concepts/policy/resource-quotas/) for example. Here is the example resource quota extended with storage, services and ingresses: spec: hard: requests.cpu: "1" requests.memory: "1Gi" limits.cpu: "2" limits.memory: "2Gi" services.loadbalancers: "2" count/ingresses.networking.k8s.io: "2" persistentvolumeclaims: "4" requests.storage: "8Gi" Then, when creating more `Loadbalancers` or `Ingresses`, you will receive an error like so: Error from server (Forbidden): error when creating "deployment.yml": services "echo-2-service-2" is forbidden: exceeded quota: user-demo-quota, requested: services.loadbalancers=1, used: services.loadbalancers=2, limited: services.loadbalancers=2 Error from server (Forbidden): error when creating "deployment.yml": ingresses.networking.k8s.io "echo-2-ingress-2" is forbidden: exceeded quota: user-demo-quota, requested: count/ingresses.networking.k8s.io=1, used: count/ingresses.networking.k8s.io=2, limited: count/ingresses.networking.k8s.io=2 Delete the test deployments to free up our resources: kubectl -n user-demo delete -f deployment.yml ### Creating a user restricted to one namespace Now that we have a namespace with resource limits, we can create a user bound to that namespace. As we stated earlier, you need a few pieces, not "just" a user. Start with the `ServiceAccount`, this is comparable to your "User". I'm assuming your namespace `user-demo` is already created, if not, see the top of this page. I'm going to use the term `User` interchangeably with `ServiceAccount` in the rest of this guide. Create a file for the user: vim user1-servivceaccount.yml Contents: apiVersion: v1 kind: ServiceAccount metadata: name: user1 namespace: user-demo Apply the file to create the service account: kubectl apply -f user1-serviceaccount.yml Output: serviceaccount/user1 created Next up is the `Role`, this file describes the specific permissions for the `Role`. The role will be later bound to the `ServiceAccount`. That is a separate process because one role can be bound to more than one user. vim namespace-admin-role.yml Contents: apiVersion: rbac.authorization.k8s.io/v1 kind: Role metadata: name: namespace-admin namespace: user-demo rules: - apiGroups: ["", "extensions", "apps"] resources: ["*"] verbs: ["*"] - apiGroups: ["batch"] resources: - jobs - cronjobs verbs: ["*"] This role grants permissions to perform almost all actions within the namespace an Admin User would do. You might want to have a more limited profile, for example, just a `Deployment` admin user: [...] name: deployment-admin rules: - apiGroups: ["", "extensions", "apps"] resources: ["deployments", "replicasets", "pods", "services", "ingresses"] verbs: ["get", "list", "watch", "create", "update", "patch", "delete"] Apply the file: kubectl apply -f namespace-admin-role.yml Output: role.rbac.authorization.k8s.io/namespace-admin created Last step in user / role creation is the `RoleBinding`. This is what couples the `Role` to the User. vim namespace-admin-rolebinding.yml Contents: kind: RoleBinding apiVersion: rbac.authorization.k8s.io/v1 metadata: name: namespace-admin-rolebinding namespace: user-demo subjects: - kind: ServiceAccount name: user1 namespace: user-demo roleRef: apiGroup: rbac.authorization.k8s.io kind: Role name: namespace-admin You can have multiple `subjects` but for our example we only need one. Apply the file: kubectl apply -f namespace-admin-rolebinding.yml Output: rolebinding.rbac.authorization.k8s.io/namespace-admin-rolebinding created One more step remaining to actually use the new user. ### Creating a kubeconfig file for the user To use the new user with permissions, the last step is to create a `kubeconfig` file. You can give that file to someone and they then can use `kubectl` within that namespace, or create a token for the dashboard for example. Start by creating a long-lived token (10 years) for the user. Update the duration to suite your needs. kubectl create token user1 -n user-demo --duration=87600h Output: eyJhbGciOiJ[...]VwRTkA Create a `user1-kubeconfig` file: vim user1-kubeconfig Contents: apiVersion: v1 kind: Config clusters: - cluster: certificate-authority-data: